Do you have a question about the Xytronic LF-389D and is the answer not in the manual?
Applies to children and damaged cords, emphasizing hazard risks and liability.
Advises keeping hot tips away from body, clothes, and flammable materials.
Instructs users not to work on live circuits and to disconnect power.
Recommends immediate discontinuation of use if the unit is damaged.
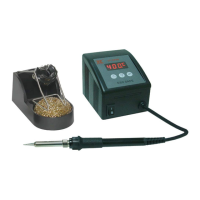
Details the LF-399D & LF-389D soldering stations, their voltage, and temperature adjustment.
Highlights Zero Voltage switching, heater failure detection, and password protection.
Describes the ceramic heating element, fast heat-up, and ergonomic soldering iron.
Explains tip grounding for low leakage and the availability of tip selections.
Guides on ensuring the power switch is off and plugging in the unit.
Details how to set temperature and the indicator light behavior.
Explains how to increase or decrease temperature using specific keys.
Describes entering mode selection via the SET key and navigating modes.
Details setting or disabling the password lock for parameter access.
Guides on adjusting temperature values for Centigrade and Fahrenheit.
Explains how to select between Fahrenheit and Centigrade display modes.
Provides optimal temperature ranges for lead-free solder and notes on high temps.
Lists common reasons for soldering tip unwetting for troubleshooting.
Provides advice on tip tinning, cleaning, avoiding pressure, and flux types.
Outlines procedures for installing a new tip to ensure longevity.
Emphasizes daily cleaning and removing build-up to prevent tip fusion.
Details the process of unscrewing the barrel assembly for tip changes.
Advises using a damp cloth with mild detergent for cleaning the unit.
Instructs to return faulty units to an authorized dealer or service department.
Reinforces warnings about keeping out of reach of children and avoiding fumes.
Illustrates the components of the soldering iron assembly.
Lists part numbers and descriptions for common replacement components.
Lists available accessories such as soldering iron stands and cleaning brushes.
Caution to switch off and unplug the unit before replacing the fuse.
Instructs to unplug the power cord from the AC socket.
Guides on unscrewing the nut at the rear side of the unit.
Details on opening the unit's panel to access internal components.
| Cord Length | 1.2m |
|---|---|
| Tip to Ground Resistance | <2Ω |
| Tip to Ground Potential | <2mV |
| Display | Digital |
| Temperature Range | 200°C - 480°C |
| Temperature Stability | ±2°C |
| Voltage | 110V/220V |