EasyManua.ls Logo

Yamaha Clavinova CLP-370 User Manual

Yamaha Clavinova CLP-370
2 pages
To Next Page IconTo Next Page
Page #1 background imageLoading...
Page #1 background image
Clavinova
CLP-S308/S306/370/340 Installation Procedure
Caution: Do not turn off the power or remove the USB flash memory during this operation.
1
Downloading the upgrade data
1) Download the Zip file.
2) Extract the file included in the Zip file.
3) Insert the USB flash memory into your computer.
4) Copy the file into the root directory of the USB flash memory.
2
Connecting the USB flash memory
Insert the USB flash memory containing the appropriate upgrade data
to the USB TO DEVICE terminal on the instrument.
Caution:
Make sure that the USB flash memory is connected properly to the terminal.
Do not try to force an incorrect connection; doing so may damage the terminal.
3
Installing the upgrade data
Simultaneously hold down the [PLAY/STOP] button on the panel and turn on the power.
Keep holding down the [PLAY/STOP] button until "UPd" message displays, then the LED of
"GRAND PIANO1" starts to flash.
Confirm the Clavinova has completed access to the USB-Device.
4
Executing the installation
1. Press the [GRAND PIANO2] button to start the installation, then the LED of “GRAND PIANO2”
starts to flash.
Question and Answer IconNeed help?

Do you have a question about the Yamaha Clavinova CLP-370 and is the answer not in the manual?

Yamaha Clavinova CLP-370 Specifications

General IconGeneral
Number of Keys88
Voices14
Sound SourceAWM (Advanced Wave Memory) Stereo Sampling
Amplifiers40W x 2
Speakers16 cm x 2
Touch SensitivityHard/Medium/Soft/Fixed
Key ActionGH3 (Graded Hammer 3)
EffectsReverb, Chorus, Brilliance
ConnectivityUSB to Host, MIDI In/Out
Pedals3
Internal Songs50 preset songs
FinishPolished Ebony
Polyphony128
Recording2-track recording

Summary

Downloading the Upgrade Data

Connecting the USB Flash Memory

Installing the Upgrade Data

Executing the Installation

Confirming the Version Number

Troubleshooting Common Issues

Power Interruption During Operation

Reinstall required if power is cut or USB is removed. Perform operation again from beginning.

USB Flash Memory Not Inserted

Indicates USB flash memory is not inserted when 'InS' blinks on power-on.

Installation Error (E.xx)

Error number appears, installation fails. Check connection, cleanliness, and data integrity.
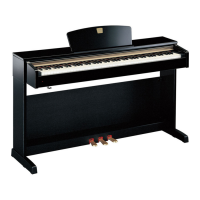
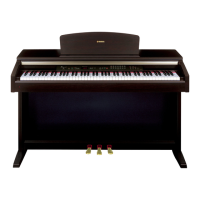
Related product manuals