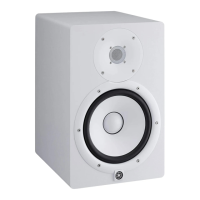
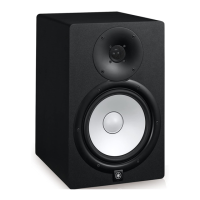
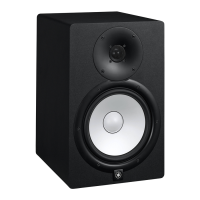
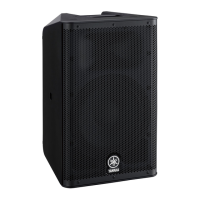
The Yamaha HS4 and HS3 are compact, high-quality powered studio monitors designed for use in music and video production. These monitors feature a two-speaker system: an active (with built-in amplifier) speaker designated as "L" (left) and a passive speaker designated as "R" (right). The active speaker houses the primary controls and connections, while the passive speaker receives its signal and power from the active unit via an included speaker cable.
Function Description:
The primary function of the HS series monitors is to provide accurate sound reproduction for critical listening in studio environments. They are designed to offer a flat frequency response, which is crucial for mixing and mastering, allowing producers to hear their audio as objectively as possible. The monitors incorporate several features to adapt their sound to different acoustic spaces and user preferences.
The active speaker (L) is equipped with a comprehensive set of controls on its rear panel. The "ROOM CONTROL" switch adjusts the speaker's low-frequency response, compensating for bass buildup that can occur when speakers are placed close to walls or corners. This switch offers settings of 0 dB (flat response), -2 dB, and -4 dB, attenuating frequencies below 500 Hz. The "HIGH TRIM" switch allows for adjustment of the high-frequency response, with settings of 0 dB (flat response), +2 dB, and -2 dB, affecting frequencies above 2 kHz. These controls enable users to fine-tune the monitor's sound to their specific listening environment and personal taste.
Input connectivity on the active speaker is versatile, accommodating various audio sources. It includes two COMBO (XLR/TRS Phone) connectors for balanced line-level inputs, suitable for professional audio interfaces or mixers. Additionally, there are two unbalanced RCA input chassis connectors (L/R) and a stereo mini-plug (ST MINI) chassis connector, allowing connection to consumer-grade devices such as computers, smartphones, MP3 players, or CD players. The active speaker also features an "OUTPUT TO RIGHT SPEAKER" terminal, where the included speaker cable connects to transmit signals to the passive right speaker.
On the front panel of the active speaker, there is a combined power and volume adjustment knob. This knob allows users to turn the speakers on/off (standby) and adjust the overall output volume. When headphones are connected to the dedicated "Headphones socket" on the front panel, the speaker output is muted, allowing for private monitoring.
Usage Features:
Setting up the HS series monitors for optimal sound involves careful placement and configuration. For accurate monitoring, the L speaker should be angled towards the user's left side, and the R speaker towards the right side. Ideally, the speakers should be positioned away from walls or corners to minimize unwanted bass reflections. If close placement is unavoidable, the "ROOM CONTROL" switch can be used to mitigate excessive bass. Symmetrical positioning of both speakers relative to the room and the listening position is recommended for balanced sound. The optimal listening position is at the apex of an equilateral triangle formed by the two speakers and the listener, with the speakers angled inward. The tweeters should be at ear height for the most accurate high-frequency monitoring.
Connecting the speakers involves first linking the active (L) and passive (R) speakers with the provided speaker cable, ensuring the red lead connects to the red terminal and the black lead to the black terminal on both units. For audio input, users can connect various devices. When connecting to an audio interface or mixer, balanced XLR or TRS phone cables are recommended for their noise resistance, especially over longer cable runs. For computers or smartphones, the included stereo mini-to-RCA cable or a commercially available stereo mini-plug cable can be used, connecting to the RCA or ST MINI inputs respectively.
Before powering on, it's crucial to ensure all connected devices are turned off and their output levels are set to minimum. The power-on sequence involves first turning on the rear power switch of the active speaker, then slightly turning the front panel volume knob clockwise to activate the speakers. The power-off sequence is the reverse: first turn the front knob counterclockwise to standby, then turn off the rear power switch, and finally turn off any connected devices. This sequence helps prevent sudden loud noises and potential damage to the speakers or hearing.
The front panel volume knob allows for easy adjustment of the listening level. It's important to gradually increase the output signal from the connected device and then adjust the monitor volume to a comfortable level for extended listening. The "ROOM CONTROL" and "HIGH TRIM" switches can be adjusted as needed to tailor the sound to the listening environment.
Maintenance Features:
To ensure the longevity and optimal performance of the HS series monitors, several maintenance guidelines should be followed. The bass reflex port on the back of the speaker unit should not be obstructed, as this can degrade sound quality. The product should be kept away from other electronic devices like TVs and radios to prevent noise interference. Exposure to excessive dust, vibration, extreme cold, or heat should be avoided to prevent damage to internal components.
It is important not to install the speakers in locations with severe temperature changes, as condensation can form inside or on the surface of the product, potentially causing damage or wood deformation. If condensation is suspected, the product should be left for several hours without power until it completely dries out. The speaker driver unit should not be touched to prevent malfunction. Vinyl, plastic, or rubber objects should not be placed on the product, as they may cause alteration or discoloration.
For cleaning, a dry and soft cloth should be used. Chemically infused wiping cloths, chemical products, or similar substances should be avoided, as they can cause discoloration or deterioration.
The product incorporates a built-in protective circuit. In case of excessive input signals, this circuit will activate and shut down the power. If this occurs, the user should turn the rear power switch to standby, wait at least three seconds, and then turn it on again. Repeatedly flipping the power switch or the front volume knob to standby/on in quick succession should be avoided, as it may cause malfunction. A small amount of electrical current flows through the product's circuitry even when in standby mode (front knob turned off), so if the product will not be used for a long time, the power cord should be unplugged from the AC outlet.