Do you have a question about the Yardworks 060-0608-2 and is the answer not in the manual?
This document is an operator's manual for a Yardworks Snowblower, model number 060-0608-2. It provides comprehensive information on the snowblower's function, technical specifications, usage, and maintenance.
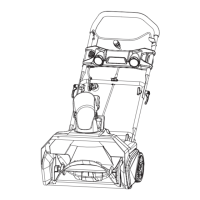
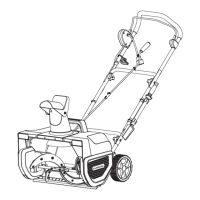
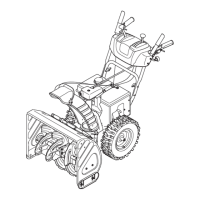
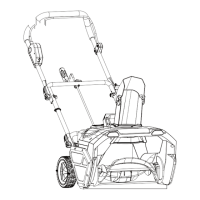
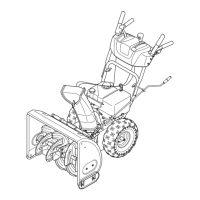
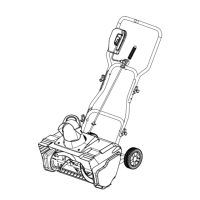
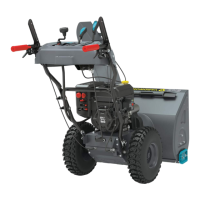
The Yardworks Snowblower is a powered machine designed for clearing snow. It features a two-stage system, meaning it uses both an auger and an impeller to collect and discharge snow. The snowblower is equipped with a self-drive system, allowing the operator to control its movement forward and in reverse, and a trigger steering system for enhanced maneuverability. It also includes a discharge chute and deflector for controlling the direction and height of snow discharge. For user comfort, the snowblower has heated hand grips and lights on the control panel for operation in low visibility conditions.
The manual emphasizes general safety precautions, including reading the operator's manual, keeping the area of operation clear of people and pets, and exercising caution on slippery surfaces. It warns against operating the snowblower under the influence of alcohol, medication, or if tired or ill.
Before starting, operators must disengage all clutch handles, wear adequate winter garments and appropriate footwear, and adjust the auger housing height to clear the surface. It's crucial to allow the engine and machine to adjust to outdoor temperatures and to inspect the auger and impeller for ice buildup. The manual also highlights the importance of wearing safety glasses or eye shields during operation or maintenance.
Gasoline is highly flammable and explosive. Users are instructed to use approved containers, extinguish all ignition sources, refuel outdoors, allow the engine to cool before refueling, and avoid overfilling the fuel tank. Spilled gasoline must be wiped up, and the machine moved to another area, waiting 5 minutes before starting. Storage of the machine or fuel container near open flames or ignition sources is prohibited.
Operators are warned not to place hands or feet near rotating parts and to keep clear of the discharge opening. Extreme caution is advised on gravel drives or roads due to thrown objects. If the unit vibrates abnormally or strikes a foreign object, the engine must be stopped, and the machine inspected for damage. The engine should be stopped before unclogging the auger housing or discharge guide, or performing any repairs. The manual also advises against running the engine indoors due to dangerous exhaust fumes and clearing snow across steep slopes. The machine should not be overloaded or operated without proper guards.
This section provides critical safety instructions: SHUT THE ENGINE OFF, wait 10 seconds for the impeller blades to stop, and ALWAYS use a clean-out tool – NEVER your hands.
A light coat of wax on the auger housing, discharge chute, and deflector can prevent snow and ice from sticking. A 2-4 minute engine warm-up is recommended. Best results are achieved by removing snow as soon as possible after it falls. Operators should adapt their technique to snow depth, wind direction, temperature, and snow conditions. Tips include discharging snow downwind, overlapping passes, and clearing snow one auger width beyond the pavement to prevent drifts.
The manual explains that air density at high altitudes reduces engine power. It provides a table for selecting the correct high-altitude carburetor main jet to alleviate issues like hard starting, increased fuel consumption, and spark plug fouling, noting that this comes at an additional cost.
Detailed steps are provided for starting both cold and warm engines, including inserting the safety key, adjusting throttle and choke levers, priming, and using either the recoil or electric start. For stopping, turning the fuel valve off and letting the carburetor run out of fuel is recommended to prevent gumming. For emergency stops, removing the engine key is advised.
The manual describes the functions of the self-drive control lever, speed control lever (6 forward, 2 reverse), auger control lever, discharge height lever, discharge direction crank, and trigger steering system. It also explains the clutch lock feature, which allows the operator to keep the snowblower moving forward while adjusting the chute. Heated hand grips can be activated via a switch. Lights on the control panel turn on and off automatically with the engine.
The manual outlines a comprehensive maintenance schedule and procedures for various components.
Instructions are provided for adjusting the skid shoes to control the shave plate height above the ground, which involves tilting the snowblower, placing a spacer, loosening bolts, and re-tightening.
The process for draining warm engine oil and refilling it to the correct level with 0W-30 oil is detailed. A warning is included that the machine is shipped without engine oil and must be filled prior to use.
Shear pins protect the augers from damage if they strike foreign objects or ice. The manual explains how to check for sheared pins, tap out broken ones, apply anti-seize lubricant, and install replacements.
This section describes how to test and adjust the tension of the self-drive cable to ensure proper transmission engagement, especially in heavy snowfalls. It warns against over-tightening to prevent premature belt wear.
Similar to the self-drive cable, proper tension of the auger cable is crucial for belt life. The manual provides steps to adjust the cable if the auger is not engaging properly, including loosening nuts and testing the auger's rotation.
Instructions are given for adjusting the chute deflector cable if it does not open fully or tip down enough, involving locating the control lever, moving it to the highest position, sliding back the rubber boot, loosening nuts, and testing full travel.
This section explains how to increase or decrease the tension of the chute deflector to prevent unwanted movement from heavy snow or to make it easier to move.
Detailed steps are provided for replacing the self-drive cable, including pivoting the snowblower, removing the base frame cover, locating and unhooking the cable, and reassembling in reverse order.
The process for replacing the auger cable is outlined, involving removing the plastic belt cover, locating and unhooking the cable, and reassembling.
Instructions for replacing the auger belt include removing the plastic belt cover, belt guide, unhooking the spring, slipping off the old belt, removing the auger housing, and reassembling with the new belt. A warning is given about the spring-loaded idler pulley.
This section details how to remove and replace the friction disc, which is crucial if the snowblower fails to drive properly. It involves pivoting the snowblower, removing wheels, removing the base frame cover, removing the hex bolt and shaft, and replacing the friction disc.
Steps for replacing the trigger steering cable are provided, including removing triggers, pivoting the snowblower, removing base frame covers, and disconnecting the cable.
The process for replacing the chute deflector cable is outlined, including adjusting the deflector, locating and removing the cable from the chute and control panel, and reassembling.
Instructions for replacing the clutch lock cable involve loosening nuts, pulling the cable from the metal plate, removing the connector, and reassembling.
All bearings and bushings are permanently lubricated and require no maintenance. However, the manual warns against over-lubrication as it can damage the friction wheel and disc drive plate.
The auger gear box requires grease every 50 hours or every 2 years. Instructions are provided for cleaning the zerk fitting, removing the bolt, attaching a grease gun, and adding Low Temp NLGI #2 grease until old grease is pushed out.
Specific valve clearance settings are provided for both summer (50°F – 86°F) and winter (< 32°F) temperatures.
A comprehensive table outlines service intervals for various components, including engine oil, spark plug, spark arrester, auger gear box, tire pressure, skid shoe, idle speed, valve clearance, fuel tank and strainer, and fuel line.
Recommendations for long-term storage (over 30 days) include mixing fuel stabilizer with gasoline, running the engine until it stops from lack of fuel, changing engine oil, removing the spark plug and adding a small amount of engine oil, cleaning the machine, inspecting for damage, applying rust protection, and storing indoors.
The manual advises allowing the engine to cool for at least 15 minutes before transporting and keeping the engine level to prevent fuel leakage. The fuel valve lever should be moved to the OFF position.
A troubleshooting guide lists common problems, possible causes, and remedies, covering issues like engine failure to start, hard starting, auger not rotating or not stopping, snowblower veering to one side, and snowblower not driving.
The snowblower comes with a 4-year limited warranty for defects in material or workmanship, excluding misuse, commercial use, improper maintenance, normal wear parts (except as noted), routine maintenance items, and exterior finish deterioration. Normal wear parts have a full 270-day warranty. Information on how to obtain service and transportation charges is also provided. An Emission Control System Warranty is also included, outlining coverage for emission-related parts for two years.
| Brand | Yardworks |
|---|---|
| Model | 060-0608-2 |
| Category | Snow Blower |
| Language | English |