EasyManua.ls Logo

Yashica MAT EM - User Manual

Yashica MAT EM
13 pages
Print Icon
To Next Page IconTo Next Page
Loading...
Yashica MAT EM
posted 12-22-'02
This camera manual library is for reference and historical purposes, all rights reserved.
This page is copyright© by , M. Butkus, NJ.
This page may not be sold or distributed without the expressed permission of the producer
I have no connection with any camera company
On-line camera manual library
If you find this manual useful, how about a donation of $3 to:
M. Butkus, 29 Lake Ave., High Bridge, NJ 08829-1701
and send your e-mail address so I can thank you.
Most other places would charge you $7.50 for an electronic copy
or $18.00 for a hard to read Xerox copy.
This will help me to continue to host this site, buy new manuals, and pay their shipping costs.
It'll make you feel better, won't it?
If you use Pay Pal, use the link below. Use the above address for a check, M.O. or cash.
Back to main camera manual page
www.PayPal.me/butkus
Question and Answer IconNeed help?

Do you have a question about the Yashica MAT EM and is the answer not in the manual?

Summary

Loading Film

Film Loading Procedure

Step-by-step guide on unlocking the back cover, removing spools, inserting film, threading the leader, winding, advancing to triangles, and locking the cover.

Crank Operation

Initial Crank Winding

Instructions for the first winding to set the film counter and cock the shutter.

Subsequent Exposures

Describes the pendulum swing motion for advancing film and cocking the shutter simultaneously.

Lens Opening and Shutter Speed Settings

Exposure Reading System

Using the Exposure Meter

Steps to set ASA, adjust the indicator knob to match the needle, and read the exposure combination.

Sighting and Focusing

Focusing Procedure

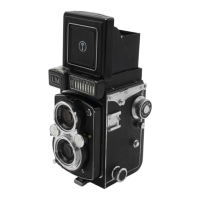
How to open the hood, rotate the focusing knob for sharp focus on the ground glass screen.

Camera Handling and Flash Pictures

Advanced Features and Maintenance

Flash Synchronization

Information on built-in synchronization, PC connector, and selector positions (M, X).

Depth-of-Field

Overview

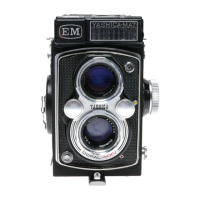
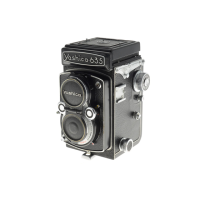
This document provides a comprehensive guide to the Yashica MAT EM camera, covering its functions, technical specifications, usage, and maintenance.

The Yashica MAT EM is a twin-lens reflex (TLR) camera designed for taking high-quality photographs. It features a robust mechanical design and an integrated exposure meter, making it a versatile tool for both amateur and experienced photographers.

Key Components and Functions:

The camera is equipped with several essential components:

  • Magnifying Glass (1): Used for critical focusing, allowing the user to achieve precise sharpness on the ground glass screen.
  • Sports Finder Frame (2): Provides an alternative viewing method for quick subject acquisition, especially useful for fast-moving subjects or when holding the camera at eye level.
  • Strap Holder (3): For attaching a camera strap, ensuring portability and security.
  • Film Counter Window (4): Displays the number of exposures taken, helping the user keep track of film usage.
  • Lens Opening & Shutter Speed Window (5): Shows the current aperture and shutter speed settings.
  • Shutter Speed Control Wheel (6): Used to adjust the shutter speed.
  • Crank (7): The primary mechanism for advancing the film and cocking the shutter.
  • Crank Rest (8): A resting position for the crank when not in use.
  • Shutter Release Button (9): Activates the shutter to take a picture.
  • Focusing Hood Cover (10): Protects the ground glass screen and can be opened for viewing and focusing.
  • Exposure Meter Reading Window (11): Displays the exposure meter's recommended settings.
  • Exposure Meter Photo Cell (12): Detects ambient light to provide accurate exposure readings.
  • Flash Synchronization Terminal (13): For connecting an external flash unit.
  • Viewing Lens (14): The upper lens, used for composing and focusing the image.
  • Lens Aperture Control Wheel (15): Used to adjust the lens opening (aperture).
  • Taking Lens (16): The lower lens, through which the image is captured onto the film.
  • Back Cover Locking Lever (17): Secures the camera's back cover.
  • Spool Locking Spring (18, 23): Holds the film spools in place.
  • Depth-of-Field Scale (19): Helps determine the range of acceptable sharpness at different apertures.
  • Exposure Setting Reading Scale (20): Provides a visual guide for exposure settings.
  • Focusing Knob (21): Rotated to adjust the focus of the viewing and taking lenses.
  • MX Synchro-selector (22): Selects the flash synchronization mode (M or X).
  • Self-timer (24): Allows for a delayed shutter release, useful for self-portraits or group photos.
  • Tripod Socket (25): For mounting the camera on a tripod.
  • Film Pressure Plate (26): Ensures the film remains flat during exposure.
  • Film Setting Mark (27): A guide for correctly loading the film.
  • Film Reverse Arm (28): Part of the film loading mechanism.
  • Film Tension Spring (29): Maintains proper tension on the film.

Technical Specifications:

  • Film Type: Uses 120 roll film.
  • Lens: Yashinon lens with aperture settings from f/3.5 to f/22. The f/3.5 setting represents the largest opening, while f/22 is the smallest.
  • Shutter: Copal Shutter with speeds ranging from 1 second to 1/500th of a second, plus a 'B' (Bulb) setting for longer exposures.
  • Flash Synchronization: Built-in synchronization with a standard PC connector. Supports M-type bulbs (any speed), F-type bulbs (1/60 or slower), and Electronic Flash (any speed, including with self-timer).
  • Exposure Meter: Integrated light meter with ASA-DIN conversion scale. ASA settings are displayed in the ASA Indicator Window, and DIN numbers are also visible.
  • Focusing: Ground glass screen with a bright circle in the center for sharp focus. Red lines on the screen assist in composition.
  • Depth-of-Field: The depth-of-field varies with the lens aperture; smaller apertures yield greater depth-of-field. For example, at 10 meters and f/16, the sharp area extends from approximately 5 meters to infinity.

Usage Features:

  • Loading Film:
    1. Unlock the back cover by turning the tripod socket to 'O' and swing it open.
    2. Remove the take-up spool from the lower chamber by pulling out the lower spool locking spring. Place it in the upper chamber by pulling out the upper spool locking spring.
    3. Place a new 120 film roll in the lower film chamber.
    4. Flip up the film transport crank and slowly wind it clockwise. Thread the film leader into the wider slot of the take-up spool.
    5. Gently wind the crank clockwise.
    6. Advance the film by winding the crank until the arrow on the film aligns with the triangles on the camera body.
    7. Close the back cover and lock it by turning the tripod socket to 'C'. The letter 'S' will appear in the film counter window.
  • Crank Operation:
    1. Wind the crank clockwise until it stops. 'S' will disappear, and '1' will appear in the film counter window.
    2. Wind the crank counter-clockwise until it stops. The camera is now ready for the first picture.
    3. For subsequent exposures, a smooth pendulum swing (downward to stop, then upward to stop) advances the film and cocks the shutter simultaneously. The downward wind advances the film, and the upward wind cocks the shutter.
    • Caution: Do not keep the shutter cocked when not in use to prevent weakening the shutter spring and accidental exposures.
  • ASA-DIN Conversion: To use film rated in DIN, move the conversion scale until the DIN number appears in the window. The corresponding ASA number will appear on the opposite side. Set this ASA number in the ASA Indicator Window.
  • Setting Lens Opening and Shutter Speed:
    • The lens opening and shutter speed are displayed in the window. 'f' indicates lens opening, and 'sec' indicates shutter speed.
    • Adjust the shutter speed by turning the control wheel with your right thumb. Ensure the red shutter speed figures are centered with the black triangles.
    • Adjust the lens opening by turning the control wheel with your left thumb. Ensure the black lens opening figures are centered with the black triangles.
    • It is advisable to set the shutter speed before cocking the shutter.
  • Using the Exposure Reading System:
    1. Move the ASA Setting Knob until the film's ASA number appears in the ASA Indicator Window.
    2. Turn the Exposure Indicator Adjusting Knob to align the 'Green Index Arrow' with the red needle.
    3. Read the correct exposure combination (lens aperture and shutter speed) in the Exposure Indicator Window.
    4. Turn the Shutter Speed Control Wheel and Lens Opening Control Wheel to set these values, ensuring they are centered in the window on the top of the viewing lens.
  • Sighting and Focusing:
    1. Open the focusing hood by lifting it from the back.
    2. Rotate the Focusing Knob until the subject on the ground glass screen is sharp. The bright circle in the center aids in precise focusing. Red lines on the screen help with composition.
  • Magnifying Glass: For critical focusing, raise the magnifying glass by pressing the front of the focusing hood cover inward. Place your eye close to the glass. Always lower the magnifying glass before closing the focusing hood.
  • Sports Finder: Depress the focusing hood cover until it clicks into place. Lift the camera to eye level and sight through the sports finder window. Push the release button to close the hood cover.
  • Holding the Camera: Various holding positions are illustrated for different shooting scenarios, including overhead, eye-level, knee-level, and ground-level.
  • Flash Photography: Consult guide numbers on flash bulb packages for correct exposures. Filters or specific bulbs may be needed for color flash pictures depending on film type (Day-light or Tungsten).
  • Self-Timer: Provides approximately 8 seconds delay. Mount the camera on a tripod or brace to prevent blur. Ensure the synchro selector is set to 'X' when using the self-timer.
  • Cable Release: A standard overlap-type cable release can be fitted by unscrewing the shutter release ring and screwing in the cable release.
  • Unloading Film: After 12 exposures, wind the film transport crank about 6 times to take up the remaining film. Open the camera and remove the film.

Maintenance Features:

  • Lens Cap: Always replace the lens cap when the camera is not in use.
  • Storage: Keep the camera away from dust and moisture.
  • Lens Cleaning: To remove dust or dirt, wipe the lens surface very lightly with clean gauze or a lens cleaning cloth. Do not use a dirty handkerchief.
  • Long-Term Storage: If not using the camera for a long period, do not leave the shutter set.

Yashica MAT EM Specifications

General IconGeneral
BrandYashica
ModelMAT EM
CategoryDigital Camera
LanguageEnglish

Related product manuals