P51-870 TITAN
®
Digital Manifold
Quick Start Guide
1
876
543
2
Tap to power
unit on
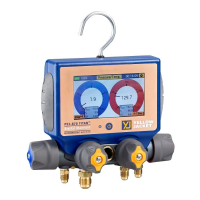
While in Pressure/Temperature mode, tapping the center of either gauge
will convert the gauge into a graph. Tap the center of the graph to convert
the graph back to a gauge.
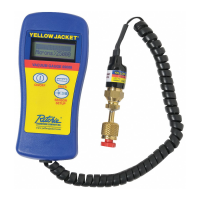
Plug the low side temperature probe into T1 on the back
of the device. Plug the high side temperature probe into
T2 on the back of the device.
Menu
Refrigerant
Menu
Units Menu
Session Timer Modes Menu
WƌĞƐƐƵƌĞdĞŵƉĞƌĂƚƵƌĞDŽĚĞĚŝƐƉůĂLJƐƐLJƐƚĞŵƉƌĞƐƐƵƌĞƚĞŵƉĞƌĂƚƵƌĞƐĂƚƵƌĂƟŽŶ
ƚĞŵƉĞƌĂƚƵƌĞƐLJƐƚĞŵƐƵƉĞƌŚĞĂƚĂŶĚƐƵďĐŽŽůŝŶŐ^ĞƫŶŐƐĐĂŶďĞĂĐĐĞƐƐĞĚďLJ
ƚĂƉƉŝŶŐƚŚĞƐĞƫŶŐƐŝĐŽŶŝŶƚŚĞƵƉƉĞƌƌŝŐŚƚĐŽƌŶĞƌdŚĞŵŽĚĞƐŵĞŶƵĐĂŶďĞ
ĂĐĐĞƐƐĞĚďLJƚĂƉƉŝŶŐƚŚĞďƵƩŽŶůĂďĞůĞĚǁŝƚŚƚŚĞŶĂŵĞŽĨƚŚĞĐƵƌƌĞŶƚŵŽĚĞĂƚƚŚĞ
ƚŽƉŽĨƚŚĞƐĐƌĞĞŶdŚĞƵŶŝƚƐĂŶĚƌĞĨƌŝŐĞƌĂƟŽŶŵĞŶƵƐĐĂŶďĞƋƵŝĐŬůLJĂĐĐĞƐƐĞĚďLJ
ƚĂƉƉŝŶŐƚŚĞďƵƩŽŶƐŝŶƚŚĞůŽǁĞƌůĞŌĂŶĚƌŝŐŚƚĐŽƌŶĞƌƐƌĞƐƉĞĐƟǀĞůLJ
WŽǁĞƌƚŚĞƵŶŝƚŽŶďLJƉƌĞƐƐŝŶŐƚŚĞƉŽǁĞƌďƵƩŽŶŽŶĐĞ
^ĞůĞĐƚƚŚĞĚĞƐŝƌĞĚŵŽĚĞŽĨŽƉĞƌĂƟŽŶĨƌŽŵƚŚĞŵŽĚĞƐŵĞŶƵ
Tap to power
unit on
While in Pressure/Temperature mode, tapping the center of either gauge
will convert the gauge into a graph. Tap the center of the graph to convert
the graph back to a gauge.
Plug the low side temperature probe into T1 on the back
of the device. Plug the high side temperature probe into
T2 on the back of the device.
Menu
Refrigerant
Menu
Units Menu
Session Timer Modes Menu
WƌĞƐƐƵƌĞdĞŵƉĞƌĂƚƵƌĞDŽĚĞĚŝƐƉůĂLJƐƐLJƐƚĞŵƉƌĞƐƐƵƌĞƚĞŵƉĞƌĂƚƵƌĞƐĂƚƵƌĂƟŽŶ
ƚĞŵƉĞƌĂƚƵƌĞƐLJƐƚĞŵƐƵƉĞƌŚĞĂƚĂŶĚƐƵďĐŽŽůŝŶŐ^ĞƫŶŐƐĐĂŶďĞĂĐĐĞƐƐĞĚďLJ
ƚĂƉƉŝŶŐƚŚĞƐĞƫŶŐƐŝĐŽŶŝŶƚŚĞƵƉƉĞƌƌŝŐŚƚĐŽƌŶĞƌdŚĞŵŽĚĞƐŵĞŶƵĐĂŶďĞ
ĂĐĐĞƐƐĞĚďLJƚĂƉƉŝŶŐƚŚĞďƵƩŽŶůĂďĞůĞĚǁŝƚŚƚŚĞŶĂŵĞŽĨƚŚĞĐƵƌƌĞŶƚŵŽĚĞĂƚƚŚĞ
ƚŽƉŽĨƚŚĞƐĐƌĞĞŶdŚĞƵŶŝƚƐĂŶĚƌĞĨƌŝŐĞƌĂƟŽŶŵĞŶƵƐĐĂŶďĞƋƵŝĐŬůLJĂĐĐĞƐƐĞĚďLJ
ƚĂƉƉŝŶŐƚŚĞďƵƩŽŶƐŝŶƚŚĞůŽǁĞƌůĞŌĂŶĚƌŝŐŚƚĐŽƌŶĞƌƐƌĞƐƉĞĐƟǀĞůLJ
WŽǁĞƌƚŚĞƵŶŝƚŽŶďLJƉƌĞƐƐŝŶŐƚŚĞƉŽǁĞƌďƵƩŽŶŽŶĐĞ
^ĞůĞĐƚƚŚĞĚĞƐŝƌĞĚŵŽĚĞŽĨŽƉĞƌĂƟŽŶĨƌŽŵƚŚĞŵŽĚĞƐŵĞŶƵ
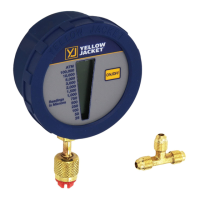
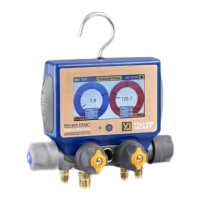
ressure as measured by a YJ auxiliary
vacuum sensor. Plug the vacuum sensor into either A1 or A2 on the back of
the device. Tap Target to set th
p Hold to
epleted, the user is prompted
to start a pressure hold test.
e
pressure hold setup screen.
Allowable change is the maximum allowable vacuum pressure the
system is allowed to reach before failure. Set the allowable change value
hold test
When ready to begin the pressure
The Pressure Rise test
will monitor the
current vacuum
pressure and the
percent change in
pressure. The device
will prompt the user
with a Pass or Fail
message depending if
the system passes or
fails the test
The Pressure Hold mode displays the change in pressure of the system
during a standing pressure test. Allowable change is the percentage of
the current system pressure the system is allowed to drop before the
pressure test is deemed a failure. Set the allowable change percentage
Decay
ext
to Pressure Decay to begin the pressure hold test.
Tap Set Pi to set the
begin monitoring for a
drop in system pressure.
The device will display a
Fail or Pass message
depending if the system
Fails or Passes the
pressure Decay
to adjust the selected refrigerant,
transduc-
ers and calibrate the display. To zero the manifold transducers, tap the
ŶǁŝůůŇĂƐŚ
and must
be fully vented to atmosphere. To recalibrate the touch display, press the
creen
OR press the calibrate display b
The refrigerant menu allows you quickly select a desired
refrigerant. Drag the slider bar to the correct page and tap
the refrigerant to select it.
to the Units menu. Use
to be altered. Once
n. Press the select
rn to the units menu. Exit will return without saving
ile in the units menu to return
user to the
p and down
m the new
enu. Pressing Exit will return to the
e in the device
red LEƚƵƌŶƐŽī.
To charge the unit, connect the micro usb cable to the micro usb port on the back
of the device. Connect the opposite end of the cable to the usb port on a charging
brick or computer. The LED will turn a solid green while the unit is charging.