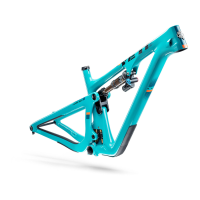
This document is the owner's manual for the Yeti SB5.5 mountain bike frame, providing comprehensive information on its features, setup, maintenance, and assembly.
Function Description
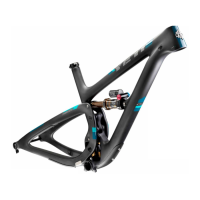
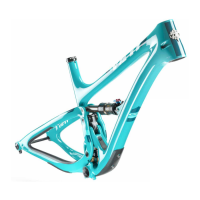
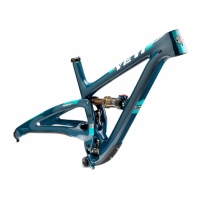
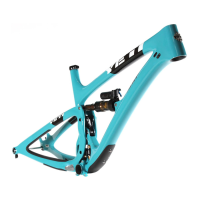
The Yeti SB5.5 is a high-performance mountain bike frame designed for aggressive trail riding and enduro. It incorporates Yeti's patented Switch Infinity Technology, which is a suspension system engineered to provide efficient pedaling while maintaining smooth and continuous travel over varied terrain. This design aims to offer a balance of climbing efficiency and downhill capability, making it suitable for a wide range of riding conditions. The frame is built to accommodate a 160mm travel fork, further emphasizing its focus on demanding trails.
Important Technical Specifications
Frame Features:
- Suspension Technology: Switch Infinity Technology, providing 5.5 inches (140mm) of travel. This system is designed to create a stiff interface between the front and rear triangles of the frame, ensuring responsive handling and power transfer.
- Material: High modulus carbon fiber for both the main frame and swing arm, contributing to a stiff, strong, and lightweight chassis.
- Pivot System: Collet pivot axles are used to reduce bearing wear and enhance durability.
- Drivetrain Compatibility: Optimized for 1x drivetrains only.
- ISCG Mounts: ISCG 05 chainguide mounts are included, with additional security in the rowdy sections.
- Head Tube: Tapered inset head tube (44mm/56mm).
- Suspension: Designed for Fox suspension components, specifically the Fox Racing Shox DPX2 EVOL shock.
- Protection: Custom debris and chain slap guards are integrated to protect the frame.
- Cable Routing: Internal cable routing for a clean look and protection of cables.
- Rear Axle: Dedicated 12 x 148 Boost dropouts with an integrated hanger for strength, stiffness, and ease of wheel installation.
- Headset: Uses an inset head tube on the SB5.5, allowing for a larger head tube with more area, increased stiffness, and lower overall ride height without compromising performance.
Geometry (with FOX 36 / 160MM FORK):
Measurements are in millimeters unless otherwise specified.
- Wheel Size: 29"
- Reach:
- MD: 421mm
- LG: 442mm
- XL: 463mm
- Effective Top Tube (ETT):
- MD: 601mm
- LG: 626mm
- XL: 652mm
- Stack:
- MD: 610mm
- LG: 624mm
- XL: 639mm
- Head Tube Length:
- MD: 90mm
- LG: 105mm
- XL: 121mm
- Seat Tube Length:
- MD: 445mm
- LG: 483mm
- XL: 521mm
- Effective Seat Tube Angle: 73.6 degrees (all sizes)
- Head Tube Angle: 66.5 degrees (all sizes)
- Mechanical Trail:
- MD: 96.3mm
- LG: 96.2mm
- XL: 96.1mm
- BB Drop: 23.7mm (all sizes)
- Estimated BB Height: 348.2mm (all sizes)
- Chainstay Length: 436.9mm (all sizes)
- Front-Center:
- MD: 730.6mm
- LG: 757.9mm
- XL: 785.4mm
- Wheelbase:
- MD: 1167.7mm
- LG: 1195.0mm
- XL: 1222.4mm
- Standover:
- MD: 742.9mm
- LG: 754.6mm
- XL: 767.2mm
- Axle to Crown: 567.1mm (all sizes)
- Fork Offset: 51mm (all sizes)
Fit Recommendations:
- Medium: 5'7" (170 cm) - 5'11" (180 cm)
- Large: 5'11" (180 cm) - 6'3" (191 cm)
- X-Large: 6'1" (185 cm) - 6'6" (198 cm)
Key Torque Specs (Newton-meters, Nm):
- Bolt Ti Male (M6 x 1 x 12mm): 7 Nm
- Infinity Link Bolts (M6 x 1): 12 Nm
- Upper Link Collet Axle (M10 x 10): 3 Nm
- Upper Link Collet Wedge (M5 x 8): 8 Nm
- Lower Link Collet Axle (M10 x 10): 3 Nm
- Lower Link Collet Wedge (M5 x 8): 8 Nm
- Main Pivot Collet Axle (M15 x 1.5): 3.5 Nm
- Main Pivot Collet Wedge (M8 x 1.25): 14 Nm
- Derailleur Hanger Cap: Torque to 80 in/lbs (9Nm)
Usage Features
Shock Setup:
- Air Pressure: The SB5.5 works best with 17.5mm of measured sag. To achieve this, the manual recommends using a sag measurement tool (O-Ring) on the shock body. Riders should start with a friend supporting the bike and with the compression set to open, sit on the bike in riding position, and cycle the shock at least 10 times to equalize the EVOL chamber before measuring sag.
- Rebound: The red knob on the drive side is used to adjust rebound. Counter-clockwise (faster) and clockwise (slower) adjustments are made based on rider preference and riding style. The manual suggests starting with a baseline and adjusting from there.
- Compression: The blue lever on the non-drive side has 3 positions (Open, Medium, Firm). For general trail riding, the "open" setting is recommended. The Switch Infinity design will do the rest. The smaller black knob in the center of the blue 3-position lever allows for 10 clicks of adjustment, affecting only the "open" position.
Derailleur Hanger Install:
- The hanger cap is REVERSE THREADED.
- Installation Steps:
- Lightly grease the outside surface of the hanger where it interfaces with the frame.
- Lightly grease the threads on the hanger cap.
- Using a 6mm allen key, tighten the hanger cap onto the hanger (REVERSE THREADED).
- Ensure the hanger and cap are sitting flush against the frame and swing arm.
Cable Setup:
- The SB5.5 uses full length cable housing to eliminate break points and reduce maintenance.
- Internal routing is used for all cables, including the rear derailleur, rear brake, and internally routed seat post.
- Rear Derailleur: The housing exits the swing arm on the front of the chain stay and goes directly up to the derailleur.
- Rear Brake: The housing runs parallel to the left side of the head tube, then down the down tube towards the exit ports above the Infinity Link. The shift housing comes out of the port on the drive side and goes immediately into the corresponding port on the swing arm.
- Internally Routed Seat Post: The housing is routed from the post forward, guided through the head tube and into the down tube via the guide tube housed in the frame.
Maintenance Features
Maintenance Schedule:
The manual provides a schedule for routine maintenance, categorized by frequency: Weekly, 3 Months/Annually.
- Weekly:
- Clean and lube chain
- Check tire pressure
- Clean bike of mud and debris
- Check brake function
- 3 Months/Annually:
- Check shock pressure (if applicable)
- Check for loose bolts and tighten (if necessary)
- Check headset and tighten/loosen (if necessary)
- Thoroughly clean pivot points with a rag (do not lubricate)
- Lube Infinity Link every 40 hours (Yeti heavy molybdenum grease)
- Check/replace brake pads (if necessary)
- Check tires for wear
- Check spoke tension and retention (if necessary)
- Check chain for wear and replace (if necessary)
- Complete tune-up performed by an authorized Yeti dealer
Frame Assembly:
The manual provides detailed, step-by-step instructions for assembling the frame, including torque settings for all bolts.
- Tools Needed: 2.5mm, 4mm, 5mm, 10mm allen keys, 10mm open end wrench, torque wrench, grease, and Blue (242) Loctite.
- Key Steps:
- Assemble all parts for the SB5.5 frame.
- Slip washers onto and apply blue (242) Loctite to the 4 bolts that secure the Switch Infinity Link to the frame.
- Insert the Infinity Link from the non-drive side, ensuring the Yeti logo is up and the Fox logos are facing the non-drive side.
- Tighten the link into place, ensuring the washers are fully captured.
- Grease the bearing surfaces on the link.
- Place the bearing race extender washers on the lower link bearings.
- Insert the collet axle nut and thread the axle in using a 4mm allen wrench.
- Install the well greased lower link collet wedge.
- Insert the lower end of the link into the frame with the bearing race extending washers in place.
- Align the link and press the lightly greased pivot axle through.
- Ensure the lower link pivot is now complete.
- Place the upper link bearing race extender washers onto the upper link bearings.
- Grease the main pivot axle and thread it into the swingarm.
- Slide the swingarm over the Infinity Link and insert the main pivot collet axle from the non-drive side.
- Insert the lightly greased main pivot axle nut into the corresponding keyed hole in the swingarm.
- Grease the upper link pivot collet axle and push it through the swingarm and upper link bearings.
- Insert the lightly greased upper link pivot axle nut into the corresponding keyed hole and thread the axle in.
- Grease and install the main pivot collet wedge with a 5mm allen wrench.
- Grease and install the upper link collet wedge with a 4mm allen wrench.
- Wipe up any excess grease around the collet wedge bolts and remove the foam/bubble wrap from around the link in preparation for installing the shock.
- Slide the rear of the shock into the swingarm, align the shock eyelet and secure with a guide pin.
- Align the front shock eyelet to the mounting points on the front triangle and secure with a guide pin.
- Place the 6.5mm washer on the front shock mounting pin.
- Slide the shock mounting pin over the guide pin and push it through the frame and the shock.
- Place the 6.5mm washer over a Male Ti bolt and apply Blue Loctite to the threads.
- Tighten a male Ti bolt into the rear shock pin.
- Slide the rear shock pin over the guide pin and push it through the swingarm and shock.
- Place the 6.5mm washer over a Male Ti bolt and apply Blue Loctite to the threads.
Warranty:
Yeti Cycles offers a five-year limited warranty on the frame and component parts (SB5.5 / SB4.5 / SB6 / SB5 / SB5+ / SB6 / Infinity Link) to the original owner. This warranty covers defects in value, performance, and ride quality. It is non-transferable and void if the bicycle was not purchased from an authorized Yeti dealer. The warranty does not apply to suspension components, wheels, drive train, brakes, seat post, handlebar, and stem.
No Fault Replacement Policy:
Yeti Cycles will make replacement parts available at a minimum charge to the original owner in the event of a crash or other non-warranty situation.
Product Life Cycle:
Every Yeti frameset has a useful product life cycle. Regular safety checks for frame stress are important to prevent accidents, injury, and product failure.