Do you have a question about the York Fitness Inspiration and is the answer not in the manual?
| Brand | York Fitness |
|---|---|
| Model | Inspiration |
| Category | Elliptical Trainer |
| Language | English |
Product for dry conditions; avoid damp/cold storage to prevent corrosion.
Consult doctor before exercise. Stop if you feel pain or abnormal symptoms.
Keep children away, check parts, use on flat surface, intended use only.
Wear proper clothing, remove jewelry, allow time after eating, avoid incorrect training.
Meets EU directives/standards. Not for therapeutic purposes.
Contact details for York Fitness U.K. Ltd. for customer assistance.
Contact details for York Fitness Australia for customer assistance.
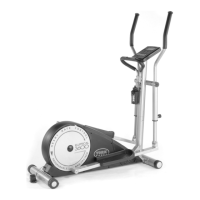
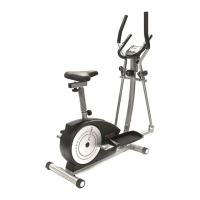
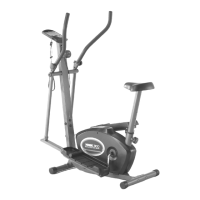
Features include Manual Magnetic resistance, 8 levels, pulse sensors, adjustable seat/handlebars, computer display.
Prepare a cleared area, unpack parts, and read steps carefully before beginning assembly.
Chart to identify hardware. Use circles for diameter, scale for length.
Assemble the main frame using carriage bolts, washers, spring washers, and nylock nuts.
Continue assembling the main frame with carriage bolts, washers, spring washers, and nylock nuts.
Attach the upright tube using allen head screws, spring washers, and washers.
Attach pedals using allen head bolts, washers, screws, and knob dawls.
Attach other pedal using allen head bolts, washers, screws, and knob dawls.
Connect components using allen head bolts, spring washers, and washers.
Attach parts using allen head bolts, spring washers, and washers.
Secure parts with screws, nylock nuts, washers, and spacer sleeves.
Fasten components with nylock nuts, spring washers, and parenthetic washers.
Attach parts using screws.
Mount the saddle using screws and seat post components.
Final assembly of the crosstrainer unit.
Guide to using the computer for monitoring performance, setting targets, and tracking progress.
Explanation of MODE, SET, and RECOVERY buttons for computer operation.
How to adjust tension, rear stabilizer, and seat post for optimal use.
How to set target time, distance, calories, and pulse using the computer functions.
Instructions for using the hand pulse sensor to read heart rate accurately.
Guidance on installing AA batteries for the computer monitor.
Instructions for proper posture and adjustments for standing operation.
Instructions for proper posture and adjustments for seated operation.
Advice on starting exercise programs, warming up, cooling down, and monitoring heart rate.
Table showing target heart rate zones and maximum heart rates based on age.
Details of the product warranty, coverage, exclusions, and return policy.