EasyManua.ls Logo

Zanussi ZBM 762 - User Manual

Zanussi ZBM 762
14 pages
Print Icon
To Next Page IconTo Next Page
Loading...
46
ENGLISH
WARNINGS AND IMPORTANT ADVICE
These warnings are provided in the interest of safety. You MUST read them carefully before
installing or using the appliance.
It is most important that this instruction book should be retained with the appliance for future
reference. Should the appliance be sold or transferred, always ensure that the book is left
with the appliance in order that the new owner can get to know the functions of the appliance
and the relevant warnings.
This appliance has been designed to be operated by
adults and children under supervision. Young children
MUST NOT be allowed to tamper with the controls or play
near or with the oven.
This appliance has been designed for cooking edible
foodstuff only and MUST NOT be used for any other
purposes.
It is dangerous to alter the specification in any way.
For hygiene and safety reasons, this appliance should
be kept clean at all times. A build-up of fats or other
foodstuff could result in a fire.
Accessible parts of this appliance may become hot
when it is in use. Children should be KEPT AWAY until it
has cooled.
Under no circumstances should you attempt to repair
the appliance yourself. Repairs carried out by
unexperienced persons may cause injury or serious
malfunctioning. Refer to your local Zanussi Service
Centre. Always insist on genuine Zanussi spare parts.
Ensure that all control knobs are in the OFF position
when not in use.
Should you connect any electrical tool to a plug near
this cooking appliance, ensure that electric cables are
not in contact with it and keep them far enough from
the heated parts of this appliance.
If the appliance is out of order, disconnect it from the
electric supply.
Do not leave untensils containing foodstuffs, e. g. fat
or oil in or on the appliance. This could cause damage
in case the appliance is inadvertently switched on.
Always place the dripping pan in position to
collect fat when using the grill or when cooking
meat. Pour a little water into the dripping pan to
avoid smoke and unpleasant smells.
Always use oven gloves to remove pans from the
oven.
It is mandatory that all operations required for the
installation are carried out by a qualified or competent
person, in accordance with existing rules and
regulations.
Disconnect the appliance from the electrical supply,
before carrying out any cleaning or manteinance work.
Some parts of the appliance are covered by a shock-
proof plastic film. Remove this film before using the
oven.
Once you removed all packaging from the appliance,
ensure that it is not damaged and the electric cable is
in perfect conditions. Otherwise, contact your dealer
before proceeding with the installation.
This appliance is meant to operate with a single-
phased connection to 230V electrical supply. An
eventual 400V poliphasic connection without earth
wire will destroy the oven and the hob, if fitted.
The manufacturer disclaims any responsability
should all the safety measures not be carried out.
Environmental Information
After installation, please dispose of the packaging with
due regard to safety and the environment.
When disposing of an old appliance, make it unusable,
by cutting off the cable.
OVEN DOOR PROTECTION DEVICE
All our appliances comply with the European Safety
Standards. Nevertheless, in order to ensure the
highest safety level, and avoid little children to be
exposed to the heat when the appliance is operated,
it is possible to fit a special protection device to the
oven door. This device can be purchased in our
Service Force Centres, specifying the relevant code
(35791) and the Product No. shown on the rating
plate. Fitting instructions are provided with the kit
package.
All manuals and user guides at all-guides.com
all-guides.com
Question and Answer IconNeed help?

Do you have a question about the Zanussi ZBM 762 and is the answer not in the manual?

Summary

Safety Warnings and Important Advice

Environmental Information

Guidance on safe and environmentally conscious disposal of packaging and old appliances.

Oven Door Protection Device

Information on a special device to prevent children from being exposed to heat when the appliance is operated.

Using the Oven

Oven Controls and Indicators

Details on oven function control knob, thermostat, and indicator lights for operation.

Safety and Cooling Features

Information on the safety thermostat and the cooling fan for appliance operation.

Catalytic Self-Cleaning Side Panels

Details on optional catalytic panels for easier oven cleaning.

Initial Oven Setup

First Installation Procedure

Instructions for initial oven installation, including running the oven empty.

Timers and Cooking Programs

End of Cooking Timer

Instructions for setting and using the end-of-cooking timer for automatic shut-off.

Electronic Timer Operation

Guide to setting time of day, cooking time, minute minder, and automatic timer.

Cooking Methods

Conventional and Fan Oven Cooking

Guidance on using conventional and fan oven modes for various cooking tasks.

Defrosting Function

Instructions for using the oven's defrosting feature with the fan only.

Grilling Techniques and Tips

Advice on grilling meat and fish, including shelf placement and using the dripping pan.

Thermal Grilling

Explanation of the thermal grilling function combining grill element and fan.

Cooking Tables and Tips

Traditional and Fan Oven Cooking Tables

Reference tables for cooking times and temperatures for various dishes.

Baking and Grilling Tips

Tips for baking cakes and grilling food, including pre-heating and door closure.

Grease Filter Usage

Instructions on fitting and cleaning the grease filter for roasting.

Cleaning and Maintenance

General Cleaning Procedures

Guidelines for cleaning the oven cavity and door, avoiding harsh materials.

Oven Door Removal and Cleaning

Step-by-step instructions for removing and cleaning the oven door.

Replacing the Oven Light

Procedure for safely replacing a burnt-out oven light bulb.

Self-Cleaning Panel Maintenance

Instructions for removing and cleaning self-cleaning panels.

Hinged Grill Cleaning

Steps for cleaning the oven roof using the hinged grill element.

Troubleshooting and Assistance

Troubleshooting Common Issues

Solutions for common oven malfunctions like not turning on or heating issues.

Technical Assistance and Spare Parts

Guidance on contacting service and identifying necessary appliance information.

Guarantee and Spare Parts

General Guarantee Conditions

Overview of warranty terms, duration, and conditions for repairs.

Guarantee Exclusions

Conditions under which the free execution of repairs will not apply.

Technical Data and Installation

Technical Specifications

Detailed technical data including dimensions, heating element ratings, and power.

Installation Guidelines

Instructions for qualified technicians regarding building-in the oven.

Electrical Connection

Procedures and safety checks for connecting the oven to the power supply.

Overview

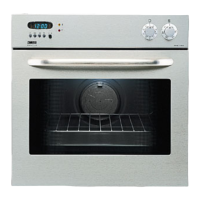
This document describes a multifunction oven, providing details on its functions, technical specifications, usage, and maintenance.

Function Description

The oven offers various cooking functions, selected via the Oven Function Control Knob (Fig. 1). These include:

  • Oven Light: Illuminates the oven cavity without any cooking function.
  • Conventional Cooking: Heat comes from both top and bottom elements, ensuring even heating.
  • Top Heating Element: Heat comes only from the top element.
  • Bottom Heating Element: Heat comes only from the bottom element.
  • Fan Cooking: Allows roasting or baking simultaneously on any shelf without flavor transference, by circulating hot air.
  • Inner Grill Element Only: For grilling small quantities.
  • Double Grill: Activates the full grill element.
  • Thermal Grilling: An alternative method combining the grill element and the oven fan to circulate hot air, reducing the need to check and turn food.
  • Defrost Setting: Assists in thawing frozen food by circulating air at room temperature without heat.

The Thermostat Control Knob (Fig. 2) allows selecting temperatures between 50°C and 250°C (MAX). The Thermostat Control Light indicates when the oven has reached the selected temperature. An Oven Control Light (if present) also comes on when a function is selected.

The oven is equipped with a Cooling Fan for the controls, which keeps the front panel, knobs, and oven door handle cool. This fan may continue to run after the oven or grill is switched off until a normal temperature is reached.

Some models (ZBC741) can be fitted with Catalytic Self-Cleaning Side Panels (accessory available on request). These panels, at normal cooking temperatures, turn fat splashes into a light residual powder that can be wiped away with a damp sponge.

The oven also features an Electronic Timer (MOD. ZBM 762 - 742) with the following functions:

  • Setting the Time of Day (24 H Clock): Press buttons A and B simultaneously while turning knob E to enter the time.
  • Cooking Time: Press button B and turn knob E to enter the desired cooking time. The "AUTO" signal appears, and an audible signal sounds when cooking is complete.
  • Manual Operation: Press button D to set the oven for manual operation.
  • Setting the Automatic Timer: Press button B and turn knob E to enter cooking time, then press button C and turn knob E to enter the end of cooking time. The oven will switch on automatically and an audible signal will sound when cooking is complete.
  • Setting the Minute Minder: Press button A and turn knob E to enter the desired time (max 23h 59min). An audible signal sounds when the time is up.

For models ZBC 741 - 981, an End of Cooking Timer is present, allowing:

  • Setting the Time of Day: Push and turn the timer knob anti-clockwise.
  • Manual Function: Pull and turn the timer knob clockwise until the symbol appears.
  • Automatic Operation: Pull and turn the timer knob clockwise to set the cooking time. The oven switches off automatically, and an acoustic alarm sounds when time is up.

Important Technical Specifications

  • Recess Dimensions: Height 59.4 cm, Width 56.0 cm, Depth 55.0 cm.
  • Oven Cavity Dimensions: Height 32.5 cm, Width 42.0 cm, Depth 39.0 cm.
  • Volume: 55 liters.
  • Oven Thermostat Settings: From 50°C up to 250°C.
  • Heating Elements Ratings:
    • Bottom heating element: 1000 W
    • Top heating element: 800 W
    • Full Oven (Top+Bottom): 1800 W
    • Grill heating elements: Simple 1750 W, Double 2550 W
    • Fan Oven heating element: 2000 W
  • Oven Lamp: 25 W
  • Convection Fan: 30 W
  • Cooling Fan: 25 W
  • Maximum Power Rating: 2600 W (ZBM 742: 2080 W)
  • Voltage Tension (50 Hz): 230 V
  • Oven Bulb Specifications: Resistant to 300°C, electric rate 230 V - 50 Hz, power rate 25 W, connection type E 14.
  • Electrical Connection: Single-phased connection to 230V electrical supply. Requires a suitable plug or a double pole switch with a minimum gap of 3 mm between contacts. Earth wire must not be interrupted.

Usage Features

  • First Use: Before cooking, set the thermostat to MAX, switch to conventional cooking, run empty for 45 minutes with a window open for ventilation, then clean the oven cavity, shelf, and dripping pan.
  • Oven Door: Always open the oven door by catching the handle in its central part.
  • Cooking with Multifunction Oven:
    • Conventional Cooking: Use the relevant symbol and set the thermostat. Adjust for more top or bottom heat if needed.
    • Fan Oven: Use the relevant symbol and set the thermostat. For multiple dishes, place shelves on the first and third positions from the bottom. For single dishes, use lower positions.
    • Defrosting: Use the relevant symbol and set the thermostat to OFF.
  • General Cooking Advice:
    • Always use oven-proof baking trays and dishes.
    • Do not place pans, biscuit pans, or aluminum foil directly on the oven base to avoid heat build-up and damage.
    • Supervise cooking with fats or oil carefully to prevent fires. Clean up any spills immediately.
    • Fish and Meat: Use oven-proof dishes or directly on the shelf with the dripping pan (containing some water) in the lowest position. White meat, poultry, and fish require 150-175°C. Red meat requires 200-250°C for a short time.
    • Baking: Cakes usually need 150-200°C. Pre-heat for about 10 minutes. Keep the oven door closed during cooking.
  • Grilling:
    • Grilling: Use the relevant symbol and set the thermostat. Spread a little oil on meat or fish, place on the oven grid. Adjust shelf level based on food thickness. Place the dripping pan (with water) at the lowest level.
    • Thermal Grilling: Use the relevant symbol and set the thermostat to a maximum of 200°C.
  • Grease Filter: Fit the grease filter over the oven fan when roasting meat to prevent fat build-up. It is dishwasher-proof. Remove after cooking and cooling.
  • Oven Door Protection Device: A special protection device can be fitted to the oven door to prevent children from being exposed to heat. It can be purchased from Service Force Centres (code 35791).
  • Power Loss: All timer settings and programs will be cancelled. The timer must be reset when power is restored.
  • Safety Thermostat: The oven has a safety thermostat that cuts power in case of overheating due to a malfunctioning main thermostat. Do not attempt to repair it yourself; contact a Zanussi Service Centre.
  • All cookings must be carried out with the oven door closed.

Maintenance Features

  • General Cleaning:
    • Always allow the oven to cool down before cleaning.
    • Avoid spreading spray cleaning products on heating elements or the thermostat sensor.
    • Never use harsh abrasives, steel wool, or cleaners with bleach, as they can damage enamel and oven door glass.
  • Oven Cavity: Clean while still warm with a soft cloth and soapy water. For tough stains, use oven cleaner, stainless steel cleaning products, or warm vinegar. Clean the oven cavity after cooking fruits to prevent stains from burning in.
  • Oven Door and Gasket:
    • To clean the oven door, it is recommended to remove it. Open the door fully, unlock and turn the small levers on the hinges (Fig. 5), handle the door by its sides, turn it half-closed, gently pull it off, and place it on a steady plan. Clean the glass with warm water and a soft cloth. Refit by reversing the procedure.
    • Periodically check the gasket condition and clean it without abrasive products. If damaged, call a Zanussi Service Centre.
  • Replacing the Oven Light: Ensure electricity supply is switched off. Push in and turn the glass lid anticlockwise, remove the faulty bulb, replace with a new one, refit the glass lid, and switch on the electricity supply (Fig. 6).
  • Removing Self-Cleaning Panels: If installed, remove them periodically for thorough cleaning. Allow the oven to cool, remove the drop collecting basin, unscrew shelf support ring nuts, and remove side panels (Fig. 0145, FO 0085). If necessary, unscrew the back panel fixing screw (FO 0028).
  • Hinged Grill (certain models): To clean the oven roof, ensure the oven is cool and isolated from electricity. Undo the screws holding the grill (Fig. 7), gently pull the grill downward, clean the oven roof, then push the grill element back into place and firmly screw the holding nuts. Ensure nuts are firmly in place to prevent the grill from falling.

Troubleshooting (What Happens If Something Goes Wrong)

  • Oven does not come on: Check if in manual operation, a cooking function and temperature are selected. Verify proper wiring, and that the socket switch or mains supply switch is ON.
  • Oven temperature light does not come on: Turn the thermostat knob to a temperature, or turn the oven function control knob to a function.
  • Oven light does not come on: Turn the oven function control knob to a function, or replace the bulb following instructions.
  • Dishes take too long/too fast to cook: Refer to the "Using the Oven" chapter for guidance.
  • Steam and condensation settle on food/oven cavity: Leave dishes inside the oven no longer than 15-20 minutes after cooking.

For further issues, contact a Zanussi Service Centre with the appliance model, product number, and serial number (found on the identification plate on the front external edge of the oven cavity). Only genuine spare parts should be used.

Zanussi ZBM 762 Specifications

General IconGeneral
BrandZanussi
ModelZBM 762
CategoryOven
LanguageEnglish

Related product manuals