EasyManua.ls Logo

Zanussi ZFG215S - User Manual

Zanussi ZFG215S
8 pages
Print Icon
To Next Page IconTo Next Page
Loading...
GETTING
STARTED?
EASY.
User Manual
ZFG215S
EN User Manual
Cooker Hood
Question and Answer IconNeed help?

Do you have a question about the Zanussi ZFG215S and is the answer not in the manual?

Summary

Product Description

Control Panel Overview

Explains the control panel functions, including light, fan speed, and indicator.

Daily Use

Using The Hood

Provides guidance on recommended fan speeds for various cooking scenarios.

Care and Cleaning

Notes on Cleaning

General advice regarding cleaning agents, appliance temperature, and filter maintenance.

Cleaning the Grease Filter

Detailed steps for removing and cleaning the grease filters, including dishwasher instructions.

Replacing the Charcoal Filter

Replacing the Lamp

Environmental Concerns

Overview

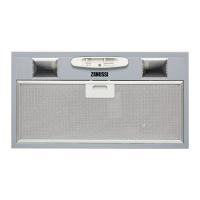
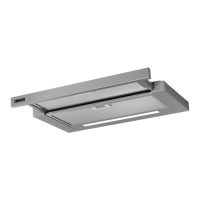
This document is a user manual for the Zanussi ZFG215S Cooker Hood. It provides essential information for getting started with the appliance, including its function, daily use, and maintenance.

Function Description

The Zanussi ZFG215S Cooker Hood is designed to extract cooking fumes and odors from your kitchen. It features a light to illuminate the cooking surface and a fan with multiple speed levels to adjust the extraction power according to your cooking needs. The hood operates independently of the light function, allowing you to use the light without the fan running. An indicator light on the control panel shows when the hood is in operation.

Usage Features

The cooker hood is operated via a simple control panel with two switches and an indicator.

  • Light Switch (1): This switch is used to turn the light on and off, providing illumination for your cooking area. The light operates independently of the fan.
  • Fan Speed Switch (2): This switch allows you to select different fan speed levels. Moving the switch to one of the speed levels activates the fan, and you can change the speed as needed by moving the switch again. To turn off the appliance, move the fan speed switch to the '0' position.
  • Indicator (3): This light indicates whether the hood is currently operating.

The manual provides guidance on recommended fan speeds for various cooking scenarios:

  • Speed 1: Recommended for heating up food or cooking with covered pots. This low setting is suitable for minimal fume production.
  • Speed 2: Ideal for cooking with covered pots on multiple cooking zones or burners, or for gentle frying. This moderate setting handles a slightly higher volume of fumes.
  • Speed 3: Best for boiling and frying large quantities of food without a lid, or when cooking on multiple cooking zones or burners. This highest setting provides maximum extraction for significant fume and odor production.

It is recommended to let the hood operate for approximately 15 minutes after cooking to ensure all remaining fumes and odors are cleared from the kitchen.

Maintenance Features

Regular maintenance is crucial for the efficient and safe operation of the cooker hood. The manual outlines cleaning procedures for both the appliance's surface and its filters.

General Cleaning:

  • Cleaning Agents: Do not use abrasive detergents or brushes on the appliance's surface. Instead, clean the surface with a soft cloth, warm water, and a mild detergent.
  • Post-Cooking Cleaning: After cooking, some parts of the appliance can become hot. Allow the appliance to cool down before cleaning. To prevent stains, dry the appliance with a clean cloth or paper towels after cleaning.
  • Stain Removal: Clean any stains with a mild detergent.
  • Regular Cleaning: It is important to clean the appliance and grease filters monthly. Pay special attention to cleaning the interior and grease filters thoroughly to remove fat accumulation or other residues, as these can pose a fire risk.

Grease Filter Cleaning: Grease filters are designed to capture grease particles from cooking fumes.

  • Washing: Grease filters can be washed in a dishwasher. Set the dishwasher to a low temperature and a short cycle. Note that the grease filter may discolour after washing, but this does not affect its performance.
  • Removal: To clean the filter, press the handle of the mounting clip on the filter panel underneath the hood. Slightly tilt the front of the filter downwards, then pull it out. Repeat this process for all filters.
  • Manual Cleaning: If washing manually, clean the filters using a sponge with non-abrasive detergents.
  • Re-mounting: To mount the filters back, follow the removal steps in reverse order.

Charcoal Filter Replacement: Charcoal filters are used in recirculation mode to remove odors from the air.

  • Non-Washable: Charcoal filters are NOT washable and cannot be regenerated. They must be replaced.
  • Replacement Frequency: The saturation time of the charcoal filter varies based on cooking type and the regularity of grease filter cleaning. It should be replaced approximately every 4 to 6 months of operation, or more frequently if usage is particularly heavy.
  • Replacement Procedure:
    1. First, remove the grease filters from the appliance as described in the "Cleaning the grease filter" section.
    2. Turn the charcoal filter counterclockwise (1) and then pull it (2) to remove it.
    3. To mount new filters, follow these steps in reverse order.

Lamp Replacement: The manual provides instructions for replacing the light bulb.

  • Safety First: Before replacing the lamp, disconnect the appliance from the electricity supply to prevent electric shock. Allow the light bulb to cool down completely before touching it to avoid burns. Use protective gloves to prevent injury and avoid using sharp-edged tools to prevent damage to the appliance.
  • Lamp Specifications: The manual specifies the type of bulb required:
    • Power: 4 W
    • Socket: E14
    • Voltage: 220-240 V
    • Dimensions: 37 x 100 mm (diameter x length)
    • ILCOS D Code: DRBB/F-4-220-240-E14-37/100
  • Replacement Procedure:
    1. The lamp cover has two slots on each side. Use a flat, non-sharp plastic tool to gently remove the lamp cover from the appliance.
    2. Replace the burnt lamp with a new one that matches the specifications.
    3. Mount the lamp cover back into place.

Environmental Concerns: The manual encourages users to recycle packaging materials and the appliance itself responsibly. Products marked with the symbol (crossed-out wheeled bin) should not be disposed of with household waste. Instead, they should be returned to a local recycling facility or the municipal office for proper disposal, contributing to environmental protection and human health.

Zanussi ZFG215S Specifications

General IconGeneral
Noise level63 dB
Number of speeds3
Type of extractionDucted/Recirculating
Noise level (low speed)45 dB
Maximum extraction power330 m³/h
Lighting efficiency classE
Minimum distance from gas hob650 mm
Fluid dynamic efficiency classD
Minimum distance from electric hob420 mm
TypeBuilt-in
Cord length1.3 m
Control typeSlider
Product colorGray
Built-in displayNo
Exhaust locationTop
Number of filters1 pc(s)
Grease filter typeAluminum
Dishwasher proof filterYes
Bulb typeLED
Number of bulbs2 bulb(s)
Lighting positionFront
AC input voltage220 - 240 V
AC input frequency50 Hz
Energy efficiency scaleA+++ to D
Annual energy consumption52 kWh
Weight and Dimensions IconWeight and Dimensions
Depth284 mm
Width520 mm
Height (max)145 mm
Height (min)138 mm

Related product manuals