Do you have a question about the ZINUS Bunk Bed and is the answer not in the manual?
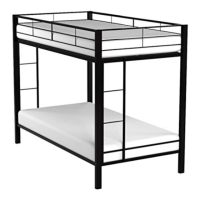
Potential bunk bed collapse due to weld failure, risking serious injury.
Inspect welds for cracks; do not install kit if welds are cracked. Contact support.
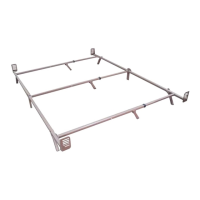
Lists all parts provided in the Zinus bunk bed preventive repair kit.
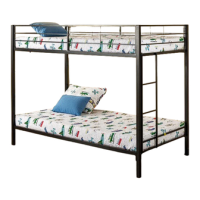
This document outlines the preventive repair instructions for Zinus bunk beds, designed to enhance safety and provide peace of mind for users. The primary function of this repair kit is to reinforce critical connection points on the upper bunk to prevent potential collapse due to weld failures. It addresses a significant safety concern where two or more welds connecting the horizontal side rail of the upper bunk to the vertical support of the guardrail could break, leading to the collapse of the upper bunk. Such an event could result in serious bodily injury to a person falling from the upper bunk or to a person in the lower bunk. Therefore, the installation of these brackets and cables is crucial for the safe use of the bunk bed.
The repair kit includes four bracket-and-cable units, which are to be installed at specific locations on the bunk bed. The components provided in the kit are:
Before beginning the installation process, it is imperative to perform a thorough inspection of the bunk bed. The instructions emphasize checking for cracks in the welds at four specific locations where the horizontal side rails of the upper bunk connect to the vertical bars of the guardrail. These locations are illustrated with red dotted lines marked 1, 2, and 3, indicating the three edges where each vertical bar is welded to the end of a horizontal side rail. Edge 3 is specifically noted as being on the back side of the vertical bar. A critical warning is issued: if any weld is observed to be cracked or coming apart, the supplied kit should NOT be installed. In such cases, users are instructed to immediately discontinue using the bunk bed and contact customer support for a refund, as this repair kit is not intended for upper bunks with broken welds.
The installation process is detailed in a step-by-step manner, ensuring clarity and ease of understanding. The first step, after the initial inspection, is to remove the mattress, bedding, and any other objects from the upper bunk of the bed to provide clear access to the work area.
The installation proceeds as follows for each of the four bed posts:
After securing the bracket and cable, the next step focuses on preventing potential hazards: 9. Secure the cable with zip ties: To prevent any openings where little fingers could get stuck between the cable (A) and the bed post, wrap one zip tie (F) around the top of the cable, bed post, and vertical bar of the guardrail. Tighten the zip tie (F) to pull the cable (A) in towards the bed post. Repeat this process by wrapping another zip tie (F) just like the first, around the bottom of the cable (A). This step ensures that the cable remains snug against the bed post, eliminating potential pinch points.
These steps (3-10) must be repeated for each of the remaining three bed posts to ensure all critical connection points are reinforced.
Maintenance features are also highlighted in the instructions. Even after the kit has been installed, users are advised to periodically check for welds that are cracked or coming apart. An example of a cracked weld is provided in the document to aid in identification. If such welds are discovered, users must immediately discontinue using the bunk bed and contact customer support for a refund. This ongoing vigilance is crucial for maintaining the safety of the bunk bed over time.
In summary, this preventive repair kit is a vital safety enhancement for Zinus bunk beds. Its function is to reinforce the structural integrity of the upper bunk's guardrail connections, mitigating the risk of collapse due to weld failures. The usage features include a clear, step-by-step installation guide that requires basic tools (provided) and a pre-installation inspection. The maintenance features emphasize continuous monitoring of the welds even after the repair, ensuring long-term safety and providing a clear course of action if new issues arise. The overall design of these instructions aims to empower users to safely maintain their bunk beds and protect against potential hazards.
| Type | Bunk Bed |
|---|---|
| Size | Twin Over Twin |
| Weight Capacity (lower bunk) | 250 lbs |
| Assembly Required | Yes |
| Bed Size | Twin |
| Warranty | 5-year limited warranty |