EasyManua.ls Logo

ZINUS FPPSTG-13 User Manual

ZINUS FPPSTG-13
4 pages
To Next Page IconTo Next Page
Page #1 background imageLoading...
Page #1 background image
x1 pc
A
x1 set
C
x1 set
F
x1 set
G
x2 pcs
H
x1 set
B
x1 pc
D
x1 pc
E
x8 pcs
J
x1 pc
K
x1 pc
O
x1 pc
T
x2 pcs
P
x2 pcs
Q
x1 pc
R
x4 pcs
x38 pcs
S
x3 pcs
L
x3 pcs
I
A
D
K
O
R
B
H x2
P x2
Q x2
E
F
G
C
FPPSTG-13
Easy as 1-2-3
Assembly Instruction
Numbers must Match for Secure Assembly
Components
Return Policy
ZINUS believes you will absolutely love your new addition to your home, but
if for some reason you want to return the product, please contact us directly
before you decide to return your product to the retailer. Our Customer
Service organization can answer most concerns and can assist you with any
questions you may have about your new product.
Please contact us first by emailing
customerservice@zinusinc.com
or by
submitting a request at
https://support.zinus.com
The item must be returned in good condition, in original box, with all original
proof of purchase, parts and accessories, within the time frame specified by
the retailer it was purchased from.
Please visit Zinus.com for warranty information on your
new product.
Question and Answer IconNeed help?

Do you have a question about the ZINUS FPPSTG-13 and is the answer not in the manual?

ZINUS FPPSTG-13 Specifications

General IconGeneral
Product NameZINUS FPPSTG-13
CategoryIndoor Furnishing
TypePlatform Bed Frame
MaterialSteel
ColorBlack
Assembly RequiredYes
StyleModern

Summary

Product Components and Overview

Parts Identification

Lists all components and hardware required for assembly, with quantities.

Bed Frame Assembly Steps

Step 1-4: Frame Base Construction

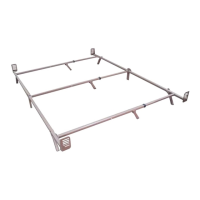
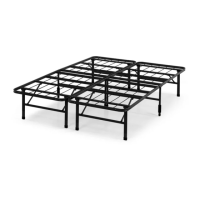
Initial assembly of the bed frame base components including side rails and support structures.

Step 5-8: Adding Support Elements

Attaching central support beams and crossbars to the main frame.

Step 9-10: Securing Center Support

Fastening the central support rail and related components.

Step 11-13: Attaching Slat Supports

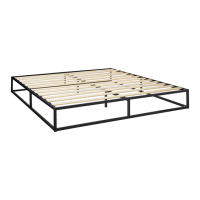
Installing the mattress support slats onto the frame.

Step 14-16: Finalizing Slat Assembly

Completing the installation of all mattress support slats.

Step 17-18: Installing Gas Lift Mechanism

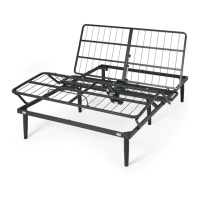
Attaching the hydraulic lift system for storage access.

Step 19-20: Final Assembly and Usage

Completing the bed frame and final checks.

Related product manuals