This document is an assembly and instruction manual for the Zippity Classica Vinyl Mailbox Post with No-Dig Steel Pipe Anchor Kit, model ZP19013.
Function Description
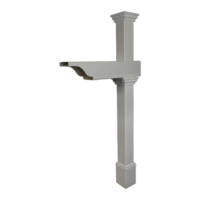
The Zippity Classica Vinyl Mailbox Post is designed to provide a sturdy and aesthetically pleasing support for a mailbox. Its "no-dig" feature, utilizing a steel pipe anchor kit, simplifies installation by eliminating the need for digging a large hole and pouring concrete, making it an "easy does it" solution for homeowners. The vinyl construction ensures durability and low maintenance, as it is resistant to weather and does not require painting or staining. The design includes a decorative post cap and base molding, contributing to its classic appearance. The post arm is designed to accommodate a standard mailbox (not included), and the overall structure is intended for outdoor use, providing a stable and attractive mailbox solution.
Important Technical Specifications
- Model Number: ZP19013
- Overall Dimensions (Assembled):
- Height: 56 ½ inches (53 ½ inches above ground, 27 inches below ground for the pipe anchor)
- Width: 19 inches (referring to the post arm width)
- Post Dimensions: 4 inches x 4 inches x 56 inches
- Post Arm Dimensions: 5 inches x 5 inches x 25 ½ inches
- Pipe Anchor Dimensions: 1 ⅝ inches diameter x 46 ¾ inches
- Ground Penetration: The pipe anchor is driven into the ground, with the bottom of the plastic gear just above ground level. The maximum depth is 21 ⅝ inches to the middle of the top gear. Secure installation can be achieved with as little as 18 inches of penetration in hard ground.
- Material: Vinyl (for post, post arm, caps, and molding), Steel (for pipe anchor), Stainless Steel (for screws).
- Screw Types:
- 1" Stainless Steel Screw (2 included)
- 1 ½" Stainless Steel Screw (5 included)
- Assembly Time: Approximately 60 minutes.
- Recommended Assembly Area: Approximately 5 feet x 8 feet for unobstructed assembly.
- Mailbox and Mounting Hardware: Not included.
Usage Features
- No-Dig Installation: The primary feature is the no-dig steel pipe anchor, which allows for installation by simply driving the anchor into the ground with a sledgehammer, eliminating the need for concrete.
- Easy Assembly: The product is designed for straightforward assembly, with clear step-by-step instructions and illustrations. Components slide together, and screws secure the main parts.
- Adjustable Post Trim Cap: A post trim cap slides into position under the post arm and is secured with a screw to prevent it from sliding down, offering a clean finish.
- Leveling Mechanism: The pipe anchor includes a "donut" and "gear" system that allows for adjustment to ensure the post is installed straight, even if the anchor is driven in crookedly. A level is recommended during installation for accuracy.
- Video Instructions: A QR code is provided for users to scan and access a video demonstrating the assembly process, offering an alternative visual guide to the written instructions.
- Customer Support: Comprehensive customer support is available via website, email, and phone for missing/damaged parts or assembly assistance.
- Durable Vinyl Construction: The vinyl material is designed to withstand outdoor elements, providing a long-lasting and attractive mailbox post without the need for frequent maintenance like painting.
- Standard Mailbox Compatibility: The post arm is designed to accommodate most standard mailboxes, allowing users to choose their preferred mailbox style.
Maintenance Features
- Low Maintenance Vinyl: The vinyl material is inherently low maintenance. It does not rot, warp, splinter, or require painting or staining. Regular cleaning with soap and water is typically sufficient to maintain its appearance.
- Durable Materials: The combination of vinyl and stainless steel screws ensures resistance to rust and corrosion, contributing to the product's longevity in outdoor environments.
- Replacement Parts Availability: In case of missing, damaged, or defective parts, customers can easily order replacements through the manufacturer's website or customer service, ensuring the product can be maintained and repaired over its lifespan.
- No Seasonal Storage Required: Due to its durable construction, the mailbox post is designed to remain outdoors year-round, eliminating the need for seasonal storage or special winterization.