EasyManua.ls Logo

Zippity ZP19019 - User Manual

Zippity ZP19019
12 pages
Print Icon
To Next Page IconTo Next Page
Loading...
WWW.ZIPPITY-OUTDOOR.COM
1
ASSEMBLY
INSTRUCTIONS
ZP19019
ZP19019
ASSEMBLY
INSTRUCTIONS
60 MIN
Approximate assembly me
Want to see a video on how to
assemble this product?
Scan the QR code
MANCHESTER
VINYL PICKET GATE
WITH POSTS

WWW.ZIPPITY-OUTDOOR.COM
VER. 011521
Question and Answer IconNeed help?

Do you have a question about the Zippity ZP19019 and is the answer not in the manual?

Summary

General Information and Support

Missing or Damaged Parts

Guidance on ordering replacement parts and troubleshooting issues with product packaging or handling.

Assembly Assistance

Contact information and advice for customers needing help with product assembly or installation.

Returns Process

Information on how to resolve issues and initiate product returns through the original purchase company.

Assembly Instructions

Step 1: Lay Out Materials

Guide to identifying and organizing all components and hardware before starting assembly.

Step 2: Assemble Gate Frame

Detailed instructions on assembling the main gate frame using rails, stiles, and brackets.

Step 3: Assemble and Attach Gate Braces

Instructions for constructing the 'X' pattern gate braces and attaching them to the frame.

Step 4: Finish Gate Assembly

Steps for inserting pickets, attaching stile caps, and installing hinges and latch components.

Step 5: Assemble Gate Posts

Instructions for assembling the gate posts, including attaching post extensions.

Step 6: Install Gate Posts

Guidance on digging holes, positioning posts, and securing them with concrete.

Step 7: Install Gate

Steps for attaching the assembled gate to the installed posts using hinges and latch.

Step 8: Install Post Caps

Final step to push the post caps onto the top of the installed gate posts.

Overview

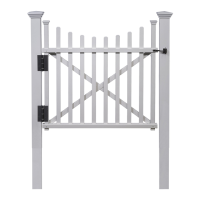
This document is an assembly instruction manual for the Zippity Manchester Vinyl Picket Gate with Posts (ZP19019).

Function Description:

The Zippity Manchester Vinyl Picket Gate with Posts is a vinyl gate system designed for outdoor use, likely as an entry point within a fence line. It features a picket design and comes with posts for installation. The gate's primary function is to provide controlled access while maintaining the aesthetic of a picket fence.

Important Technical Specifications:

  • Model Number: ZP19019
  • Gate Dimensions (assembled):
    • Width: 42 inches
    • Height: 42 inches
  • Detailed Product Dimensions (referencing page 4):
    • Overall Height (from ground to top of post cap): Approximately 45 3/8 inches
    • Gate Opening Width: 42 1/2 inches
    • Outside Posts Width: 49 1/2 inches
    • Height from Ground to Bottom Rail: 2 inches
    • Height from Ground to Top Rail: 31 1/2 inches
    • Post Cap Height: 2 3/4 inches
    • Post Extension Length: 36 inches
    • Post Length: 52 inches
    • Top Rail Length: 41 inches
    • Bottom Rail Length: 41 inches
    • Vertical Stile Length: 40 1/2 inches
    • Gate Brace Length: 48 3/8 inches
    • Picket Lengths (4 different sizes): 37 1/2", 35 3/8", 34 1/2", 33 3/8"
  • Materials: Vinyl components, stainless steel screws (white and black, self-drilling).
  • Hardware Included:
    • Post Cap (2)
    • Post (2)
    • Vertical Stile (2)
    • L Bracket (4)
    • 5/8" White Self-Drilling Stainless Steel Screw (27)
    • 2" Self-Drilling Stainless Steel Screw (4)
    • 5/8" Black Self-Drilling Stainless Steel Screw (30)
    • Top Rail (1)
    • Picket (8) (in varying lengths)
    • Bottom Rail (1)
    • Gate Brace (2)
    • Vertical Stile Cap (2)
    • Post Extension (2)
    • Gate Hinge (2)
    • Latch Catch (1)
    • Latch Finger (1)
  • Estimated Assembly Time: 60 minutes

Usage Features:

  • DIY Assembly: The product is designed for self-assembly, with detailed step-by-step instructions provided.
  • Picket Design: Features a classic picket fence aesthetic, suitable for various outdoor settings.
  • Vinyl Construction: Implies durability, low maintenance, and resistance to weather elements like rot, rust, and insects, common with vinyl products.
  • Gate Hinges and Latch: Includes all necessary hardware for a functional gate, allowing for opening and closing, and securing the gate.
  • Post Extensions: The posts are designed with extensions for in-ground installation, providing stability.
  • Compatibility: Designed to work in conjunction with Zippity Manchester Vinyl Picket Fence (ZP19018), using joiner clips (not included with the gate, but with the fence panels) to attach the gate to fence panels.
  • Installation Flexibility: While concrete is recommended for post installation, crushed stone compacted tightly around the posts can be substituted if the user intends to remove and reinstall the gate.

Maintenance Features:

  • Vinyl Material: Vinyl is generally low maintenance, requiring only occasional cleaning with soap and water to maintain its appearance. It does not require painting or staining.
  • Stainless Steel Hardware: The use of stainless steel screws helps prevent rust and corrosion, contributing to the longevity of the gate system.

Assembly and Installation Process Overview:

  1. Lay Out Materials: Identify and organize all included components.
  2. Assemble Gate Frame:
    • Slide Top and Bottom Rails over Vertical Stiles.
    • Align pre-drilled holes and fasten rails to stiles with white self-drilling screws (note: some screws are left out temporarily).
    • Attach L Brackets to the inside corners of the gate frame for reinforcement.
  3. Assemble and Attach Gate Braces:
    • Fit the two Gate Braces together to form an "X" pattern.
    • Align pre-drilled holes on the Gate Braces with the Top and Bottom Rails (on the back of the gate frame) and fasten with 2" self-drilling stainless steel screws.
  4. Finish Gate Assembly:
    • Insert Pickets down through the Top Rail and into the Bottom Rail following a specific pattern.
    • Pressure fit Vertical Stile Caps onto the Vertical Rails.
    • Fasten Gate Hinges to one side of the gate with black self-drilling screws, ensuring they are about 1" from the Top and Bottom Rails (do not fasten inside hinges yet).
    • Align and fasten the Latch Finger to the Top Rail with black self-drilling screws (note: one screw can be drilled directly into the vinyl without a pre-drilled hole).
  5. Assemble Gate Posts:
    • Insert Post Extensions into the bottom of the Posts.
    • Align pre-drilled holes and fasten them together with white self-drilling screws.
  6. Install Gate Posts:
    • Dig two 8" diameter x 2' deep holes, 46" apart (center to center).
    • Insert both Posts into the holes, ensuring the space between them is 42 1/2" and they are square.
    • Backfill the holes with concrete (or crushed stone if temporary removal is desired).
  7. Install Gate:
    • Temporarily use 2" blocks of wood to raise the gate off the ground.
    • Fasten the Gate Hinges to the Posts with black self-drilling screws.
    • Open the gate and fasten the Gate Hinges to the inside of the Posts with additional black self-drilling screws.
    • Align the Latch Catch with the Latch Finger and install with black self-drilling screws.
  8. Install Post Caps:
    • Push the two Post Caps onto the Posts.

Important General Information for Assembly:

  • Read fence instructions first if installing with a fence.
  • Pre-assemble the gate frame as a "dry run" without screws to ensure all parts are present, fit correctly, and the assembly order is understood.
  • Install gate posts before fence posts for better fit.
  • Do not hang the gate system off a single non-supported post; connect the hinge post to a fence panel that is connected to another post for stability.
  • Place components on a non-abrasive surface during assembly to prevent scratching.
  • An assembly area of approximately 5'x 8' is recommended.
  • Excessive force should not be needed during assembly.

Customer Support and Troubleshooting:

  • Missing or Damaged Parts: Visit parts.nychbrands.com or contact customer service via support@zippity-outdoor.com or phone (704-892-5222 / 877-234-6196). Provide item number ZP19019 and part name, and batch lot number (stamped inside the box).
  • Assembly Help: Contact customer service at 704-892-5222 / 877-234-6196.
  • Returns: Contact the company from which the product was purchased. It is recommended to contact Zippity customer service first for issue resolution.
  • Customer Service Hours: Weekdays from 9 am-5 pm EST. Voicemail available outside these hours.
  • Assembly Video: A QR code is provided on the first page to access an assembly video.

Zippity ZP19019 Specifications

General IconGeneral
BrandZippity
ModelZP19019
CategoryFencing & Gates
LanguageEnglish

Related product manuals