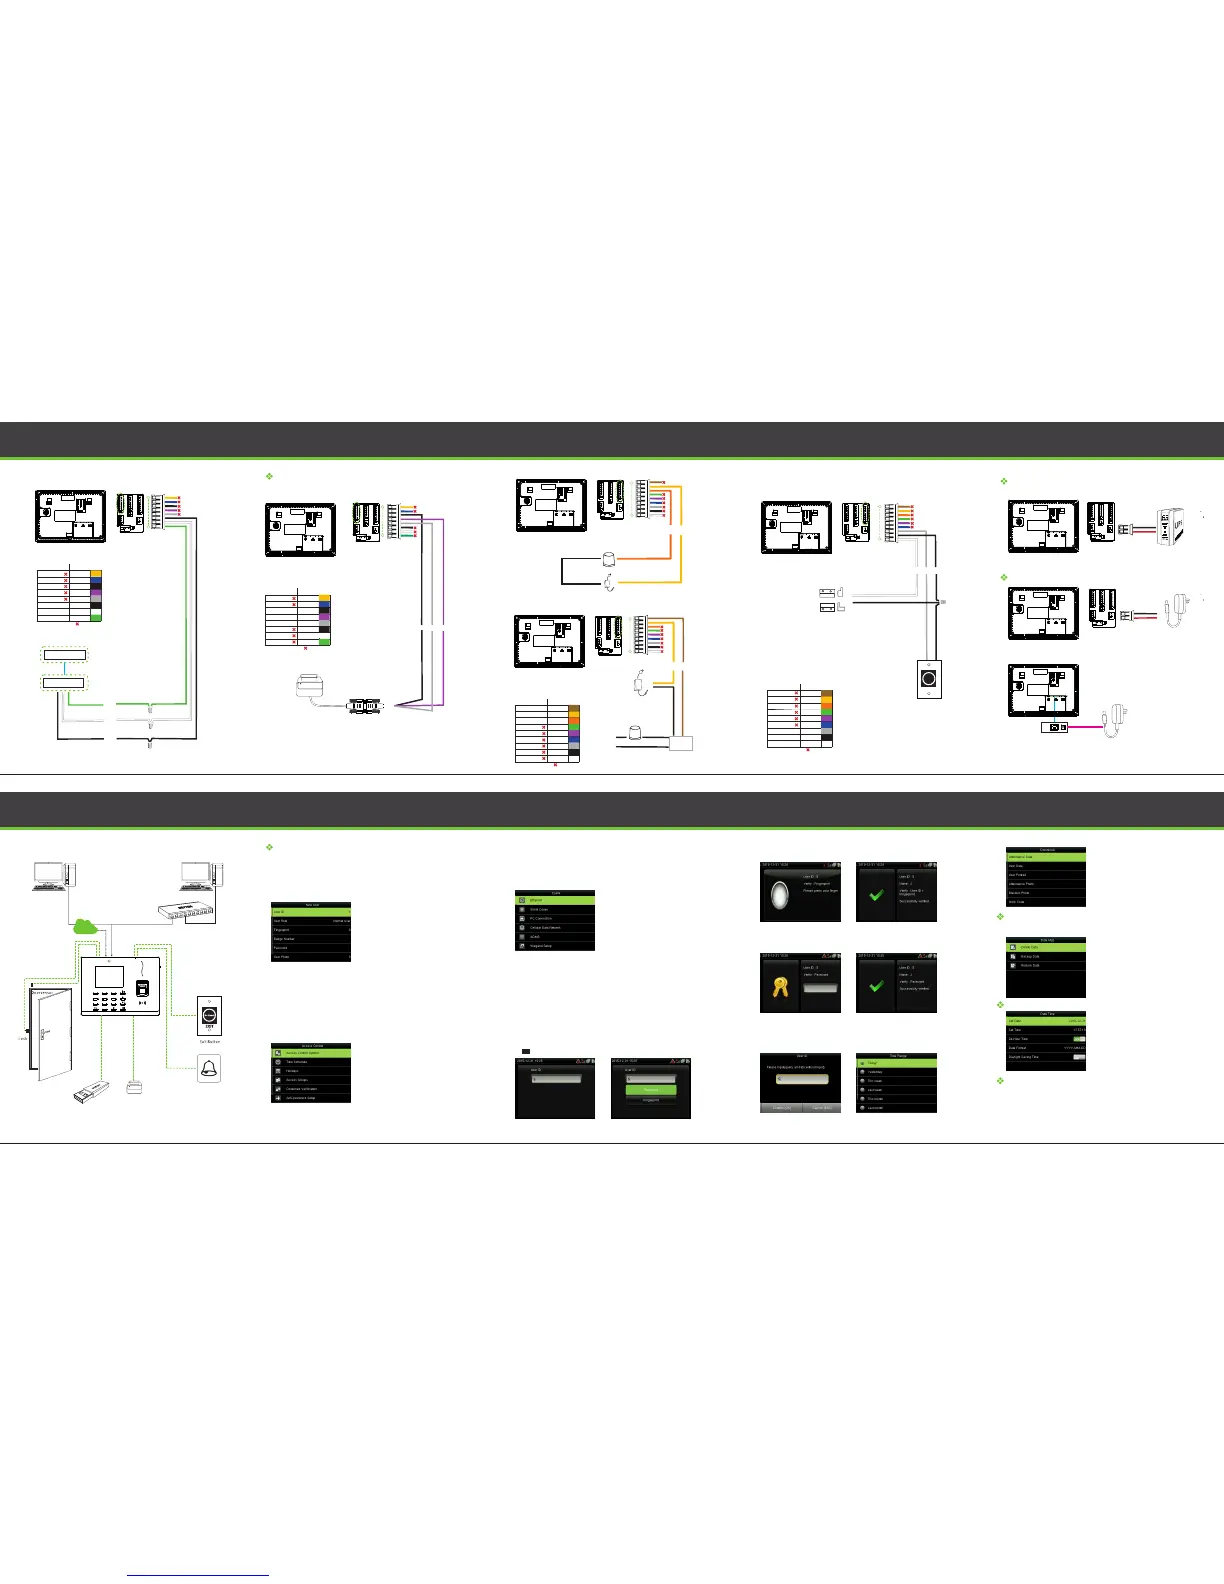
Wiegand Output Connection
SGND
WD1
WD0
Wie gand Ou t
Wie gand De vice
9
1
8
NO 2 COM 2
COM 2 NC2
SE N
GN D
BU T
Alarm Connection
11
Ala rm
Ala rm itse lf powe r
1
1
9
9
Button & Sensor Connection
12
1
9
Power Connection
12V DC Adaptor
12V DC Adaptor
GND
GND
+12V DC
+12V DC
Without UPS
With UPS (Optional)
Recommended power supply
1)12V ± 10%, at least 500mA.
2)To share the power with other devices, use a power supply with higher
current ratings
13
EXIT
No Touch
Standalone Installation
Exi t Butto n
24V A C
Con tacto r
AC 22 0V
Doo r Senso r
14
1 2
3
4
5 6
7
8 9
0
G2
Device Operation
Quick flows
To enroll administrator and user:
Go to Communication Settings>Punch/Verify>View Records
1) En roll Adminis trator an d Users
a.Enroll Adm inistrator Main Menu>User Manageme nt>New User
Use r ID En roll user ID; it supp or ts 1-9 digi ts of numbe rs.
Selec t the user rolebetwee n Normal User a nd Super Ad minUse R ole
Enr oll a finge rp rint or finge rp rints.Finger print
Enr oll face ac cording to the pro mpts of scr een and voi ce.Face
Enr oll a badge b y swiping t he badge.Bad ge Numb er
Enr oll the pas sword ; it supports 1-9 digits of numb ers.Passwo rd
Enr oll the use r photo whi ch will be disp layed a ft er verifi cation.Use r Photo
Set the Access Control pa rameter s of the user.Acc ess Control Role
Acc ess Control Settin g Ma in Menu>Access Con trol
Acc ess Control Opti ons: Incl uding D oor Loc k Delay,Door S ensor Del ay, Door Senso r
Type, NC / NO Time Period e tc.
Sched ule Doors opening t ime, 50 tim e zones are availa ble to defi ne.Tim e Sc hedule:
Set spe cial time z ones fo r holiday s.Hol idays :
Set to mAcc ess Gro ups: ana ge empl oyees i n gro ups.
15
Device Operation
2)C ommunic ation S ettings Ma in Menu>Communicat ion
Eth ernet The d evice can com municat e with P C vi a the Etherne t parameters.
The de vice ca n commu nicat e with P C via the ser ial port according to Seria l Comm
the u ser-def ined pa ramet ers.
Set the p assword and device ID so that yo u can conne ct t he devicePC Connec tion
wit h software in P C
Whe n the devic e is applie d on a dial up networ k,ensureCel lular Dat a Network
tha t the devic e is within t he cove rage of the m obile net worksign als(G).
Setti ngs used for connectin g with A DMSser ver.AD MS Setti ng
The d ev ice pro vides a Wi-Fi mod ule, wh ich can be bu ilt in the devi ceWi Fi Set ting
mou ld or exter nally c onnec ted, to e nable dat a transmiss ion and to es tablish a w irele ss
net work envi ronme nt.
Set wie gandoutp arame tersWie gand Setup
3)Verifi catio n(1:1 verif icati on mode for exampl e
Cli ck to ent er 1:1 ve rificat ion mode on i nitial in terf ace.
Ent er User ID a nd press [O K].
When multi-verification mode is registered,
please choose the verify mode as shown in the
figure above: password, fingerprint and face.
Set var ious groups in to a comb ined acce ss group to achi eveComb ined Ver ificati on:
mul ti-verificat ion.
Set duress fun ction opt ions.Duress Opt ions:
b. Enroll No rmal Users (Fo llow th e same step s of "Enrol ling Admi nistrat or" exc ept the
"Us er Role "op tion)
16
Device Operation Device Operation
b. Fin gerprint Ver ificati on Mode
c. Password Verificat ion Mode
4) Vie wing At tenda nce Records
aView records in the device(Main Menu>Attendance Search>Attendance Record
Ent er the user ID to searc h.
Selec t the time ra nge for
att endance r ecord q uery.
17
18
Do not use
DE SCRI PTI ON
WI RE
NC2
COM 2
NO2
NC1
COM 1
NO1
BUT
GND
SEN
Yellow
White
Gray
Black
Brown
Purple
Green
Orange
Blue
Do not use
DE SCRI PTI ON
WI RE
NC2
COM 2
NO2
NC1
COM 1
NO1
BUT
GND
SEN
Yellow
White
Gray
Black
Brown
Purple
Green
Orange
Blue
Do not use
DE SCRI PTI ON
WI RE
485 B
485 A
GN D
TX D
RX D
GN D
WD1
WD0
Yellow
White
Black
Black
Gray
Purple
Green
Blue
ZKTime.NetZKTime Web
WAN
PC
Opt ion A Opt ion B
TCP /IP
3G
PC
G2
SW ITCH
Ext ernal B ell
Ser ial Pri nter
RS232 Connection
Printer connec t
GN D TX DRX D
10
1
8
RS232 cabel
Do not use
DE SCRI PTI ON
WI RE
485 B
485 A
GN D
TX D
RX D
GN D
WD1
WD0
Yellow
White
Black
Black
Gray
Purple
Green
Blue
Ser ial Pri nter
-
+
+
+
+
-
-
-
1. Insert the US B di sk correc tly.
2. Down load the at tendanc e data to the d isk.
3. Up load th e atten dance dat a from th e disk to
you r compute r.
4. Na me the do wnloaded da ta as "Device S erial
Num ber.da t".
You can open the d ownlo aded data and v iew it.
To avoid data loss due to mis-operation, you can back up the data to local drive or USB disk
at any time.
a. Da te TimeMai n Menu>Sy stem>Da te Time
Set the d ate, ti me and time format for t he device .
b.Vi ew records on comp uter (Main Menu >U SB Manager>Download> Attendance Data)
Backup Data
Other Settings
1. Enter Main Menu>Data Management>Backup
Data>Saving Type>Data Type to backup.
2. Select the content to-be-backed up.
Troubleshooting
Q: Inval id time zon e is displaye d af ter ver ificati on?
A: Co ntact Admin istrato r to check if t he user has t he privileg e to gain a ccess
wit hin tha t time zo ne.
Q: Ver ificati on succeeds b ut the user c annot gain ac cess?
A: 1. C heck wh ether t he user p rivileg e is set correc tly.
2. Ch eck whe ther th e lock wi ring is cor rect.

 Loading...