2
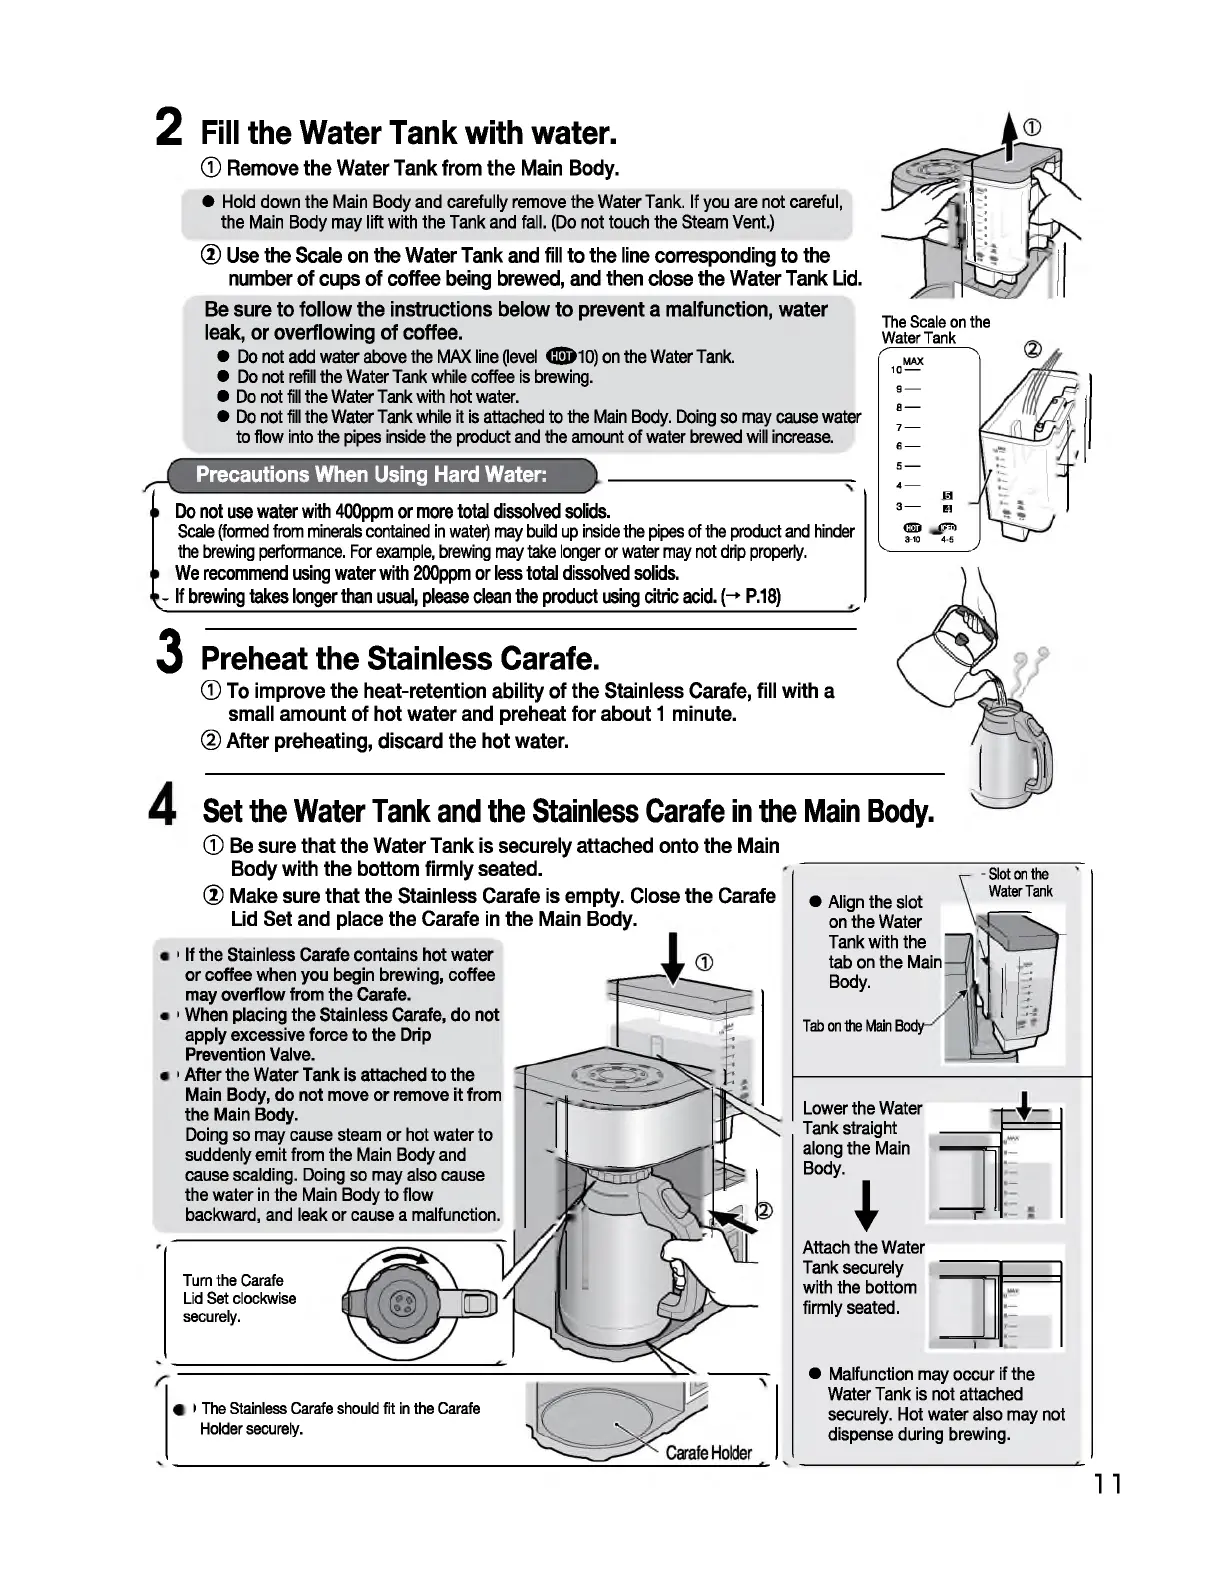
Fill the W ater Tank with water.
(D Remove the Water Tank from the Main Body.
• Hold down the Main B ody and carefully remove the W ater Tank. If you are not careful,
the Main Body may lift w ith the Tank and fall. (Do not tou ch the Steam Vent.)
© Use the Scale on the Water Tank and fill to the line corresponding to the
number of cups of coffee being brewed, and then close the Water Tank Lid.
Be sure to follow the instructions below to prevent a malfunction, water
leak, or overflowing of coffee.
• Do not add w ater above the MAX line (level <33)10) on the W ater Tank.
• Do not refill the W ater Tank while coffee is brewing.
• Do not fill the W ater Tank with hot water.
• Do not fill the W ater Tank while it is attached to the Main Body. Doing so may cause w
to flow into the pipes inside the product and the amount of water brewed will increase.
Precautions When Using Hard Water:
The Scale on the
Water Tank
r
MAX
1 0
-----
A .
9
-----
8
-----
7
-----
6
-----
5
-----
4
-----
3
-----
S
El
CED
3-10
V
fT T )
4-5
y
Do not use water with 400ppm or more total dissolved solids.
Scale (formed from minerals contained in water) may build up inside the pipes of the product and hinder
the brewing performance. For example, brewing may take longer or water may not drip properly.
We recommend using water with 200ppm or less total dissolved solids.
v- If brewing takes longer than usual, please clean the product using citric acid. (-*■ P.18)
________
__
3 Preheat the Stainless Carafe.
© To improve the heat-retention ability of the Stainless Carafe, fill with a
small amount of hot water and preheat for about 1 minute.
® After preheating, discard the hot water.
Set the Water Tank and the Stainless Carafe in the Main Body.
© Be sure that the Water Tank is securely attached onto the Main
Body with the bottom firmly seated.
© Make sure that the Stainless Carafe is empty. Close the Carafe
Lid Set and place the Carafe in the Main Body.
' If th e S tainless Carafe con tain s h ot w a ter
o r c offee w hen you begin brew ing, coffe e
may o verflow fro m the Carafe.
1 W hen p la cing the Stainless Carafe, do no t
apply e xcessive force to the Drip
Prevention Valve.
' A fte r the W a ter Tank is atta ch ed to the
Main B ody, d o n ot m ove o r rem o ve it from
the M ain Body.
Doing so m ay cause steam or hot water to
sud denly em it from the Main B ody and
cause scalding. Doing so may also cause
the w ater in the Main Body to flow
backward, and leak o r cause a m alfunction.
Turn the Carafe
Lid Set clockwise
securely.
i The Stainless Carafe should fit in the Carafe
Holder securely.
• Align the slot
on the W ater
Tank w ith the
tab on the Main
Body.
Tab on the Main Body
- Slot on the
Water Tank
Low er the W ater
Tank straight
along the Main
Body.
I
Attach the W ater
Tank securely
w ith the bottom
firm ly seated.
• M alfunction m ay occ ur if the
W ater Tank is not attached
securely. Hot w ater also m ay not
dispense during brewing.
1
1
2
Fill
the
Water
Tank
with
water.
G)
Remove
the
Water
Tank
from
the
Main
Body.
•
Hold
down
the
Main
Body
and
carefully
remove
the
Water
Tank.
If
you
are
not
careful,
the
Main
Body
may
lift
with
the
Tank
and
fall.
(Do
not
touch
the
Steam
Vent.)
00
Use
the
Scale
on
the
Water
Tank
and
fill
to
the
line
corresponding
to
the
number
of
cups
of
coffee
being
brewed,
and
then
close
the
Water
Tank
Lid.
Be
sure
to follow
the
instructions below to prevent a malfunction, water
leak,
or overflowing of
coffee.
The
Scale
on
the
Water
Tank
•
Do
not
add
water
above
the
MAX
line
Oevel
810)
on
the
Water
Tank.
•
Do
not
refill
the
Water
Tank
while
coffee
is
brewing.
•
Do
not
fill
the
Water
Tank
with
hot
water.
MAX
10-
•
Do
not
fill
the
Water
Tank
while
it
is
attached
to
the
Main
Body.
Doing
so
may
cause
w
ater
to
flow
into
the
pipes
inside
the
product
and
the
amount
of
water
brewed
will
increase.
ater
9-
8-
7-
6-
5-
4-
~---------
,,
•
Do
not
use
water
with
400ppm
or
more
total
dissolved
solids.
J;t
3-
l!l
Scale
(formed
from
minerals
contained
in
water)
may
build
up
inside
the
pipes
of
the
product
and
hinder
the
brewing
performance.
For
example,
brewing
may
take
longer
or
water
may
not
drip
properly.
®
Qi
3-10
4-5
•
We
recommend
using
water
with
200ppm
or
less
total
dissolved
solids.
•
If
brewing
takes
longer
than
usual,
please
clean
the
product
using
citric
acid.(
➔
P.18)
3
Preheat
the
Stainless
Carafe.
G)
To
improve
the
heat-retention ability of
the
Stainless
Carafe,
fill with a
small
amount
of hot water
and
preheat
for about 1
minute.
@
After
preheating,
discard
the
hot
water.
4
Set
the
Water
Tank
and
the
Stainless
Carafe
in
the
Main
Body.
G)
Be
sure
that
the
Water
Tank
is
securely attached onto the
Main
Body with
the
bottom firmly
seated.
00
Make
sure
that
the
Stainless
Carafe
is
empty.
Close
the
Carafe
Lid
Set
and
place
the
Carafe
in
the
Main
Body.
• If
the
Stainless
Carafe
contains hot water
or coffee
when
you
begin
brewing,
coffee
may
overflow
from
the
Carafe.
•
When
placing
the
Stainless
Carafe,
do
not
apply
excessive
force to
the
Drip
Prevention
Valve.
• After
the
Water
Tank
is
attached to
the
Main
Body,
do not
move
or
remove
it
from
the
Main
Body.
Doing
so
may
cause
steam
or
hot
water
to
suddenly
emit
from
the
Main
Body
and
cause
scalding.
Doing
so
may
also
cause
the
water
in
the
Main
Body
to
flow
backward,
and
leak
or
cause
a
malfunction.
Turn
the
Carafe
Lid
Set
clockwise
securely.
•
The
Stainless
Carafe
should
fit
in
the
Carafe
Holder
securely.
•
Align
the
slot
on
the
Water
Tank
with
the
tab
on
the
Main
Body.
Tab
on
the
Main
Body
Lower
the
Water
or,~
,...
Tank
straight
":""=
along
the
Main
Body.
'
Attach
the
Water
Tank
securely
with
the
bottom
firmly
seated.
•
Malfunction
may
occur if
the
Water
Tank
is
not
attached
securely.
Hot
water
also
may
not
dispense
during
brewing.
~ H
~,
1
-
-------------------------
·' '·
------------
l l
 Loading...