EasyManua.ls Logo

Zoom R8 - User Manual

Zoom R8
140 pages
Print Icon
To Next Page IconTo Next Page
Loading...




Table of Contents

Other manuals for Zoom R8

Questions and Answers

  • K
    Kyle LewisAug 15, 2025
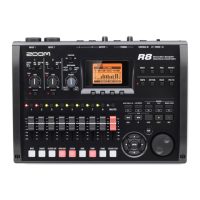
    Why is there no sound or very weak sound on my Zoom R8?
    • H
      harrisrandyAug 16, 2025
      If you are experiencing no sound or very weak sound, verify the connections to the monitoring system and its volume settings. Also, ensure that the status indicators in the mixer section are lit green and that their faders are raised. If a track's indicator is not green, press its key repeatedly until it lights green. Check that the [MASTER] status key is not lit and the [MASTER] fader is raised. If an insert effect is applied to an input, verify the effect output level (patch level) setting is suitable.
  • M
    maciaszacharyAug 18, 2025
    What to do if the recorded sound is distorted on my Zoom R8?
    • P
      Patricia LambertAug 18, 2025
      If the recorded sound is distorted, ensure that the input GAIN knobs and recording levels are not set too high. Also, lower the faders so that the level meters do not reach 0 dB. If the EQ gain in the track mixer is set extremely high, lower it to a suitable value.
  • K
    Kathy WilliamsAug 21, 2025
    What to do if the input signal cannot be heard or is very weak on my Zoom R8 Recording Equipment?
    • J
      John MoralesAug 21, 2025
      If the input signal cannot be heard or is very weak, make sure that the GAIN control for that input is turned up. Also, check that the status light is green (playback enabled) and that the fader of the track is raised.
  • D
    Debra WatersAug 25, 2025
    Why is the send-return effect not working on my Zoom Recording Equipment?
    • A
      Angela SolomonAug 26, 2025
      If the send-return effect is not working, confirm that the REV or CHO icon is shown on the display. If it is not shown, press the EFFECT key, then press the REVERB or CHORUS soft key and set ON/OFF to On. Also, make sure that the send levels for the tracks are raised.
  • N
    Nathaniel HarrisAug 27, 2025
    Why can't I record on a track with my Zoom Recording Equipment?
    • V
      victor49Aug 28, 2025
      If you cannot record on a track, make sure that you have selected a track for recording. Also, check whether you have run out of free space on the SD card. If the project is protected, set “PROTECT” to “OFF”, or use a different project.
  • R
    Richard GilesAug 30, 2025
    What to do if moving the fader does not affect the volume on my Zoom R8 Recording Equipment?
    • M
      Mario JonesAug 30, 2025
      If moving the fader does not affect the volume, it may be because stereo link is turned ON. Either turn stereo link OFF, or use the fader of the odd-numbered channel in the pair.
  • B
    Brian BellSep 2, 2025
    What to do if insert effect is not working on my Zoom R8 Recording Equipment?
    • I
      Isabel HurstSep 3, 2025
      If the insert effect is not working, check that the insert effect [INS] icon is shown on the display. If it is not shown, press the EFFECT key, then press the INSERT soft key and set ON/OFF to On. Also, make sure that the insert effect is inserted in the desired location.
  • D
    debra82Sep 5, 2025
    Why can't I save a project on my Zoom R8?
    • P
      phillip15Sep 5, 2025
      If you cannot save a project, it may be because the project is protected. Set "PROTECT" to "Off".
  • R
    Rodney HartmanSep 8, 2025
    What does it mean if my Zoom R8 shows the message “Stop Recorder”?
    • A
      Ashley AllenSep 9, 2025
      If an operation does not work and the message “Stop Recorder” is shown on the display, it indicates that the recorder is operating. Press the STOP key to stop the recorder and then conduct the operation.
  • J
    Joseph BoyerSep 12, 2025
    Why can't I create a new project or copy a project on my Zoom R8?
    • R
      Ryan BradySep 12, 2025
      If you cannot create a new project or copy a project, it may be because no more projects can be created on the card. Delete unneeded projects to free up memory.

Summary

Usage and Safety Precautions

Safety Warnings and Symbols

Covers mandatory actions, prohibitions, injury warnings, and symbol meanings.

Usage Precautions and Handling

Covers AC adapter, batteries, environment, interference, cleaning, and malfunction.

Introduction to ZOOM R8

Key Features Overview

Highlights recorder, USB interface, control surface, inputs, and sampler capabilities.

Operation Workflow Overview

Recording Preparations and Process

Covers project setup, recording, and basic effects.

Connections Guide

Input Connections

Details connecting microphones, guitars, and line-level devices.

SD Card Management

SD Card Installation Procedure

Step-by-step guide for inserting and ejecting SD cards.

Powering the Unit

Using AC Adapter or Batteries

Instructions for connecting power sources.

Preparing for Recording

Creating a New Project

Steps for setting up a new song project.

Tempo Settings

Setting the Project Tempo

How to adjust the song's tempo using the dial or tap.

Recording the First Track

Connecting Instruments and Mics

Guides for connecting audio sources and phantom power.

Adjusting Input Gain

Input Gain Adjustment

Steps to set input gain and avoid clipping.

Using Insert Effects

Applying Insert Effects

Steps to select and enable insert effects.

Overdubbing Tracks

Overdubbing Process Overview

Recording additional parts over existing tracks.

Stereo Recording and Linking

Enabling Stereo Link

Steps to link adjacent tracks for stereo recording.

Stereo Recording Procedure

How to perform stereo recording using linked inputs.

Punch-in;out Recording

Manual Punch-in;out Process

How to re-record parts of a track manually.

Automatic Punch-in;out

Setting Punch-in;out Points

Defining start and end points automatically.

Combining Tracks via Bouncing

Bouncing Preparation Steps

Selecting source and destination tracks for bouncing.

Bouncing Execution and Playback

Bouncing Execution Steps

Performing the bounce operation.

A-B Repeat for Section Playback

Setting A-B Repeat Points

Defining start (A) and end (B) points for looping.

Using A-B Repeat for Looping Playback

Activating and controlling section playback.

Mixing Overview

Input Mixer Functions

Explains input signal processing and parameters.

Track Mixer Functions

Details track signal mixing, EQ, pan, and effect sends.

Track Parameter Adjustment

Setting Track Level, EQ, and Pan

How to adjust volume, equalization, and panning.

Using Send-Return Effects

Selecting Effects and Patches

Steps to choose effects and their settings.

Adjusting Send-Return Levels

How to control effect signal amounts per track.

Using Insert Effects on Tracks

Applying Insert Effects to Tracks

Steps for adding insert effects to recorded audio.

Mastering Effect Application

Using a Mastering Effect

How to apply a mastering effect before the master fader.

Mixing Down to Master Track

Preparing Signal Levels for Mixdown

Adjusting levels before recording the master track.

Recording and Playback of Master Track

Process of creating the final stereo mix and playback.

Assigning Rhythm Patterns to Tracks

Assigning from Rhythm Menu

Steps to assign patterns using the RHYTHM menu.

Assigning from Track Menu

Steps to assign patterns using the TRACK menu.

Creating Rhythm Patterns

Preparing a Rhythm Pattern

Setting bars, time signature, and quantization.

Real-time Pattern Input

Inputting Patterns in Real-time

Recording patterns by playing pads along with a metronome.

Step Input for Rhythm Patterns

Importing Rhythm Patterns

Importing All Patterns

Copying all patterns from another project.

Importing One Pattern

Copying a specific pattern from another project.

Using the Sampler to Make Songs

Making Basic Rhythm Loops

Assigning loops and setting them to repeat.

Creating More Loops and Sequencing

Recording additional instruments and structuring the song.

Sampler Overview

Loop Tracks Explained

How to set tracks to loop and their functions.

Assigning Drum Loops to Tracks

Assigning Loops from SD Card

Steps to load and assign loops from the included SD card.

Setting Loops

Setting a Track to Loop

Enabling loop playback for individual tracks.

Setting the Loop Interval

Setting Loop Start Point and Length

Procedure for defining loop start and end.

Changing Audio Tempo (Time-Stretching)

Time-Stretching Procedure

Steps to change audio tempo without altering pitch.

Trimming Unnecessary Audio Parts

Trim Audio File Procedure

Steps to set start/end points and remove excess data.

Track Sequencer Overview

Arranging Patterns and Loops for Songs

How the sequencer organizes tracks for playback.

Creating a Sequence

Real-time Sequence Creation

Recording sequence data by playing pads in real-time.

Step Input for Sequence Creation

Step Input Procedure

Entering sequence data one step at a time.

Inserting and Deleting Beats

Inserting;Deleting Beats Procedure

Steps to add or remove beats in a sequence.

Overview of Effects

Insert Effects Explained

Describes insert effects and their placement options.

Send-Return Effects

Send-Return Effects Routing

How send-return effects are routed and adjusted.

Selecting Effect Patches

Effect Patch Selection Procedure

Steps to choose and enable insert or send-return effects.

Editing Effect Patches

Editing Effect Modules

Turning effect types on/off and adjusting parameters.

Adjusting Effect Parameters

Parameter Adjustment Procedure

How to set individual parameter values.

Saving Effect Patches

Saving Patches Procedure

Steps to save custom effect patches.

Importing Effect Patches

Importing All Patches

Copying all patches from another project.

Importing One Patch

Copying a specific patch from another project.

Using Effects for Monitoring

Monitoring Effect Setup

Applying insert effects only to the monitoring signal.

Project Protection and Selection

Protecting a Project

Preventing accidental saving or deletion of a project.

Selecting a Project

Loading existing projects from the SD card.

Copying Projects and Audio Files

Copying a Project

Creating a duplicate of an existing project.

Changing Project and File Names

Changing Project Name

Procedure to rename projects and their folders.

Changing Audio File Name

Procedure to rename individual audio files.

Deleting Projects and Audio Files

Deleting a Project

Removing a project and its associated files.

Dividing Audio Files

Dividing Audio File Procedure

Splitting a single audio file into two.

Recording Format and Mode Settings

Sequential Project Playback

Loading Audio Files from Other Projects

USB Connection Overview

Exchanging Data with Computer

Card Reader and Disconnection

Audio Interface and Control Surface Setup

USB Connection and Disconnection Procedures

Changing SD Card While Powered

SD Card Formatting and Capacity Check

Using a Footswitch

Firmware Checking and Upgrading

Effect Types and Parameters 1

Effect Types and Parameters 2

Effect Types and Parameters 3

Effect Types and Parameters 4

Effect Types and Parameters 5

Effect Types and Parameters 6

Effect Types and Parameters 7

Effect Types and Parameters 8

Effect Types and Parameters 9

Effect Types and Parameters 10

Effect Types and Parameters 11

Error Message List

Troubleshooting Common Problems

Playback and Recording Issues

Solutions for sound, fader, input, and recording errors.

Effects and Other Operational Issues

Troubleshooting effects, saving, and project errors.

Specifications

Zoom R8 Specifications

General IconGeneral
Sample rate96 kHz
Audio quality24 bit
Microphone input impedance1000 Ω
USB 2.0 ports quantity1
Product colorBlack
Weight and Dimensions IconWeight and Dimensions
Weight780 g
Dimensions (WxDxH)257 x 190 x 51 mm

Related product manuals