The drain saddle should always be installed above (before) the trap
and on the vertical or horizontal tailpiece. Never install the drain saddle
close to the outlet of a garbage disposal because plugging of the RO
drain line may occur. (See Fig. 4)
1) Remove backing on foam seal and place over hole on threaded half
of the drain saddle. Place drain saddle at the selected location and
mark the pipe through the threaded opening.
2) Drill a 1/4” hole at the marked location through one side of the
drain tailpiece.
3) Position both halves of the drain saddle on the drain pipe so that the
threaded opening is lined up with the hole in the drain pipe.
4) Use the screws and nuts to clamp the drain saddle onto the
drain pipe. Make sure that there is equal space between saddle
halves on each side. Do not overtighten (See Fig. 5).
5) Screw in elbow and orient toward the RO faucet.
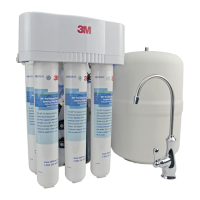
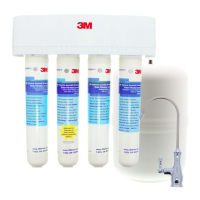
J. INSTALL THE FILTRATION ASSEMBLY AND STORAGE TANK
Undercounter Installation:
The filtration assembly is usually mounted to the right or the left
side wall inside of the sink cabinet, taking into consideration the space
available and the tank location. Generally, the storage tank is placed in
the rear of the sink cabinet while the filtration assembly is positioned
toward the front for replacement filter accessibility.
Install screws and washers halfway, so you can easily slip the
bracket to wall before firmly setting screws. NOTE: If you are mounting
onto sheetrock or drywall, use anchors or screws (not included).
NOTE: It is essential that the filters be installed in the correct location.
Use the icon coded labels to match the replacement filters with their
corresponding filter heads.
STEP 1: Cut open the sealed plastic bag and remove the RO membrane
module.
STEP 2: Remove the white plug from the fitting at the bottom of the
module by pushing in the small white collet and pulling out the plug
simultaneously.See“UsingPush-inFittings”onpreviouspage
STEP 3: Remove the sanitary protective cap from the top of the module.
STEP 4: Connect the red SFC reject tubing by inserting it into the fitting
as far as it will go, located at the bottom of the RO membrane module.
Line up the module ears (See Fig 7), insert the module and push it into
the head until it is fully seated. Twist the module 1/4 turn to the right to
lock it into place. The final orientation should be such that the module
fitting is located towards the rear.
STEP 5: Install remaining replacement filters into their respective filter
heads using the icon coded labels, matching the replacement filters with
their corresponding filter heads (See Fig 9).
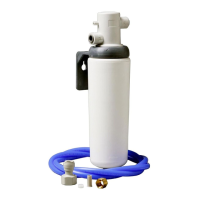
To mount the filtration assembly, elevate it at least 2” (5 cm) off
of the cabinet floor and, while keeping it level, mark the location of the
mounting holes on the cabinet side wall. Make small pilot holes with an
awl or a drill and screw in the two mounting screws; leaving just enough
protruding to allow the bracket mounting slots to slide over them.
NOTE: If the cabinet side walls are not of solid construction, the
filtration assembly can be set on the cabinet floor and held against the
side wall with the mounting screws. However, the filtration assembly
will then need to be lifted from the mounting screws in order to remove
the replacement filters.
The storage tank may be oriented either vertically or horizontally. It is
generally placed to the rear of the cabinet but can be set in the front
center (between the sink basins) for ease of access if space permits.
K. MAKE THE TUBING CONNECTIONS
With all of the components in place, the tubing connections can
be made. When routing the tubing between the components, several
guidelines should be observed.
• Tubingrunsshouldgenerallyfollowthecontourofthecabinet
rather than interfere with the cabinet storage area.
• Striveforaneatandorderlytubing“flow”byusingfasteners(e.g.
insulated staples) to secure the tubing.
• Arrangethetubingsothattherearenosharpbends.Leavesome
“play” in the tubing for ease of servicing, then cut the tubing to the
desired length.
• Trytokeepthetubingfromthefiltrationassemblytothetank
and faucet as short as practical for good flow.
Undercounter Installation:
The filtration system will use 1/4” orange, 1/4” green, 3/8” blue,
3/8” black and 3/8” yellow tubing supplied with the system.
1) The 1/4” orange tubing should have already been connected to
the feedwater connection under Section G. Insert the other end into
the “Feed” connection labeled on the filtration system (right side).
2) Attach the 1/4” x 3/8” union to 1/4” blue tubing on faucet.
3) Insert one end of the 3/8” blue tubing into the “Faucet” connection
labeled on the filtration system (left side), and the other end into
the 1/4” x 3/8” union per Step 2.
4) Connect the 3/8” black tubing from the air gap faucet to the
drain saddle so that it slopes continuously downward without any
loops or low spots. Cut the tubing to the proper length and connect
it to the drain elbow.
5) Insert one end of the 3/8” yellow tubing into the “Tank”
connection labeled on the filtration system, and the other end into
the tank valve.
6) Route the special red SFC tubing with 1/4” union connector from
the RO membrane module to the 1/4” green tubing connected
to the faucet. Do not cut this special SFC tubing. It’s length is
important to maintain proper efficiency and performance.
L. START UP THE SYSTEM
1) Double check to see that all of the connections are secure.
2) Open the cold water feed valve and check the system for
leaks. If any leaks are detected, close the valve and correct the
problem before proceeding. NOTE: If a leak occurs at a “Push In”
plasticfitting,thenrefertopage7,“UsingPush-InFittings”.
3) Lift the faucet handle and open the storage tank valve until a
steady stream of water flows. Close the faucet, wait at least five (5)
minutes and carefully check for leaks. Correct them as necessary.
M. FLUSH THE SYSTEM AND CHECK OPERATION
1) With the tank valve closed (the tank should still contain the
sanitizing solution at this point), open the faucet (set the faucet
handle in the “up” position) and feedwater valve. Water should
begin to drip from the faucet within several minutes. Continue
to flush the system for 24 hours. Water will steadily drip from
the faucet at the time. During this procedure, the tank is being
intentionally bypassed in order to thoroughly sanitize the tank and
also flush the membrane of any sanitizers.
2) After flushing for 24 hours, shut off the faucet. Open the tank valve,
lift the faucet handle again and allow the tank to completely empty.
When the water begins to drip steadily from the faucet the tank
should be empty.
3) Close the faucet and reinspect the system for leaks. Allow the tank
to fill completely (it will take approximately 4 hours), then drain the
tank again. The water should be discarded because it may contain
small amounts of sanitizer or sanitizing solution.
4) The system should be ready to use as soon as the tank refills.
If any objectionable taste is noticed after the second tankful is
drained, drain the tank the following day.
8
 Loading...