stethoscope utilizes a unique design for
attaching the eartip to the eartube. The eartips
are pushed on to the end of the eartube and
snapped firmly into place. To remove, pull
firmly on the eartip.
Headset Adjustment:
Your Littmann
stethoscope is designed to
provide a comfortable,
acoustically sealed ear fit.
Notice that the ear tubes
are set to accommodate
the typical anatomy of the
ear canal. The eartips
should point in a forward
direction as you insert
them into your ear canals.
To reduce spring tension
in the headset, hold each
ear tube at the bend near
the eartip and gradually
pull apart until fully
extended.
To increase spring
tension, grasp the headset
with one hand where the
ear tubes enter the plastic
tubing and squeeze until
the plastic tubing on one
ear tube touches the other.
Repeat as necessary.
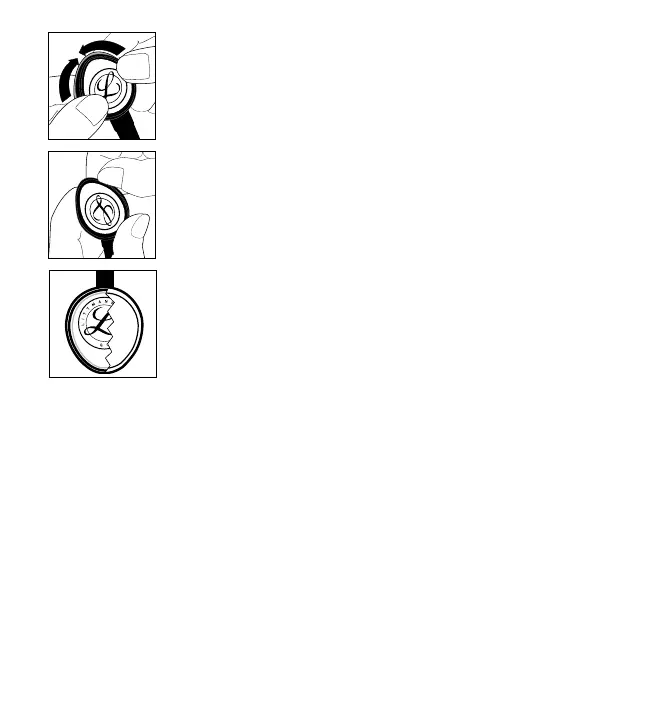
Removing the Diaphragm and
Cleaning the Chestpiece:
With the diaphragm side
up, push the rim at one
point with both thumbs
and roll the rim off the
edge of the chestpiece.
Remove the diaphragm
from the rim and clean
parts in soapy water or
wipe with alcohol. Wipe chestpiece surfaces
with alcohol or soapy water. Dry all parts and
surfaces thoroughly before reassembly.
Assembly and Replacement of the
Diaphragm:
Using your fingertip,
apply a small amount of
talcum powder to the
inside surface of the
flexible edge of the
diaphragm then align the
rim and diaphragm as a
unit. This will facilitate
assembly and maintain
smooth and quiet
low/high frequency
alternation. Snap the
diaphragm with your
fingers to remove excess
talcum powder. Insert
the flexible edge of the
diaphragm into the
groove of the rim. This
is best accomplished by
starting with the rim
positioned above the
legible side of the
diaphragm. Visually
3
N
N
A
M
T
T
I
L
Q
U
A
L
I
T
Y
TM
N
N
A
M
T
T
I
L
Q
U
A
L
I
T
Y
N
N
A
M
T
T
I
L
Q
U
A
L
I
T
Y
TM
38-9018-0777-6 11/7/03 1:16 PM Page 5
Y
I
L
Q
U
A
N
N
A
M
T
T
L
I
T
N
N
A
M
T
T
T
I
L
Q
U
A
L
I
Y
TM
examine the ring to
ensure that the flexible
edge is smoothly engaged
inside the rim. Refer to
illustration for correct
assembly of the non-chill
rim and diaphragm. If
necessary, flex the
assembly by pinching the
outer rim edge between
the thumb and fingers.
To attach the
rim/diaphragm assembly
to the chestpiece, engage
the groove of the rim
(with the diaphragm
attached) around the
chestpiece at one point
and hold it in place with
your thumbs. Slowly roll
the rim around and over
the chestpiece edge using
both thumbs, moving in opposite directions
around the chestpiece. Visually inspect the
edge where the diaphragm engages the rim for
uniform containment. Minor adjustments may
be made by slightly pulling and rolling the rim
away from the diaphragm, allowing the
diaphragm to slip into position.
Littmann Stethoscope Service and
Warranty Program:
Your Littmann stethoscope comes with the
finest service and warranty policy in the
industry. The Littmann Lightweight
Stethoscope is warranted against any defects in
material and workmanship for a period of two
(2) years. If a material or manufacturing defect
is discovered during the warranty period,
repairs will be made without charge upon the
return of the instrument to 3M, except in cases
of obvious abuse or accidental damage.
For maintenance or repair services, write a
short note explaining the repair or service you
require, include your name, address and phone
number and send your stethoscope directly to:
3M Health Care Service Center
Bldg. 502, Suite 200
Oakdale, MN 55128
1-800-292-6298
3M Health Care Service Center
80 Enterprise Drive South
Canada N6N1C2
1-800-563-2921
Outside of the U.S. and Canada please contact
your local 3M subsidiary for maintenance and
repair information.
4
 Loading...