EasyManua.ls Logo

3M Ranger User Manual

3M Ranger
4 pages
To Next Page IconTo Next Page
Page #1 background imageLoading...
Page #1 background image
ii
I I
3M
Ranger
Pressure Infusor
Quick
Start Guide
Refer to the Operator’s Manual for warnings, instructions and
other information related to this product.
Instructions For Use
1. Locate the main power switch on the
underside of the base of unit (as shown).
Turn the unit ON.
2. Verify pressure range visual alerts (“Low”,
“High”, “In Range”) on control panel turn ON.
After two seconds, turn off.
3. Verify Start/Stop button indicators on control
panel change to Standby mode (amber).
3M
Ranger
Pressure Infusor
Start/Stop buttons
Low
High
Low
High
In Range In Range
300 mmHg
4. Prepare warming unit, warming set and spike
uid bags.
5. Open pressure infusor door and slide fluid
bag into infusor chamber ensuring bag port
and spike hang below the metal retaining
ngers.
6. Securely close and latch the pressure infusor
door.
Power entry
module
Main power
switch
Question and Answer IconNeed help?

Do you have a question about the 3M Ranger and is the answer not in the manual?

3M Ranger Specifications

General IconGeneral
Brand3M
ModelRanger
CategoryMedical Equipment
LanguageEnglish

Summary

Instructions For Use

Power Switch and Initial Checks

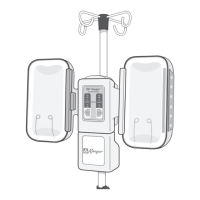
Locate main power switch, turn ON, verify visual alerts and standby mode indicators.

Fluid Bag Preparation and Loading

Prepare warming unit, set, fluid bags, and load bag into infusor chamber.

Operating the Pressure Infusor

Starting Infusion

Press Start/Stop to turn infusor chamber ON, wait for 'In Range' LED, and open clamps for flow.

Stopping Infusion

Press the Start/Stop button to turn the pressure infusor chamber OFF when fluid bag is depleted.

Troubleshooting

Standby/ON Mode Issues

Addresses conditions where nothing illuminates or power LED status lights do not illuminate.

Pressure Infusor Not Working

Covers power connection, unit ON status, and general unit failure for the pressure infusor.

Indicator Alarms and Fluid Issues

Addresses low/high indicator alarms, fluid leakage, and bladder deflation problems.

Safety and Precautions

General Warnings

Warnings about tipping, device damage, and infusing fluids with air bubbles.

Usage Cautions and Notices

Cautions on mounting height, product design, sterilization, and cleaning procedures.

Related product manuals