5
GB
3M™ PELTOR™ Comtac XPI
3M™ PELTOR™ Comtac XPI is a hearing protector with level-dependent function for
ambient listening and input for external equipment. Differences in available features may
appear on specic models. Read these instructions carefully before use and save for
future reference.
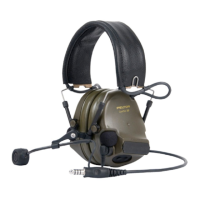
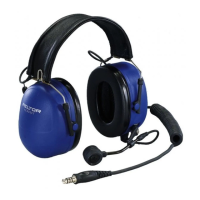
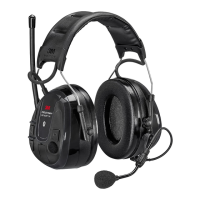
1. COMPONENTS
A:1 Foldable headband (stainless steel sheet, leather)
A:2 Cup supporting arm (stainless steel)
A:3 Two-point fasteners (POM)
A:4 Cup
A:5 Battery lid
A:6 Microphone for level-dependent function for ambient listening
A:7 Damping pad (PUR foam)
A:8 Ear cushion (PVC foil, PUR foam)
A:9 Speech microphone input (J22) (only specic models)
A:10 External input cable (PUR) (only specic models)
A:11[-] button
A:12 [+] button
A:13 Bone conduction microphone (only specic models)
A:14 Speech microphone (TPE, PC) (only specic models)
A:15 Neckband (stainless steel, TPO)
2. FITTING AND ADJUSTMENT
Note! Brush aside hair around your ears so the ear cushions (A:8) t snugly. Spectacle
frames should be as thin as possible and t close to the head to minimize acoustic leakage.
2:1 Foldable headband (Fig. B)
(B:1)(B:2) Slide out the cups and tilt the top of the cup out, as the cable must be on the
outside of the headband.
(B:3) Adjust the height of the cups by sliding them up or down while holding the head-
band in place.
(B:4) The headband should be positioned across the top of your head.
2:2 Neckband (Fig. C)
(C:1) Place the cups in position over the ears.
(C:2) Keep the headset in position and place the head strap on top of your head and
lock it tight in position.
(C:3) The head strap should be positioned across the top of your head.
2:3 Speech microphone (Fig. D)
For maximum noise cancelling, the speech microphone should be positioned close to
your mouth (<3 mm).
2:4 Bone conduction microphone
The bone conduction microphone (A:13) should be positioned between your jaw bone and
chin bone for best performance.
3. USAGE/FUNCTIONS
3:1 Inserting batteries
Remove the battery compartment lids and insert the batteries (2xAAA). The battery polarity
must correspond to the marking in the battery compartment. The lids must be pressed all
the way down to ensure good seal. Low battery level is indicated by a ghost voice message
“low battery”, repeatedly.
3:2 Switching the headset on and off
Press and hold the [+] or [-] button for two seconds to switch the headset on or off. The
current setting is always saved when the headset is switched off, except when in ear-plug
mode. The headset is automatically powered off after two hours of inactivity. This is indi-
cated by a ghost voice message during the last minute before the headset switches off.
 Loading...