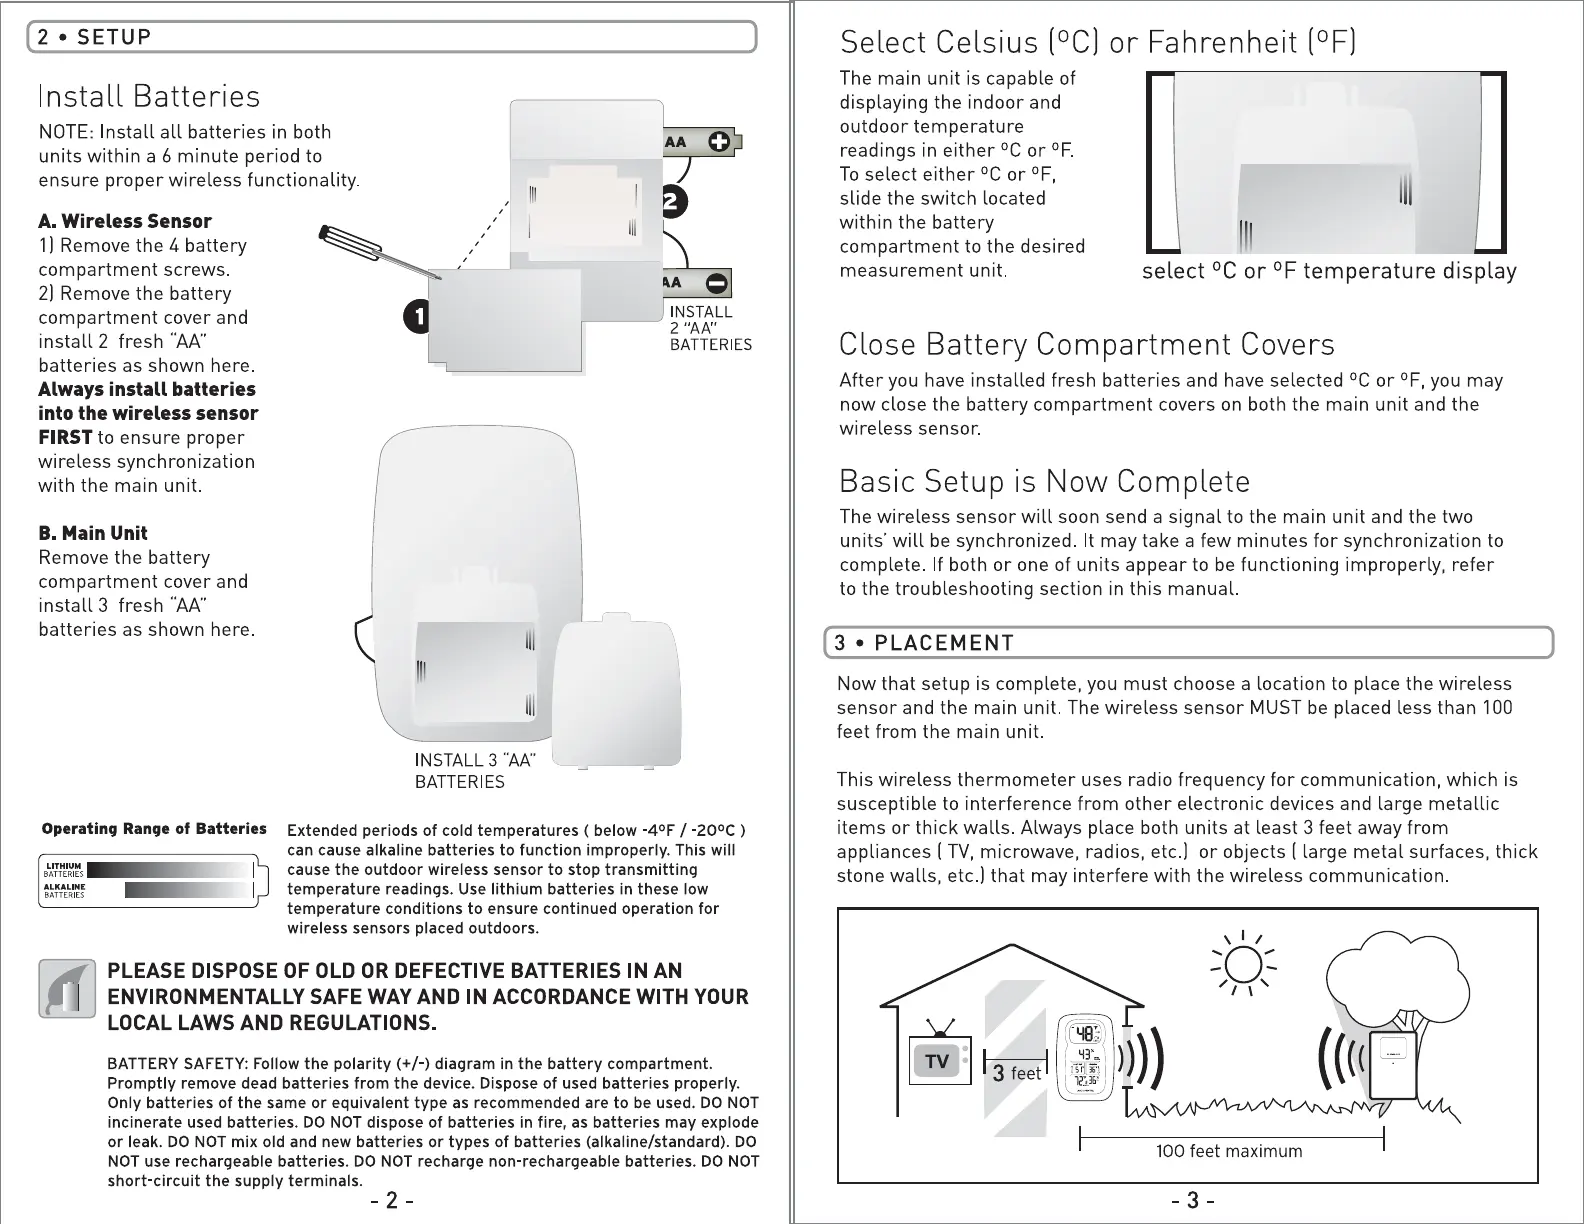
(2 • SETUP
)
Install
Batteries
NOTE
: Install
all
batteries
in
both
0
units within a 6 minute period to
ensure proper wireless functionality.
A.
Wireless Sensor
1]
Remove the 4 battery
,•
compartment screws.
2]
Remove the battery
/
©
REMOVE
4
SCREWS
compartment cover and
TO
OPEN
BATTERY
2 "AA"
COMPARTMENT
install 2 fresh
"AA"
batteries as shown here.
,/
@
\.
@
BATTERIES
Always install batteries
into the wireless sensor
FIRST
to ensure proper
wireless synchronization
with the main unit.
B.
Main
Unit
Remove the battery
compartment cover and
install 3 fresh
"AA"
batteries as shown here.
INSTALL
3
"AA
"
BATTERIES
Operating Range of Batteries
Extended periods of cold temperatures ( below -4°F /
-20°c
)
can
cause alkaline batteries
to
function improperly. This will
B~rr~~~
s
0-f
ii
ii-h
M
(70GC)
158°F
I
cause the outdoor wireless sensor
to
stop transmitting
:~~~
I
~~
@Q
ffl
(10DC)158°F
I
temperature readings.
Use
lithium batteries in these low
temperature conditions
to
ensure continued operation
for
wireless sensors placed outdoors.
PLEASE
DISPOSE
OF
OLD
OR
DEFECTIVE
BATTERIES
IN
AN
ENVIRONMENTALLY
SAFE
WAY
AND
IN
ACCORDANCE
WITH
YOUR
LOCAL
LAWS
AND
REGULATIONS.
BATTERY
SAFETY
:
Follow
the polarity(+/-)
diagram
in
the
battery compartment.
Promptly
remove
dead
batteries
from
the
device.
Dispose
of
used
batteries
properly.
Only
batteries
of
the
same
or
equivalent type
as
recommended
are
to
be
used.
DO
NOT
incinerate
used
batteries.
DO
NOT
dispose
of
batteries
in
fire,
as
batteries
may
explode
or
leak.
DO
NOT
mix
old
and
new
batteries
or
types
of
batteries (alkaline/standard).
DO
NOT
use
rechargeable batteries.
DO
NOT
recharge
non-rechargeable batteries.
DO
NOT
short-circuit the
supply
terminals.
- 2 -
Select Celsius (°C]
or
Fahrenheit
(°F]
The
main unit is capable of
displaying the indoor and
outdoor temperature
readings
in
either
0
c
or
°F.
To
select either
0
c
or
°F,
slide the switch located
within the battery
compartment to the desired
measurement unit.
select
°C
or
°F
temperature
display
Close
Battery
Compartment
Covers
After
you
have
installed fresh batteries and
have
selected
°C
or
°F,
you
may
now close the battery compartment covers
on
both the main unit and the
wireless sensor.
Basic Setup is Now Complete
The
wireless sensor
will
soon send a signal to the main unit and the two
units·
will
be
synchronized . It may take a few minutes for synchronization to
complete. If both
or
one of units appear to
be
functioning improperly, refer
to the troubleshooting section
in
this manual.
( 3 • PLACEMENT
)
Now that setup is complete,
you
must choose a location to place the wireless
sensor and the main unit.
The
wireless sensor
MUST
be
placed less than
100
feet from the main unit.
This wireless thermometer uses radio frequency
for
communication, which is
susceptible to interference from other electronic devices and large metallic
items
or
thick walls. Always place both units at least 3 feet away from
appliances (
TV,
microwave, radios, etc.]
or
objects ( large metal surfaces, thick
stone walls, etc.] that may interfere with the wireless communication.
\ I /
-
--o
...
-
/ I
\'
100 feet
maximum
- 3 -
 Loading...