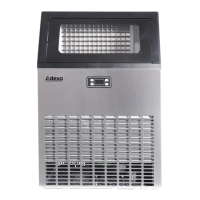
This document is an instruction manual for an Adexa Automatic Ice Maker, model HZB-120F, designed for catering equipment. It provides comprehensive information on the appliance's function, technical specifications, usage, and maintenance.
Function Description
The Adexa HZB-120F is an automatic ice maker designed to produce ice cubes. It operates by continuously circulating water over an evaporator plate, where ice forms. Once the ice reaches the desired thickness, a harvest cycle is initiated to release the ice into a storage bin. The unit features an automatic self-cleaning program and various sensors to monitor environmental temperature, water levels, and ice fullness, ensuring efficient and safe operation. It is intended for use in household and similar applications, including staff kitchens, farmhouses, hotels, motels, bed and breakfast establishments, and catering services.
Important Technical Specifications
- Model: HZB-120F
- Power Supply Voltage: 1 Phase, 220-240V/50Hz
- Climate Class: SN/N/ST/T
- Electrical Protection Class: I
- Ice Making Rating (Amps): 3.0Amp
- Ice Harvest Rating (Amps): 3.4Amp
- Ice Making Capacity (KG/24H): 120kg/24Hour (tested at 21°C room temperature and 10°C water temperature)
- Refrigerant Charge: R290, 100g
- Net Weight (KG): 40kg
- Vesicant: C5H10
- Unit Dimensions (W X D X H) (mm): 556 x 435 x 832
- Connection:
- Power Cord: 0.75 mm²
- Water Supply: 6.35mm diameter
- Drain: Φ 16 SYLPHON BELLOWSS (REAR)
- Water Consumption (L/24H): 100L (for 120kg/24H capacity) or 130L (for higher capacity, not explicitly stated but implied by two values)
- Max Ice Storage Capacity (KG): 22Kg
- Accessories: Shovel, Installation Kits (including 3-meter white water drain pipe, water quick connector for faucet, 3-meter 6.35mm diameter white water supply pipe)
- Running Conditions:
- Room Temp: 10-38°C
- Water Supply Temp: 5-35°C
- Water Supply Pressure: 0.04-0.6 MPa
Usage Features
- Operation Panel: Features "TIMER CLEAN" and "ON/OFF" buttons, along with "+" and "-" buttons for adjustments.
- LCD Display Window: Shows environmental temperature (in °F), ice-making time countdown (in M), ice-making/de-icing status (rotating/flashing symbols), automatic self-cleaning symbol, on/off symbol, error codes (E1 for sensor damage, E2 for anomaly/refrigerant leak), water flow/shortage indicators, ice full alarm, and timing/ice-making time settings.
- Starting Up: Plug in, press "ON/OFF". The machine will automatically add water and begin ice production.
- Ice Thickness Adjustment: Use "+" and "-" buttons to adjust ice-making duration (1 minute per press) to control ice thickness. Default setting is "0".
- Timing Setting: Press "TIMER CLEAN" once to enter Timer setting program. Use "+" and "-" buttons to set delay time (1 hour per press) for automatic shutdown or startup. Range: 1-24 hours.
- Automatic Self-Cleaning Program: Press "TIMER CLEAN" for more than 5 seconds to activate. The program runs for 20 minutes, with the water pump cycling on and off. The "CLEAN" light will be on, and the display will show the remaining time. Can be cancelled by pressing "ON/OFF".
- Forced Ice Harvest: During ice making, press "ON/OFF" for more than 5 seconds to force an ice harvest cycle, useful for removing stuck ice.
- Safety Features: The appliance must be earthed and connected to a proper 220-240V/50Hz power supply. It is recommended to use a separate circuit. Ventilation openings must be clear. The refrigerant circuit should not be damaged.
Maintenance Features
- Unpacking and Initial Cleaning: Remove packaging, check accessories, clean inner cabinet and ice scoop with a wet cloth. Allow 4 hours for refrigerant to settle before plugging in.
- Water Connection:
- Connect the white water supply hose to the unit's water inlet port using the provided quick connector and clipper.
- Connect the white drainage pipe to the unit's water draining port and then to the main water drainage pipeline.
- Connect the water supply hose to the customer-supplied water faucet using the provided quick connector.
- General Cleaning (Before First Use & Regular):
- Open the ice door.
- Clean with diluted detergent, warm water, and a soft cloth.
- Repeatedly clean water-contacting inner parts.
- Drain cleaned water from the water tank (by pulling out pipe "H") and then from the unit's main drain port ("7"). Reinstall pipes and caps.
- Discard the first batch of ice after cleaning.
- Clean the exterior regularly with mild detergent and warm water.
- Dry interior and exterior with a clean soft cloth.
- Long Storage Preparation:
- Ensure all ice cubes are ejected.
- Turn off, unplug, and shut off main water supply.
- Disconnect water supply hose.
- Drain all water from the water tank and main drain port. Reinstall pipes and caps.
- Disconnect water drain pipe.
- Leave door open to prevent mold.
- Dry interior and exterior.
- Cover with a plastic bag.
- Interior Cleaning (Ice Storage Bin):
- Sanitize occasionally, especially before first use or after extended storage.
- Disconnect power.
- Wipe interior with a sanitizing solution (28g household bleach/chlorine + 7.5L hot water).
- Rinse thoroughly with clear water; waste water will drain out.
- Reconnect power.
- Wash ice scoop regularly.
- Ice Making Parts Cleaning:
- Periodically clean the water tank and other inner parts.
- Specifically clean the water dividing pipe on the evaporator if water flow is poor. Disassemble, clean small holes, and reinstall.
- If ice cubes are stuck on the evaporator, use the forced ice harvest function (press "ON/OFF" for >5 seconds) instead of mechanical force.
- Clean the water tank and ice-full detecting plate with neutral cleaner and water, then rinse with clean water. Drain water from the tank.
- Ice Making Assembly System Cleaning (Using Nu-Calgon Nickle Safe Ice-machine Cleaner):
- Recommended every 6 months for hard water areas.
- Turn off, keep connected to water supply/drain, but shut off main water faucet.
- Remove all ice.
- Prepare cleaning solution: 300ml Nu-Calgon Nickle Safe Ice-machine Cleaner + 2.8L warm water (50-60°C). Wear gloves and safety goggles.
- Pour one cup of solution into the water tank. Wait 5 minutes.
- Turn on, press "TIMER CLEAN" for >5 seconds to start the 30-minute self-cleaning program.
- After 30 minutes, drain the solution from the water tank and lower ice storage bin. Shake unit to ensure complete drainage. Reinstall drain pipe.
- Repeat steps 4-6 to clean again.
- Open main water faucet. Press "TIMER CLEAN" for >5 seconds to run another 30-minute self-cleaning program for rinsing.
- After rinsing, drain water again. Repeat rinsing (steps 8-9) two more times.
- Clean the ice storage bin.
- Return to regular ice making mode. Discard the first batch of ice.
- Cleaning Suggestion:
- Daily: Clean ice shovel, door, and water dividing pipe. Rinse shovel, wipe door.
- Semi-Monthly: Clean ice shovel, ice bin, water tank, ice-full detecting plate, and evaporator surface.
- Semi-Annual: Clean all water/ice-exposed components (ice storage bin, water tank, door, evaporator, water pump, silicone tube, water dividing pipe) using Nu-Calgon Nickle Safe Ice-machine Cleaner by a serviceman.