T
thenryAug 13, 2025
Why is the “ICE-FULL” symbol on my Adexa HZB-30F?
- MMatthew VargasAug 13, 2025
The “ICE-FULL” symbol is illuminated because the ice storage bin is full. To resolve this, simply remove some of the ice cubes from the bin.
Why is the “ICE-FULL” symbol on my Adexa HZB-30F?
The “ICE-FULL” symbol is illuminated because the ice storage bin is full. To resolve this, simply remove some of the ice cubes from the bin.
What to do if my Adexa Ice Maker cycle is normal but no ice is produced?
If your Adexa Ice Maker completes its cycle but doesn't produce ice, it could be due to a high ambient or water temperature. Try moving the unit to a location where the temperature is below 32°C and use colder water in the tank. If this doesn't resolve the issue, it may require professional maintenance.
Why are the ice cube shapes irregular in my Adexa Ice Maker?
Irregular ice cube shapes in your Adexa Ice Maker can result from poor water quality or a dirty water tank. Clean the water tank and replace the water. Also, partially blocked holes on the water dividing pipe can cause this issue. Ensure all nine holes are clear.
Why is the ice cube transparency poor in my Adexa HZB-30F?
If the ice cubes from your Adexa Ice Maker aren't very transparent, it's likely due to poor water quality. Try using a water filter or purifier to soften or filter the water before using it in the ice maker.
Why are the ice cubes very thin in my Adexa Ice Maker?
Thin ice cubes in your Adexa Ice Maker are often caused by a high ambient temperature. Try moving the unit to a cooler location or extending the duration of each ice-making cycle. Poor air circulation around the unit can also contribute to this issue. Ensure there is at least 20 cm of free space around the back and front of the unit.
What to do if the water pump works but no water flows from the dividing pipe in my Adexa HZB-30F Ice Maker?
If the water pump in your Adexa Ice Maker is working, but no water flows from the water dividing pipe, it's likely that the small holes on the pipe are blocked. Clean these holes to ensure proper water flow.
Why doesn't the water circulation pump work in my Adexa HZB-30F Ice Maker?
If the water circulation pump in your Adexa Ice Maker isn't working, it could be due to some substance blocking the pump blade in the water tank. Clean both the water tank and the water pump to resolve this issue.
Why are the ice cubes too thick in my Adexa HZB-30F?
If the ice cubes produced by your Adexa Ice Maker are too thick, it's likely because the ambient temperature is too low. Try reducing the duration of each ice-making cycle.
Essential safety guidelines for operating the ice maker, covering usage, power, and general handling.
Details warnings on earthing, ventilation, refrigerant, user qualifications, and flammable materials.
Explains wire color coding for safe electrical connection to the appliance.
Provides physical dimensions, connection types for water and drain, and power cord details.
Details model, voltage, current, ice making capacity, refrigerant, and operating conditions.
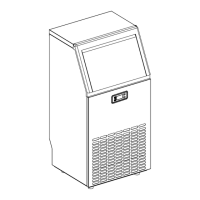
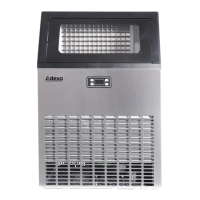
Identifies and describes the main external parts of the ice maker unit.
Lists and details internal components for ice production and water management.
Explains the symbols, indicators, and digital displays on the control panel.
Describes the functions of the LED light, Timer/Clean, and ON/OFF buttons.
An exploded view diagram with numbered parts for identifying ice maker components.
Details the operation of the ON/OFF, '+', and '-' buttons for controlling the ice maker.
Instructions for removing packaging, checking accessories, and initial cleaning before operation.
Specifies optimal placement, clearance, and environmental conditions for installing the unit.
Details the mandatory earthing, power supply, and grounding methods for safe electrical connection.
Recommends thorough cleaning of the ice maker before its initial operation.
Step-by-step guide on how to connect the water supply hose to the unit.
Instructions for connecting the water drainage pipe and connecting water hose to faucet.
Visual chart explaining the steps of the ice making cycle from standby to ice harvest.
Explains symbols for water supply, ice cube making, ice harvest, temperature, and timer.
How to use '+' and '-' buttons to adjust ice-making duration for ice cube thickness.
How to start, cancel, and duration of the automatic self-cleaning program.
Guides on setting ON-Timer and OFF-Timer, and how to cancel them.
How to turn on/off the internal LED light and change temperature units.
Explains error codes E1 and E2, and how to force ice harvest.
Instructions for draining water from the ice storage bin and water tank.
Describes common sounds produced by the ice maker during operation.
Steps to follow when the ice maker will not be used for an extended period.
Safety precautions and general advice for cleaning and maintaining the appliance.
Instructions for cleaning the external surfaces of the ice maker.
How to sanitize and clean the ice storage bin.
Guides on cleaning the water dividing pipe and other internal ice-making components.
How to clean the water tank and ice-full detecting plate for hygiene.
Instructions for using a specific cleaner for the ice-making assembly system.
Details on mixing the cleaner and applying it to the ice making system.
Steps to run the self-cleaning program using the specialized cleaner.
Recommended cleaning intervals and methods for different parts of the ice maker.
Visual representation of the electrical connections and components of the ice maker.
Lists common issues, possible causes, and solutions for operating problems.
Details the terms, conditions, and coverage period of the product warranty.
Guidance on environmentally responsible disposal of the appliance at the end of its life.
This document provides comprehensive instructions for the Adexa Automatic Ice Maker, Model HZB-30F, designed for catering and similar applications. It emphasizes safety, proper installation, operation, and maintenance to ensure optimal performance and longevity of the appliance.
The Adexa Automatic Ice Maker is designed to produce ice cubes automatically with a continuous water supply. It features an ice-making evaporator, a water tank for circulation, and a water pump to facilitate the ice-making process. The unit is equipped with sensors to detect when the ice storage bin is full, automatically stopping production to prevent overflow. It also includes an automatic self-cleaning program to maintain hygiene and efficiency. The ice maker is designed for indoor use and requires a stable, level surface for operation. It uses R290 refrigerant and C5H10 vesicant, highlighting its modern design and adherence to environmental standards.
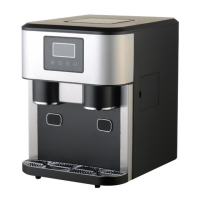
The ice maker offers a user-friendly operation panel with an LCD display window that provides real-time information about the unit's status.
The LCD display shows:
The unit supports both ON-Timer and OFF-Timer settings, with a range of 1-24 hours and a default of 1 hour.
The ice maker requires a continuous supply of potable water with a pressure between 0.04-0.6 MPa. It comes with a white water supplying hose and a quick connector for easy installation to a water faucet. A pressure-decreasing valve may be needed if the water pressure is too high. The unit also includes a white drain pipe for water drainage.
Regular cleaning and maintenance are crucial for the ice maker's efficiency, hygiene, and long life. The manual provides detailed instructions for both daily and periodic cleaning.
Before the first use, the ice maker must be thoroughly cleaned. This involves:
The unit has two drainage points:
The door and cabinet should be cleaned regularly with a mild detergent solution (28g dish soap in 7.5L warm water) and a soft cloth. Abrasive cleaners and solvents should be avoided. The side steel plate, if discolored by chlorine gas, should also be cleaned with a mild detergent.
The ice storage bin should be sanitized occasionally, especially before first use and after extended periods of inactivity.
This involves cleaning the water tank and the water dividing pipe on the evaporator. If water flow from the dividing pipe is minimal or absent, it indicates a blockage.
The unit features an automatic self-cleaning program that lasts 20 minutes. It can be initiated by pressing the "TIMER/CLEAN" button for more than 5 seconds. During this program, the "A" symbol is displayed, and the remaining time is shown. The program rinses the water dividing pipe, evaporator, water pump, silicone pipe, and water tank. The program can be canceled by pressing the "ON/OFF" button.
For thorough cleaning of mineral scale buildup, especially in hard water areas, Nu-Calgon Nickel Safe Ice-Machine Cleaner is recommended every 6 months.
This comprehensive guide ensures that users can effectively operate and maintain their Adexa Automatic Ice Maker for reliable and hygienic ice production.
| Model Number | HZB-30F |
|---|---|
| Ice Making Capacity | 30 kg/24h |
| Ice Storage Capacity | 15 kg |
| Voltage | 220-240V |
| Frequency | 50Hz |
| Ice Cube Size | 22 x 22 x 22 mm |
| Power Supply | 220-240V/50Hz |