MegaTron Quick Steps
Our cell router packages are a plug and play
setup. The controller CAT5 is connected to
the ROUTER-3 CAT5 via a coupler. Then plug
in the ROUTER-3’s electrical cord to power.
Troubleshooting (additional on back)
Step 1:
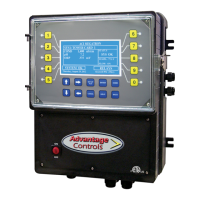
This is the RUN Screen. When the controller
is communicating with our network correctly,
there will be a steady DR (DA) code displayed.
If the code alternates DR/DL (or a steady DC)
this usually means that the cellular signal is
not strong enough. The ROUTER-3 box and
antenna may need to be relocated to an area of
regular cell reception. CAT5 cable run over 328
ft. requires a repeater or switching appliance.
Megatron
3 ALARMS! RELAYS
SYS1: Towers 1-4
COND: 0 uS/cm
pH: 3.2
ORP: 548 mV
TEMP1: 68°F
WM1: 0.0
WM2: 0.0
FLOW: ON
DR
Other codes that may be present:
NC = Talking to ICM but not connected
1,3
DR (DC) = DHCP remote connect (+WebAdv)
DA = DHCP WebAdv connection & authent.
DL = DHCP local connection
SR (SC) = Static remote connect (+WebAdv)
2
SA = Static WebAdv connection & authent.
2
SL = Static local connection
2
FL = DHCP failed local connection
3
CS = No communication card detected
4
1
Diagnostics - Only shows on startup/boot.
2
Controller assigned static IP (DHCP:O). Not used
with cellular connections. Enable DHCP as directed
in Steps 2 through 4.
3
No network detected or CAT5 cable not plugged in.
4
If a card is present and you are getting CS, check
that the comm card is properly seated into the carrier
board. This may loosen in shipment. On MG and
XS units make sure the board is seated in all the
way (with power o). On SS units make sure ribbon
cable to carrier board is plugged in correctly.
Step 2:
Push the SET UP RUN button to get this screen. From here
push CONFIGURE (Button 7) to go to the next screen.
>HOME SETUP<
SETPOINTS DATE/TIME
CALIBRATION CONFIGURE
TIMERS HISTORY
CUSTOMIZE WATER METER
ALARMS RELAYS
Step 3:
This is the Congure Screen. From here push NETWORK
(Button 8) to go to the next screen.
>CONFIGURE<
PASSWORD CONTRAST
RELAYS TEMP SCALE
NETWORK
HISTORY SYS INFO
FLOW SW FACTORY
Step 4:
This is the Network Summary Screen. This screen is
a summary of the currently assigned controller network
settings. When connected to the cellular modem, these
numbers will auto populate. Note: Any changes beyond
this point require RESET (Button 0) to be pressed and a 60
second restart countdown will begin.
>NETWORK<
DHCP
SETTINGS RESET
IP ADDR: 192.168.1.76
SUBNET MASK: 255.255.255.0
GATEWAY: 192.168.1.240
DOMAIN: DynamiCUniversal Rabbit BIO
ACI SERVER: web80.advantagecontrols.com
HOST: mycontroller
MAC: 00:90:c2:d9:ea:7c
DHCP: On
Local Mode: On
Remote Mode: On
Web Connectivity via Cell ROUTER-3 Internet
If you are getting a DR (DA) or SR (SA) and cannot see the
controller on the WebAdvantage summary screen, please
check with us to see if you have submitted the connection
sheet correctly. If you have not lled out the connection
sheet, you can do so online at...
www.advantagecontrols.com/request_webadv_connect.php