This document is the original instruction manual for the AEG AC756S air compressor. It provides essential information for assembling, operating, and maintaining the product, and is subject to technical modifications.
Function Description
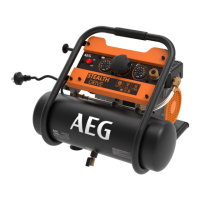
The AEG AC756S is an air compressor designed to supply pressurized air only. It is intended for operating air-powered tools and must be used indoors. It is not designed to compress any other gas.
Important Technical Specifications
The AC756S air compressor has the following key technical specifications:
- Rated motor power: 600 W
- Rated current: 2.5 A
- Air outlet: 6.35mm (1/4") NITTO style connector/coupler (suitable for NITTO fitments)
- Quick connector fitting size: 6.35 mm (1/4") BSP thread
- Weight: 16.4 kg
- Product dimensions (L x W x H): 430 mm x 380 mm x 365 mm
- Input: 220-240 V AC, 50 Hz
- Power cord length: 2 m
- Air tank capacity: 6 L
- Free air delivery: 42 L/min
- Maximum air delivery: 80 L/min at 0 bar tank pressure
- Maximum air pressure: 8 bar (116 psi)
- Working pressure range: 6-8 bar (87 - 116 psi)
- Pressure gauge: 2 pcs, 41 mm diameter
- Maximum rotational shaft speed: 1400 min⁻¹
- Operating temperature: 0-45°C
- Measured sound pressure level (LpA): 64.27 dB(A), KpA=3 dB(A)
- Measured sound power level (LWA): 74.03 dB(A), KWA=3 dB(A)
- Replacement parts: Air filter (39890001010)
Usage Features
The AC756S air compressor is equipped with several features for operation and control:
- On/off switch (1): Powers the compressor on and off. When in the ON (I) position, the compressor automatically turns on when tank pressure drops below a preset limit and shuts off when the desired pressure is reached.
- Tank pressure gauge (2): Displays the current pressure in the air tank.
- Pressure regulator knob (3): Adjusts the desired line pressure. Turning clockwise increases air pressure at the outlet, while turning counterclockwise reduces it. Turning fully counterclockwise stops the flow of air.
- Carrying handle (4): For easy transport of the unit.
- Regulated pressure gauge (5): Shows the regulated output pressure.
- Quick connect coupler (6): For attaching air hoses and tools.
- Tank (7): The 6-liter air storage tank.
- Drain valve (8): Used to drain moisture from the tank.
- Rubber foot x4 (9): Provides stability and reduces vibration.
- Safety valve (10): Automatically releases air if tank pressure exceeds the preset maximum. It can also be manually rotated counterclockwise to release pressure and clockwise to close.
- Cord wrap hook x2 (11): For neatly storing the power cord.
- Power cord (12): Connects the compressor to the power supply.
- Solenoid valve (13): Releases pressure when the compressor reaches maximum pressure. Its LED lights up when powered on.
- Air filter (14): Filters incoming air.
Operating Procedures:
- Turning On/Off: Plug in the compressor and press the on/off switch to the ON (I) position. To turn off, press the switch to the OFF (O) position.
- Attaching Air Hose/Tool: Ensure the compressor is off and unplugged, and the pressure regulator knob is fully counterclockwise with outlet pressure at zero. Attach the hose with a quick connect air fitting to the 6.35 mm (1/4 in.) quick connect coupler, pushing it fully until the sleeve locks.
- Adjusting Pressure: After turning the compressor on, rotate the pressure regulator knob to achieve the desired line pressure for the air tool. Always use the minimum pressure necessary for the application to prevent rapid tank drainage and frequent cycling.
- Disconnecting Air Hose/Tool: Rotate the pressure regulator knob fully counterclockwise until the outlet pressure is zero. Firmly hold the release end of the hose, pull back the release sleeve on the quick coupler, and then pull out the air fitting.
- Checking Pressure Relief Valve: The safety valve automatically releases air if tank pressure exceeds the maximum. To manually check, turn the compressor on, allow the tank to fill, then turn it off. Rotate the safety valve counterclockwise for 3-5 seconds to release air, then clockwise to close. If air leaks after closing or if the valve is stuck, do not use the compressor until it's replaced.
- Transporting: Ensure the compressor is unplugged and the power cord is secured. Grasp the carrying handle firmly and lift the compressor into a safe carrying position. Be mindful of the drain valve during transport to avoid damage.
- Storage: Turn off and unplug the compressor. Relieve air pressure from the hose and tool, or from the tank via the drain valve. Wrap the power cord around the hooks. Store the compressor in its normal operating position in a dry and protected area, with the drain valve open if not used for a while to prevent corrosion.
Safety Warnings:
- Always read the manual before use.
- Wear safety glasses with side shields, ear protection, and a face/dust mask in dusty conditions.
- Do not exceed the pressure rating of any component or attachment (maximum 8 bar).
- Keep the work area clean, well-lit, and free from obstructions.
- Do not use in damp/wet conditions or expose to rain.
- Keep children and visitors away.
- Never use in an explosive atmosphere.
- Guard against electrical shock by preventing body contact with grounded surfaces.
- Do not abuse the power cord.
- Disconnect air and power supply before making adjustments, servicing, or when not in use.
- Never direct compressed air towards people or animals.
- Do not use the compressor to spray chemicals.
- Do not attempt to tamper with the safety valve.
- Drain moisture from the tank daily to prevent corrosion and rupture.
- Do not use air from the compressor for human consumption.
- Hot surfaces are present; avoid contact.
- The compressor may start without warning.
- Do not modify the product or use unapproved accessories.
- Do not remove NITTO couplers as this voids the warranty. Use adaptors for alternative fittings.
Maintenance Features
Regular maintenance is crucial for the longevity and safe operation of the AC756S air compressor.
- General Maintenance: Keep the exterior of the compressor dry, clean, and free from oil and grease. Use a clean cloth for cleaning. Avoid using brake fluids, gasoline, petroleum-based products, or strong solvents on plastic parts as they can cause damage.
- Tank Drainage: The air tank must be drained of moisture daily after each use. If the unit will not be used for a while, leave the drain valve open to prevent corrosion inside the tank. Condensate is a polluting material and should be disposed of according to local regulations.
- Air Filter Replacement (See Figure 6):
- Normal environment: Check and clean the filter once a month. Replace if damaged or heavily clogged.
- Heavy-dust environment: Check and clean the filter once a week. Replace if damaged or heavily clogged.
- To replace: Remove the air filter cover by turning counterclockwise, remove the old filter, install a new one, and refit the cover by rotating clockwise to secure.
- Hose and Cord Inspection: Periodically inspect product cords and hoses for damage. Have them repaired at an authorized service center if necessary.
- Component Check: Regularly check for misalignment or binding of moving parts, breakage of parts, and any other condition that may affect the product's operation. Damaged parts should be repaired or replaced by an authorized service center.
- Tank Inspection: Inspect the tank yearly for rust, pinholes, or other imperfections that could make it unsafe. Never weld or drill holes in the air tank.
- Service: All repairs should be performed by an authorized AEG service center using only identical replacement parts. Contact AEG service agents for parts not described in the manual or for an exploded view of the product.