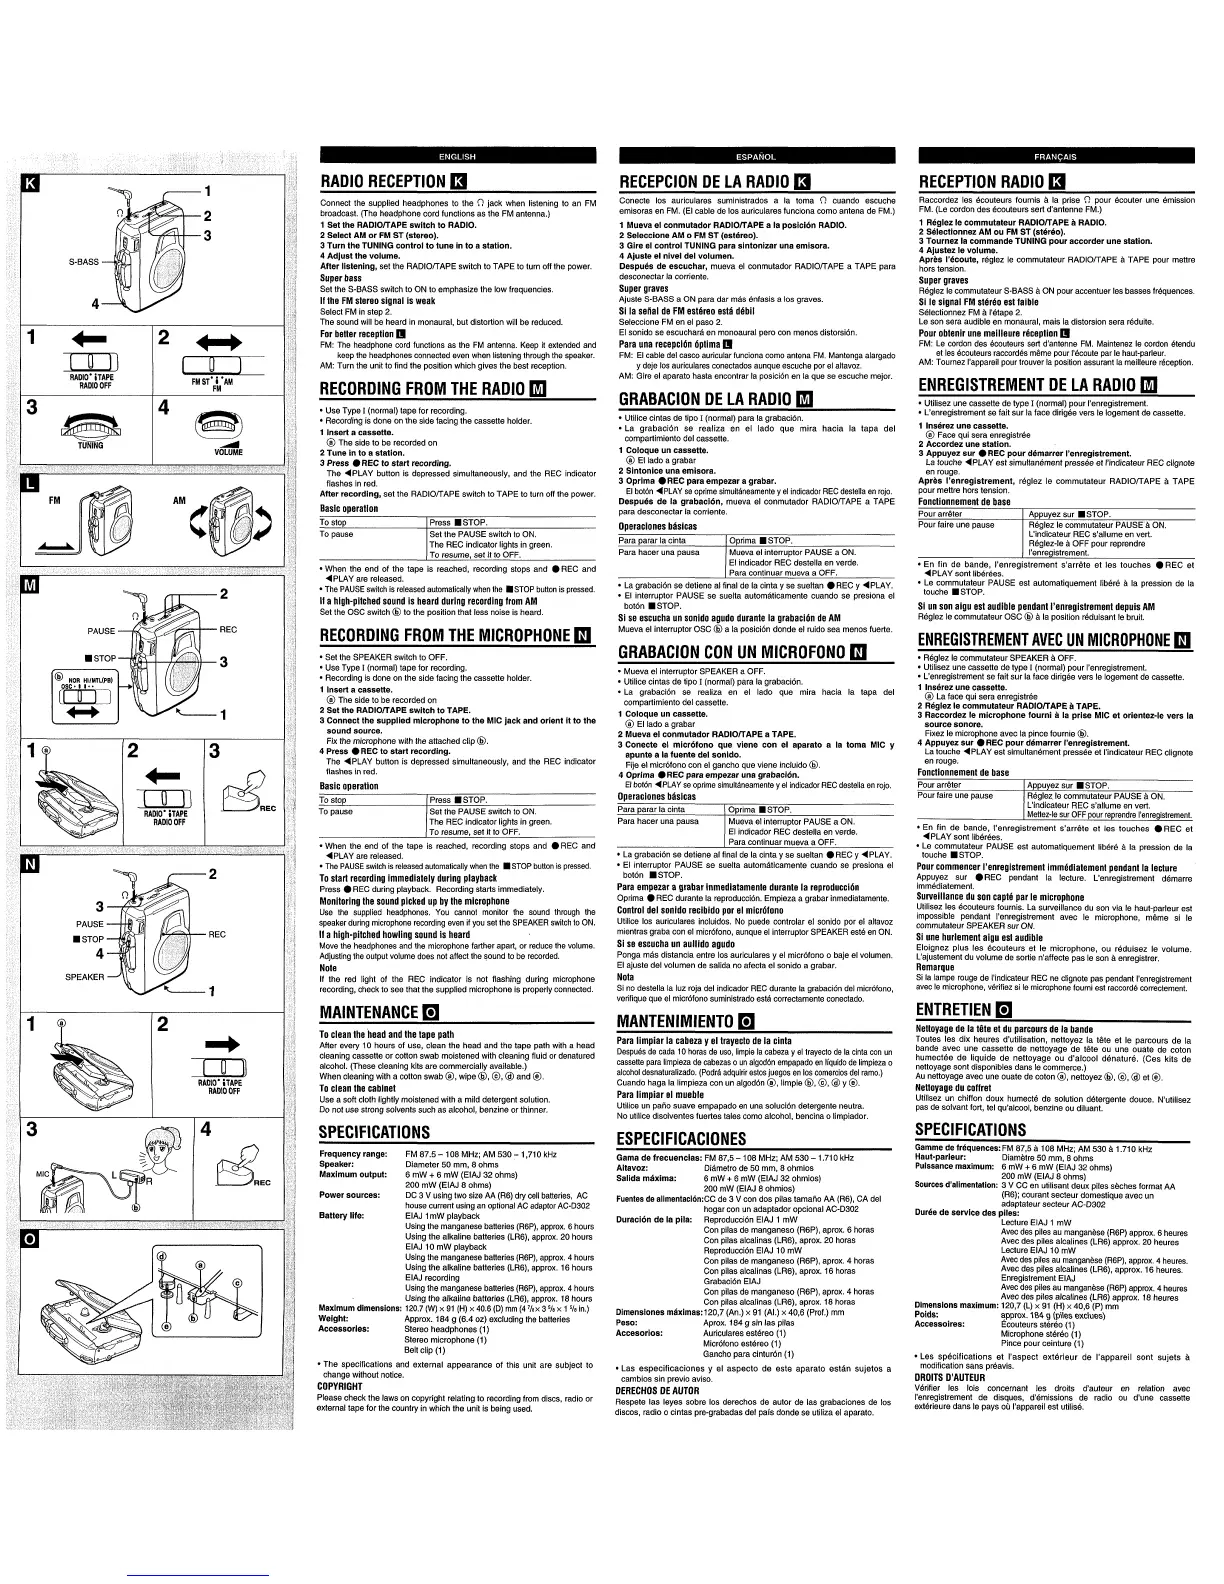
RADIO RECEPTION ❑
RECEPCION DE LA RADIO ❑
RECEPTION RADIO ❑
Conecte Ios auriculares suministrados a la toma ~ cuando escuche
emisoras en FM. (El cable de Ios auriculares funciona como antena de FM.)
Raccordez Ies 4couteurs fournis ~ la prise 0 pour 6couter une emission
FM. (Le cordon des 6couteurs serf d’antenne FM.)
1 Reglez Ie commutateur RADIO/TAPE a RADIO.
2 S61ectionnez AM ou FM ST (at6r60).
3 Tournez la commande TUNING pour accorder une station.
4 Ajustez Ie volume.
Apres l’~coute, r6glez Ie commutateur RADIOflAPE A TAPE pour mettre
hors tension.
Super graves
Reglez Ie commutateur S-BASS a ON pour accentuer Ies basses frbquences,
Si Ie signal FM stdrdo est faible
Sdlectionnez FM ~ l’&ape 2.
Le son sera audible en monaural, mais la distortion sera r6duite.
Pour obtenir une meilleure rdception ❑
FM: Le cordon des 6couteurs serf d’antenne FM. Maintenez Ie cordon etendu
et Ies Acouteurs raccordes m6me pour l’6coute par Ie haut-parleur.
AM: Tournez I’appareil pour trouver la position assurant la meilleure r6ception,
Connect the supplied headphones to the ~ jack when listening to an FM
broadcast. (The headphone cord functions as the FM antenna.)
1 Set the RADIO/TAPE switch to RADIO.
2 Select AM or FM ST (stereo).
3 Turn the TUNING controf to tune in to a station.
4 Adjust the volume.
After listening, set the RADIOflAPE switch to TAPE to turn off the power.
Super bass
Set the S-BASS switch to ON to emphasize the low frequencies.
If the FM stereo signal is weak
Select FM in step 2.
The sound will be heard in monaural, but distortion will be reduced.
For better reception ❑
FM: The headphone cord functions as the FM antenna. Keep it extended and
keep the headphones connected even when listening through the speaker.
AM: Turn the unit to find the position which gives the best reception.
1 Mueva el conmutador RADIO~APE a la posici6n RADIO.
2 Seleccione AM o FM ST (estt$reo).
3 Gire al control TUNING para sintonizar una emisora.
4 Ajuate el nivel del voluman.
Despues de escuchar, mueva el conmutador RADIO/TAPE a TAPE para
desconectar la corriente.
Super graves
Ajuste S-BASS a ON para dar m~s t$nfasis a Ios graves.
Si la setlal de FM est6reo estfi dtibil
Seleccione FM en el paso 2.
El sonido se escucharA en monoaural pero con menos distorsi6n.
Para una recepci6n 6ptima ❑
FM: El cable del casco auricular funciona como antena FM, Mantenga alargado
12
au
[~
“’
RADIO*iTAPE
RADIOOFF
FMST*F~AM
;
.!
y deje Ios auriculares conectados aunque escuche por el altavoz.
AM: Gire el aparato hasta encontrar la posici6n en la que se escuche mejor.
ENREGISTREMENT DE LA RADIO ❑
● Utilisez une cassette de type I (normal) pour I’enregistrement.
● L’enregistrement se fait sur la face dirigee vers Ie Iogement de cassette.
RECORDING FROM THE RADIO ❑
GRABACION DE LA RADIO ❑
● Use Type I (normal) tape for recording.
● Recording is done on the side facing the cassette holder.
1 Insert a cassette.
@) The side to be recorded on
2 Tune into a station.
3 Press
● REC to start recording.
The <PLAY button is depressed simultaneously, and the REC indicator
flashes in red.
After recording, set the RADIO~APE switch to TAPE to turn off the power.
Basic operation
To stop Press ■ STOP.
To pause Set the PAUSE switch to ON,
The REC indicator lights in green.
To resume, aet it to OFF.
● When the end of the tape is reached, recording stops and ● REC and
<PLAY are released.
● The PAUSE switch is released automatically when the ■ STOP button is pressed.
H
a high-pitched sound is heard during recording from AM
Set the OSC switch@ to the position that less noise is heard.
● Utilice cintas de tipo I (normal) para la grabacidn.
● La grabaci6n se realiza en el Iado que mira hacia la tapa del
comparfimiento del cassette.
1 Coloque
un cassette.
@
El Iado a grabar
2 Sintonice una emisora.
3 Oprime
● REC para empezer a grabar.
El bot6n <PLAY se oprime simult~neamente y el indicador REC destella en rojo.
Deapu6s de la grabaci6n, mueva el conmutador RADIOflAPE a TAPE
para desconectar la corriente.
1 Inserez une cassette.
@ Face qui sera enregistr6e
2 Accordez une station.
3 Appuyez sur
● REC pour d6marrer I’enregistrement.
La touche <PLAY est simultanement press6e et I’indicateur REC clignote
en rouge,
Aprtx I’enregistrement,
r6glez Ie commutateur RADIO/TAPE ~ TAPE
pour mettre hors tension.
Fonctionnement de base
Pour arr~ter
Appuyez sur
■ STOP.
Pour faire une pause R6glez Ie commutateur PAUSE”~ ON,
L’indicateur REC s’allume en vert.
R6glez-le a OFF pour reprendre
I’enregistrement.
● En fin de bande, I’enregistrement s’arr~te et Ies touches ● REC et
<PLAY sent liber6es.
● Le commutateur PAUSE est automatiquement Iibere a la pression de la
touche
■ STOP.
Operaciones bilsicas
Para Darar la cinta i Omima ■ STOP,
Para hater una pausa
Mueva el interruptor PAUSE a ON.
El indicador REC destella en verde.
Para continuar mueva a OFF.
● La grabaci6n se detiene al final de la cinta y se sueltan ● REC y <PLAY.
● El interruptor PAUSE se suelta autom~ticamente cuando se presiona el
bot6n
■ STOP.
Sise escucha un sonido agudo durante ia grabaci6n de AM
Mueva el interruptor OSC @ a la posici6n donde el ruido sea menos fuerfe.
Si un son aigu est audibie pendant i’enregistrement depuis AM
Reglez Ie commutateur OSC @ A la position reduisant Ie bruit,
RECORDING FROM THE MICROPHONE ❑
ENREGISTREMENT AVEC UN MICROPHONE ❑
GRABACION CON UN MICROFONO ❑
● Set the SPEAKER switch to OFF.
● Use Type I (normal) tape for recording.
● Recording is done on the side facing the cassette holder.
1 Insert a casaette.
@ The side to be recorded on
2 Set the RADIO/TAPE switch to TAPE.
3 Connect the supplied microphone to the MIC jack and orient it to the
sound source.
Fix the microphone with the attached clip @.
4 Press
● REC to start recording.
The <PLAY button is depressed simultaneously, and the REC indicator
flashes in red.
Basic operation
To stop
Press ■ STOP.
To pause Set the PAUSE switch to ON.
The REC indicator lights in green.
To resume, set it to OFF.
● When the end of the tape is reached, recording stops and ● REC and
<PLAY are released.
c The PAUSE switch is releasedautomatically when the
■ STOP button is pressed.
To start recording immediately during piayback
Press ● REC during playback. Recording starts immediately.
Monitoring the sound picked up by the microphone
Use the supplied headphones. You cannot monitor the sound through the
speaker during microphone recording even if you set the SPEAKER switch to ON.
H
a high-pitched howling sound is heard
Move the headphones and the microphone farther apart, or reduce the volume.
Adjusting the output volume does not affect the sound to be recorded.
Note
If the red light of the REC indicator is not flashing during microphone
recording, check to see that the supplied microphone is properly connected.
● R6glez Ie commutateur SPEAKER a OFF.
● Utilisez une cassette de type I (normal) pour I’enregistrement.
● L’enregistrement se fait sur la face dirigee vers Ie Iogement de cassette,
1 Inserez
une cassette.
@La
face qui sera enregistrde
2 Reglez fe commutateur RADIOfiAPE a TAPE.
3 Raccordez Ie microphone fourni a la prise MIC et orientez-le vers la
source sonore.
Fixez Ie microphone avec la pince fournie (@.
4 Appuyez sur
● REC pour demarrer I’enregistrement.
La touche <PLAY est simultanement pressee et I’indicateur REC clignote
en rouge.
● Mueva el interruptor SPEAKER a OFF,
● Utilice cintas de tipo I (normal) para la grabaci6n.
● La grabacion se realiza en el Iado que mira hacia la tapa del
comparfimiento del cassette,
1 Coloque
un cassette.
@
El Iado a grabar
2 Mueva el conmutador RADIO~APE a TAPE.
3 Conecte e} microfono que viene con el aparato a la toma MIC y
apunte a la fuente del sonido.
Fije el micr6fono con el gancho que viene incluido @.
4 Oprima
● REC para empezar una grabaci6n.
El bot6n <PLAY se oprime simultaneamente y el indicador REC destella en rojo,
Operaciones bdsicas
Para ~arar la cinta ! Orwima ■ STOP.
1?
a
4-
RADIO*i TAPE
l) &
REC
RADIOOFF
Fonctionnement de base
Pour arr6ter Appuyez sur ■ STOP.
Pour faire une pause
R6glez Ie commutateur PAUSE a ON.
L’indicateur REC s’allume en vert.
I Mettez-le sur OFF pour reprendre I’enregistrement.
● En fin de bande, I’enregistrement s’arr6te et Ies touches ● REC et
<PLAY sent lib&4es.
● Le commutateur PAUSE est automatiquement Iibere a la pression de la
touche
■ STOP.
Pour commencer i’enregistrement imm6diatement pendant ia iecture
Appuyez sur ● REC pendant la lecture, L’enregistrement d6marre
immediatement.
Surveiiiance du son captd par ie microphone
UtiliSez Ies ecouteurs fournis. La surveillance du son via Ie haut-parleur est
impossible pendant I’enregistrement avec Ie microphone, m6me si Ie
commutateur SPEAKER
sur ON,
Si une huriement aigu est audibie
Eloignez plus Ies 6couteurs et Ie microphone, ou reduisez Ie volume.
L’ajustement du volume de sortie n’affecte pas Ie son A enregistrer.
Remarque
Si la
Iampe rouge de I’indicateur REC ne clignote pas pendant I’enregistrement
avec Ie microphone, verifiez si Ie microphone fourni est raccord~ correctement,
Para hater una pausa
Mueva el interruptor PAUSE a ON.
El indicador REC destella en verde,
Para continuar mueva a OFF.
● La grabaci6n se detiene al final de la cinta y se sueltan ● REC y <PLAY.
● El interruptor PAUSE se suelta autom~ticamente cuando se presiona el
boton 9 STOP.
Para empezar a grabar inmediatamente durante ia reproducci6n
Oprima .
REC durante la reproducci6n. Empieza a grabar inmediatamente.
Controi dei sonido recibido por ei micr6fono
Utilice Ios auriculares incluidos. No puede controlar el sonido por el altavoz
mientras graba con el micr6fono, aunque el interruptor SPEAKER este en ON.
Sise escucha un auiiido agudo
Ponga mzis distancia entre Ios auriculares y el micr6fono o baje el volumen.
El ajuste del volumen de salida no afecta el sonido a grabar.
Nota
I
!
I
,
I
Si no destella la Iuz roja del indicador REC durante la grabacitm del micr6fono,
verifique que el micr6fono suministrado est~ correctamente conectado.
ENTRETIEN ❑
MAINTENANCE ❑
MANTENIMIENTO ❑
12
Nettoyage de ia ti2te et du parcours de ia bande
Toutes Ies dix heures d’utilisation, nettoyez la ti%e et Ie parcours de la
bande avec une cassette de nettoyage de t&e ou une ouate de coton
humectde de Iiquide de nettoyage ou d’alcool denature. (Ces kits de
nettoyage sent disponibles clans Ie commerce.)
Au nettoyage avec une ouate de coton @, nettoyez @, @, @et@.
To ciean the head and the tape path
Afler every 10 hours of use, clean the head and the tape path with a head
cleaning cassette or cotton swab moistened with cleaning fluid or denatured
alcohol. (These cleaning kits are commercially available.)
When cleaning with a cotton swab@, wipe @,@,@ and@.
To ciean the cabinet
Use a soft cloth lightly moistened with a mild detergent solution.
Do not use strong solvents such as alcohol, benzine or thinner.
o
1
R~Olo*i TAPE
RAD1OOFF
Para iimpiar ia cabeza y ei trayecto de ia cinta
Despu6s de cada 10 horas de USO,Iimpie la cabeza y el trayecto de la cinta con un
cassette para Iimpieza de cabezas o un algod6n empapado en Iiquido de Iimpieza o
alcohol desnaturalizado. (Podr~ adquirir estos juegos en Ios comercios del ramo,)
Cuando haga la Iimpieza con un algod6n @, Iimpie @, @,@ y@.
Para iimpiar ei muebie
Utilice un paflo suave empapado en una soluci6n detergence neutra.
No utilice disolventes fuertes tales como alcohol, bencina o Iimpiador.
Netfoyage du coffret
Utilisez un chiffon doux humect6 de solution d&ergente deuce. N’utilisez
pas de solvant fort, tel qu’alcool, benzine ou diluant.
SPECIFICATIONS
SPECIFICATIONS
ESPECIFICACIONES
Gamme de frequencies: FM 87,5a 108 MHz; AM 530a 1.710 kHz
Haut-parleur:
DiamMre 50 mm, 8 ohms
Puissance maximum: 6 mW + 6 mW (EIAJ 32 ohms)
200 mW (EiAJ 8 ohms)
Sources d’aiimentation: 3 V CC en utilisant deux piles sbches format AA
(R6); courant secteur domestique avec un
adaptateur secteur AC-D302
Duree de service dea piles:
Lecture EIAJ 1 mW
Avec des piies au manganbse (R6P) approx. 6 heures
Avec des piles aicalines (LR6) approx. 20 heures
Lecture EiAJ 10 mW
Avec des piles au manganbse (R6P), approx, 4 heures.
Avec des piles alcaiines (LR6), approx. 16 heures.
Enregistrement EiAJ
Avec des piles au manganese (R6P) approx, 4 heures
Avec des piles aicalines (LR6) approx. 18 heures
Dimensions maximum: 120,7 (L) x 91 (H) x 40,6 (P) mm
Poid$
approx. 184 g (piles exckres)
Accessoires:
Ecouteurs st&60 (1)
Microphone st6r40 (I )
Pince pour ceinture (1)
● Les specifications et i’aspect ext6rieur de i’appareil sent sujets a
modification saris preavis.
OROiTS D’AUTEUR
V&ifier ies iois concernant Ies droits d’auteur en reiation avec
I’enregistrement de disques, admissions de radio
ou d’une cassette
ext6rieure clans Ie pays ou i’appareil est utiiise.
Frequency range:
FM 87.5-108 MHz; AM 530-1,710 kHz
Speaker:
Diameter 50 mm, 8 ohms
Maximum output:
6 mW + 6
mW (EiAJ 32 ohms)
200 mW (EiAJ 8 ohms)
Power sources: DC 3 V using two size AA (R6) dry ceii batteries, AC
housecurrent usingan opfionaiAC adaptorAC-D302
Battery iife:
EiAJ 1
mW piayback
Usingthe manganesebatteries(R6P),approx,6 hours
Using the aikaiine batteries (LR6), approx. 20 hours
EIAJ 10 mW piayback
Usingthe manganesebatteries(R6P),approx.4 hours
Using the aikaiine batteries (LR6), approx. 16 hours
EiAJ recording
Usingthe manganesebatteries(R6P),approx.4 hours
Using the alkaiine batteries (LR6), approx. 18hours
Maximum dimensions: 120.7(W)x 91 (H)x 40.6(D)mm(4
7/8X 3 % x 1 5/8in.)
Weight:
Approx. 184 g (6.4 OZ) exciuding the batteries
Accessories:
Stereo headphones (1)
Stereo microphone (1)
Belt clip (1)
● The specifications and externai appearance of this unit are subject to
change without notice,
COPYRiGHT
Please check the iaws on copyright relating to recording from discs, radio or
externai tape for the country in which the unit is being used.
Gama de frecuencias: FM 87,5-108 MHz; AM 530 – 1.710 kHz
Aitavoz: DiAmetro de 50 mm, 8 ohmios
Saiida mAxima: 6 mW + 6 mW (EiAJ 32 ohmios)
200 mW (EiAJ 8 ohmios)
Fuentesde aiimentacion:CC de 3 V con dos piias tamaho AA (R6), CA dei
hogar
con un adaptador opcionai AC-D302
Duration
de ia piia:
Reproducci6n EiAJ
1 mW
Con piias de manganeso (R6P), aprox. 6 horas
Con pilas alcalinas (LR6), aprox. 20 horas
Reproducci6n EiAJ 10 mW
Con piias de manganeso (R6P), aprox. 4 horas
Con pilas alcalinas (LR6), aprox. 16 horas
Grabaci6n EiAJ
Con piias de manganeso (R6P), aprox.4 horas
Con piias aicaiinas (LR6), aprox. 18 horas
Dimensioned m~ximas: 120,7 (An.) x 91 (Ai.) x 40,6 (Prof.) mm
Peso: Aprox. 184 g sin Ias piias
Accesorios: Auricuiares est6reo (1)
Micr6fono est&eo (1)
Gancho para cintur6n (1)
*
Las especificaciones y ei aspecto de este aparato estdn sujetos a
cambios sin previo aviso.
DERECHOS DE AUTOR
Respete ias ieyes sobre ios derechos de autor de ias grabaciones de Ios
discos, radio o cintas pre-grabadas de! pais donde se utiliza el aparato.
..— .
 Loading...