Do you have a question about the Aiwa XR-M191 and is the answer not in the manual?
Safety measures for unit installation, including water, heat, and ventilation.
Guidelines for safe use of power sources, cords, and plugs to prevent shock.
Explanation of graphical symbols and warning statements related to electric shock risk.
Guidelines for connecting and grounding outdoor antennas for safety.
Procedures for cleaning the unit, tape heads, and CDs.
Conditions that necessitate professional servicing by a qualified technician.
Step-by-step guide for connecting speakers, antennas, and power.
Common issues and their potential solutions for the unit's operation.
Detailed technical data for the main unit and speakers.
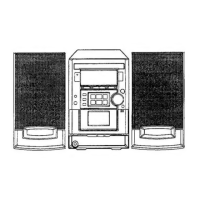
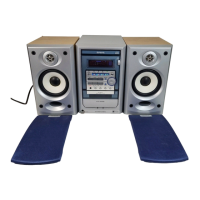
This document describes the Aiwa XR-M191 Compact Disc Stereo System, a versatile audio unit designed for home use. It combines a CD player, a stereo cassette receiver, and a radio tuner, offering various playback and recording functionalities. The system also includes SX-LM191 speakers, a remote control, and AM/FM antennas.
The system requires careful and complete reading of the operating instructions before use, with all precautions strictly followed. It is designed to be connected to a standard AC power source (120 V AC, 60 Hz). For initial setup, speakers are connected to the SPEAKERS R and L terminals, ensuring correct polarity with white-striped cords going to the positive terminals. The supplied FM antenna connects to the FM 75 Ω terminals, and the AM antenna to the AM LOOP terminals. Finally, the AC power cord is plugged into an AC outlet. Upon first connection, "DEMO" may appear on the display, which can be deactivated by pressing DEMO/ECO.
The remote control operates using two R6 (size AA) batteries, inserted with correct polarity. Batteries should be replaced when the operational distance shortens and removed if the unit will not be used for an extended period. The remote control's functionality can be affected by intense sunlight or obstructed line of sight.
The unit features a POWER STANDBY/ON button to switch the unit on and off. Turning the unit on can also be achieved by pressing any function button (TAPE, TUNER/BAND, AUX/VIDEO, or CD), which will automatically start playback if a disc or tape is inserted. The volume is adjusted using the VOLUME/MULTI JOG on the main unit or the VOL buttons on the remote control, ranging from 0 (minimum) to 30 and MAX (maximum). The volume setting is retained during power-off standby, but if set to 21 or higher, it automatically defaults to 20 upon the next power-on.
The XR-M191 offers several sound adjustment features to enhance the listening experience. The QSOUND function provides a three-dimensional sound area for stereo sources. It can be activated by pressing QSOUND, and different modes can be selected by pressing it again within four seconds. Users should note that at higher volumes, QSOUND might cause sound distortion, in which case the volume should be reduced.
The Super T-BASS feature emphasizes low frequencies for a powerful sound. It can be adjusted by pressing JOG MODE once, then turning VOLUME/MULTI JOG within four seconds to change the T-BASS level. If the sound becomes distorted with the T-BASS effect, it can be canceled.
A graphic equalizer allows users to select sound equalization curves to match music types. By pressing JOG MODE twice, then turning VOLUME/MULTI JOG within four seconds, users can choose from three curves: ROCK (emphasizing treble and bass), POP (more presence in vocals and midrange), and JAZZ (accented lower frequencies). The equalization can also be selected using the EQ button on the remote control. To cancel equalization, select "GEQ OFF" using the same methods.
The radio tuner supports both FM and AM bands. To select a band, press TUNER/BAND on the main unit or BAND on the remote control. Manual tuning is done using the DOWN or UP TUNING buttons. "TUNE" is displayed when a station is tuned in, and "((1))" lights up for FM stereo reception. For automatic station search, hold down DOWN or UP. The search stops at reception, but may not stop at weak signals.
Favorite stations can be preset for direct tuning. To preset a station, tune to the desired station, then press SET. The preset number appears on the display, starting from "1". Up to 32 preset stations can be stored. To tune to a preset station, press DIR/PRESET repeatedly on the main unit or use the numbered buttons on the remote control. Preset stations can be cleared by tuning to the station, pressing CLEAR, and then SET within four seconds.
For FM reception, the antenna should be extended fully in a T-shape. For AM reception, rotate the antenna to find the best reception. Antennas should be kept away from metallic objects, electrical equipment, and cords. To reduce noise in poor FM stereo reception, the MODE button on the remote control can switch between stereo and monaural FM reception. The AM tuning interval can be switched between 9 kHz/step and 10 kHz/step by holding down TUNER/BAND and pressing POWER. This action clears all preset AM stations.
The XR-M191 plays back finalized CD-R/RW discs as well as audio CDs. To play a CD, press CD, then press CD OPEN/CLOSE to open the disc compartment. Load the disc with the labeled side up and close the compartment. Playback begins with the first track. For 8-cm (3-inch) discs, place them on the inner circle of the tray. Playback can be stopped by pressing STOP and paused by pressing PAUSE.
To skip tracks, press the previous track (◄◄) or next track (►►) buttons. To search within a track, hold down the fast reverse (◄◄) or fast forward (►►) buttons. Tracks can be selected directly using the numbered buttons on the remote control. The DISPLAY button on the remote control can show the remaining playback time of the CD, returning to the elapsed time display with another press. This feature is not available during random, repeat, or programmed playback.
The unit supports random and repeat playback. For random play, press MODE on the remote control once, and "RANDOM" will light up. To cancel, press MODE once during play or four times in stop mode. For repeat play, press REPEAT on the remote control. Each press cycles through different repeat modes, such as repeating the entire disc or a single track.
Blank skip playback allows the unit to skip silent portions between tracks on a CD. Activate it by pressing CD BLANK SKIP; "CD BLANK SKIP ON" will scroll, and a specific indicator will appear. This feature is canceled during programmed, random, repeat playback, and edited CD recording.
Programmed playback allows up to 30 selected tracks to be played in a specific order. In stop mode, press MODE repeatedly on the remote control until "PRGM" lights up. Then, use the numbered buttons to program tracks. The selected track number lights up on the display. If the total playback time exceeds 99:59 minutes or if more than 30 tracks are programmed, "FULL" is displayed. The program can be checked by pressing the track skip buttons during stop mode. To clear the program, press CLEAR during stop.
The cassette deck supports type I (normal) tapes. To play a tape, press TAPE/REV MODE, then PUSH EJECT to open the cassette holder. Insert the tape with the exposed side down and the playback side facing out, then close the holder. Playback starts with the front side (forward). The reverse side is indicated by a specific symbol. Playback can be stopped by pressing STOP and paused by pressing PAUSE.
Fast forward and rewind are controlled by the fast forward (►►) and rewind (◄◄) buttons. The playback side can be changed by pressing DIR/PRESET in play or pause mode. The reverse mode can be selected by pressing TAPE/REV MODE repeatedly, cycling through options like playing one side only, playing from front to back side once, or playing both sides repeatedly. The tape counter can be reset to "0000" by pressing CLEAR in stop mode or by opening and closing the cassette holder.
The Direct Play Function allows the tape to start playing when the power is off. Press TAPE/REV MODE, and the unit will turn on, starting tape playback. It is recommended to avoid 120-minute or longer tapes as they are thin and easily damaged. Any slack in the tape should be taken up before use to prevent jamming.
For basic recording, use type I (normal) tapes. Insert the tape into the deck and wind it to the desired starting point. Press TAPE/REV MODE to select the reverse mode (one side or both sides). Prepare the source: select CD function and load discs, tune to a radio station, or select VIDEO/AUX/TV for external equipment. Press REC/REC MUTE to start recording. CD playback starts automatically, while external sources need to be started manually.
The AI Edit Recording feature helps record a whole CD onto a tape by rearranging track order to fit the tape length, preventing tracks from being cut short. Insert the tape, select CD function, and load the disc. Press MODE repeatedly on the remote control until "AI EDIT" appears. Use the numbered buttons to enter the tape length (10 to 99 minutes). The unit will then determine the tracks for each side. Press REC/REC MUTE to start recording. The tape rewinds, plays a lead segment, then records side A, followed by side B. Recording and CD playback stop simultaneously when STOP is pressed. This feature cannot be used with discs having more than 30 tracks.
Programmed Edit Recording displays the remaining recording time for each side of the tape as tracks are programmed, allowing users to select tracks that fit the tape length. Insert the tape, select CD function, and load the disc. Press MODE repeatedly until "PRGM EDIT" appears. Enter the tape length using numbered buttons. Select the first track for side A, then repeat for subsequent tracks. Switch to side B using MODE and select tracks for that side. Press REC/REC MUTE to start recording.
To prevent accidental erasure, break off the plastic tab of the cassette tape. To record on the tape again, cover the detection slot with adhesive tape.
The system includes both sleep timer and timer playback functions. The sleep timer automatically turns off the unit after a specified time. Press SLEEP, then use the track skip buttons or MULTI JOG to set the duration (5 to 240 minutes in 5-minute steps). The current setting is entered automatically if no button is pressed for four seconds. To check the remaining time, press SLEEP. To cancel, press SLEEP twice.
Timer playback turns on the unit at a specified time for a specified duration. Ensure the clock is set correctly. Select the desired playback source (CD, radio, or tape). Press TIMER; a specific indicator and "PLAY" will appear, alternating with the timer-on time and source name. Set the timer-on time and duration using the track skip buttons or MULTI JOG, then press ENTER. Adjust volume and tone for timed playback (volume defaults to 20 if set higher). Prepare the source (load CD, tune radio, insert tape, or set external timer for AUX/VIDEO equipment). Finally, press POWER STANDBY/ON to turn the unit off. The timer standby indicator will remain on. Timer playback will only begin if the unit is turned off first.
Regular care and maintenance are essential for optimal performance. The cabinet should be cleaned with a soft, dry cloth, or a lightly moistened cloth with mild detergent for dirtier surfaces. Avoid strong solvents like alcohol, benzine, or thinner.
Tape heads should be cleaned with a head cleaning cassette after every 10 hours of use to prevent sound deterioration. Demagnetize tape heads with a demagnetizing cassette every 20 to 30 hours of use.
CDs should be wiped from the center out with a cleaning cloth if dirty and stored in their cases after use. Avoid hot or humid places. Tapes should also be stored in their cases, away from magnets, motors, television sets, or direct sunlight.
If the unit experiences an unusual condition or display error, it can be reset. Turn off the power (or disconnect/reconnect AC power if it won't turn off), then hold down STOP and press POWER. This will clear all stored memory.
| Type | Stereo System |
|---|---|
| CD Player | Yes |
| Radio Tuner | AM/FM |
| Cassette Deck | Yes |
| Number of Discs | 1 |
| Remote Control | Yes |
| Equalizer | Yes |
| Outputs | Headphone |
| Inputs | Auxiliary, Microphone |