6
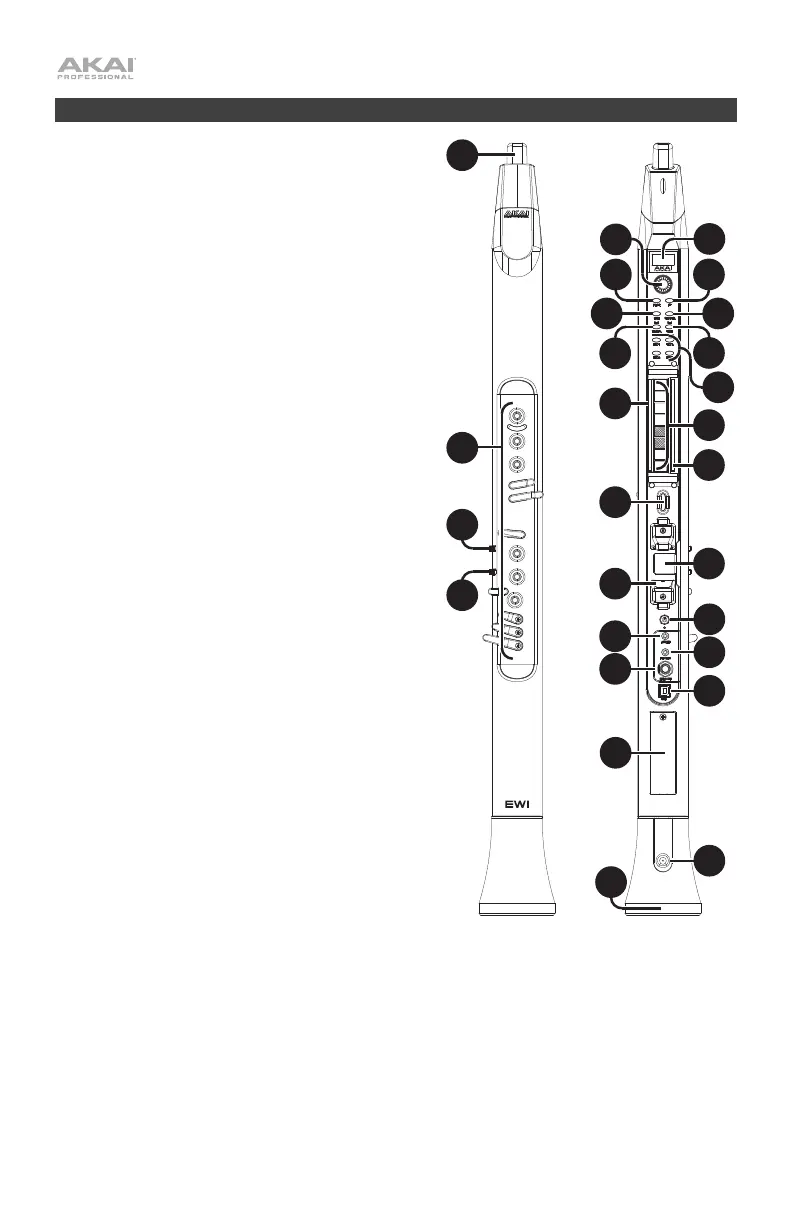
Features
1. Mouthpiece: Hold the mouthpiece gently in
between your lips with your teeth and exhale into
it (like a traditional wind instrument). You can
produce a vibrato effect by gently biting the
mouthpiece while blowing into it, but do not bite
too hard.
2. Note Keys: Press these keys in different
combinations while blowing into the mouthpiece
to determine the note. See Appendix >
Fingering Charts for more information.
You can adjust the position of the three lowest
note keys by loosening their screws.
3. Hold Button: Press this button to enter Hold
Mode. By default, Hold Mode is set to Legato;
the first note of a phrase will sustain while you
play subsequent notes. Use the Global Menu to
adjust this setting.
4. Interval Button: Press this button to enter
Interval Mode. By default, this is set to Fixed
Interval; when you play a note, that note and the
note at the assigned interval will sound (an
octave below, by default). Use the Global Menu
to adjust this setting.
5. Display: This screen allows you to view
programs, browse menus and edit parameters.
6. Encoder: This encoder is used to navigate the
display and select presets, depending on which
mode is selected. When no mode is selected,
turn the encoder to adjust the audio volume.
7. FX (Effects) Button: Press this button to view
available effects and set their level. Use the
encoder to select Reverb, Chorus, or Delay, and
adjust the available parameters. To return to the
previous page or exit the FX menu, press the FX
button again.
8. Program Button: Press this button to view the
Program list in the display. Turn the encoder to
scroll through the programs and press it to load.
9. Global Button: Press this button to enter the
Global Menu, where you can adjust various
hardware settings. See Advanced Functions >
Global Menu for more information.
10. Edit Button: Press this button to access the program editing controls, where you can adjust
the Pitch Tuning, Filter and LFO 1/2 settings for the current program. See Advanced
Functions > Edit Mode for more information. For Advanced Edit mode, download the EWI
Solo Editor Software at akaipro.com.
11. Save Button: Press this button to save the current program along with any changes to one of
four Favorite lists, where you can quickly access your most-used programs. If changes have
been made to the preset, the LED above this button will be lit. Selecting another preset before
saving will discard any changes.
12. Trans (Transpose) Button: Press this button to activate or deactivate the transposition
function. Its LED will light up when transposition is activated. To adjust the transposition value,
press and hold this button, turn the encoder to select the value, and then release this button.
1
2
3
4
11
13
14
15
16
25
19
20
21
22
24
23
17
7
5
9
14
8
10
12
6
26
18
 Loading...