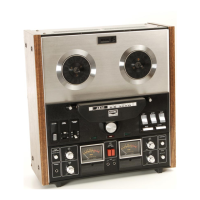
1.
INDEX
COUNTER
&
RESET
BUTTON
For
use in
loealing
positions
on
a
tape.
With
the
Reset
Buttan,
set
Index
Counter
to
"0000"
before
beginning
recording
or
pl.yb.ck.
2.
TRACK
SELECTOR
BUTTONS
1~4/Stereo/3-2
Track
Selector
Buttons
for
easy
track
selection.
3.
SENSING POLE
Reverses
tape
[Cavel
dire
ctio n
du
ring
playback
mode.
Automatic
re
verse
is
effected
when
th
e
sensing
foil
(affixed
to
the
inner
s
ide
of
the
magn
etic
tape)
co
rnes in
co
nt
ac
t w
ith
this
sensing
pole.
4. SUPPLY
REEL
TABLE
5.
REEL
RETAINER
Pull
tip
of
Retainer
on
reel
shaft
outward
and
turn
to
left
or
right
to
lock
reel
into
plac
e.
6.
TENSION
ARM
T
he
Tension
Arm
not
only
work
s
ta
co
rrect
tape
slack,
but
also
st
abi
lizes
tape
speed.
As
th
e t
ape
advances
,
proper
tension
is
app
lied
and
tape
vibration
is elimjn
ated.
7.
PAUSE BUTTON
Con
....
en
ient
for
use in
temp
o rarily
suspend
ing
tape
movement
during
recording
or pla
ybac
k.
Oepr
ess
fo r
pause
mode.
8.
AUTOMA TIC
SHUT-OFF
BUTTON
The
A
utomat
ic
Shul-Off
Buuon
i5
link
ed
10
the
AUlOmatic
Shut-Off
Lever.
If
thi
s
but
ton
is a l
depre
ssed p
os
ition
, wh en
th
e
ta
pe
cornes
ta
the
end,
the
p
owe
r
of
the
en
lire
unit
will be
cul
off.
A
convenienl
safety
feature
in case Ihe
recorder
is
leCt
unattended.
9. POWER SWITCH
JO.
TAPE
SPEED
SELECTOR
BUTTONS
7-1/2
and
3-3/4
ips
Speed
Selec
t
or
Bultons.
Feather
touch
for
easy
selection
of
desir
ed
spee
d.
II.
TAPE
SELECTOR
SWITCH
Se
l
to
ON
po
sitio n
when
usi ng
Aka
i
Super
Range
Tape
or o
th
er
mak
e
lo
w no ise
lap
es.
Sel
10
OFF
po
s
ition
for
regular
magnelic
lape
.
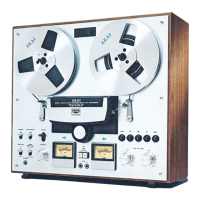
12. MICROPHONE JACKS (lert & right)
Vlhen
using
microphone
s
for
r
ecord
ing,
insert
microphone
plug
s
into
these
jacks.
13. MICROPHONE
RECORDING
LEVEL
CONTROLS
(lef! &
righ!)
When
using
microph
ones
f
or
reco
rding,
adjust
input
with
th
ese
controls
while
observing
VU
Meters.
14. HEADPHONE JACK
Connect
stereo
headphones
of 8
n.
ta
this
jack
for
monit
oring
so
und
during
re
co
rding
or for
private
headphone
li
sten ing.
15.
UNE
RECORDING LEVEL
CONTROLS
nef!
& right)
For
u
se
in
adjusting
tine r
eco
rdin
g l
evel.
Adjust
while
observing
v u
Meters.
16
. VU METERS (lert & right)
Indicales
recordi
ng
and
pl
ay
ba
ck levels.
Normal
r
eco
rdîng
l
eve
l
sho
uld
not
exceed
"0"
VU
le
ve
l.
17.
RECORDING
INDICATOR
LAMP
Recording
mode
indi
ea
ta r l
amp.
When
Record
and
Fo rw
ard
Buttons
are
depress
ed,
this
Reco
rding
Indicator
lamp
williight.
18.
RECORDING
SAFETY
BUTTON
For
effecting
r
ecordi
ng
mode,
while
depressing
this
bUll
on
depress
Forward
Bulton.
19. HEAD
COVER
Hou
ses
Era
se,
Recording
, Play
back
and
Revèrse
Playback
Head
s.
20
. TAKE-UP
REEL
TABLE
21.
REEL
RETAINER
Pull
tip
of
Reta
iner o n r
ee
l
sha
ft
outward
and
turn
10 lefl or
right
ta
Jock
reel
int
o
place.
22
. CAPST
AN
Tran"ports
tape.
23. PINCH WHEEL
Pres.o;;es
agains
t
Capstan
10
lran
spO
ri
tape.
24. SENSING POLE
Reverses t
ape
travel
direction
during
playback
m
ode.
Automat
ic
rever
se
is
effected
""hen
the
sensing
tape
(previou
sly
affixed
la
outer
edge
of
tape
surface)
cornes
in
conlact
with
thi
s
sens
ing
pol
e.
25. AUTOMATIC
SHUT-OFF
LEVER
At
the
end
of
the
tape,
this
lever
is
released
and
tape
movement
is
st
opped.
If
the
Automatic
Shut-Off
Button
is
at
depressed
position,
when
the
Automatic
Shut-Off
Lever
is
released,
the
power
of
th
e
ent
ire
unit
is
eut
off.
26. REWIND BUTTON
For
effee
ting
manual
rever
se
playback.
Se
ns
ing
t
ape
is used
for
aUloma
tic
reverse.
27.
REVERSE
BUTTON
For
effee
ting
manual
reverse
playback.
Sensing
tape
is u
sed
for
automat
ic reverse.
28. FAST
FORWARD
BUTTON
r
:or
advilnc
in g
tape
in
forwflrd
direction
J I high
spee
d.
29
.
FORWARD
BUTTON
Advanc
es
tape
in
forward
direction
for
rec
o
rding
or
playback.
for
r
eco
rdin g
mode,
depress
this
button
while
depressing
the
Re
co
r
ding
Safety
Bulton.
30. SOUND-ON-SOUND BUTTON
S
ee
So
und
·On-
So
und
re
co
rding
proc
e
dur
e,
page
12
.
31. MONITOR SWITCH
During
record
i
ng
mode,
set
Ihi
s
Swi
l
ch
to
SO
URCE
po
s
ili
o
ll
fo r
moni[o
rÎng
sound
sourc
e,
a
nd
10
TAPE
po
s
ilion
Cor
chec king
recorded
signaIs.
For
pl
ayback,
set
Swi
lch
10
T APE
po
siti
on
.
32. STOP BUTTON
Depress
ta
stop
tape
trave!.
33. DOLBY NOISE REDUCTION SWITCH & DOLBY INDICATOR
LAMP
Set
ta
ON
position
for
rec
o
rdin
g o r
playback
with
the
Dolby
pro
cess. In
olher
cases,
the
switch
much
be
set
ta
OFF
position.
34. VOLUME CONTROLS (lert & right)
For
adj
us
tmenr
o f
sound
level
during
playback
mode.
35. CYCLE CONVERSION SWITCH
Thi
s
Switc
h
mu
sl
be
sel
to
50
H z or
60
Hz in
accordance
w
ith
area
p
owe
r
sou
rce.
36. REMOTE CONTROL JACK
Fo r
connecling
RC-16
Rem
ote
Con
tr
o l
unit
(optional
accesso-
ry).
Enables
control
of
recording,
playback,
st o p, fast
forward
,
re
wind,
and
reverse
playback
modes
From a dis
tance.
37.
UNIVERSAL
VOLTAGE
SELECTOR
&
FUSE
POST
See
Voltage
&
Cycle
Conver
si
on
procedure.
38.
UNE
OUTPUT JACKS (left & right)
Fo r pl
ayback,
connect
thè
se
jack
s
la
the
tape
input
jacks,
or
auxiliary
j
acks
of
an
eXle
rnal
ster
eo
arnplifier.
39. EXTRA AC OUT LET
Ex
lra
un
sw
itched
o
utlel.
Not
inte
rl
ocked
w
ith
fro
nt
panel
Power
Sw
itch.
40.
AC
CORD
41. DlN JACK HIGH/LOW INPUT
SELECTOR
SWITCH
Wll
en using
Din
Jack
for
connectiun
with
an
exte
rnal
amplifier,
set
thi
s
Switch
to
HIGH
po
siti
on
wh
en
the
o
utput
level
of
the
amp
lifier
is
high,
and
to
LOW
po
siti
on
when
the
output
level
of
the
a
mplifier
is
low.
42.
UNE
INPUT JACKS (lert & right)
To
record
trom
an
external
tun
er
amp
lifier
or
record
player,
con
n
ect
the
outp
ut
jacks
10
the
se
Jack
s.
43. DlN JACK
Thi
s
jack
e
nable
s r
eco
rding
and
play
baek
Ihr
o
ugh
an
external
amplif
ier wi
th
Ihe
use
of
a single
Din
co
nnection
cor
d.
When
re
co
rding
us
ing
Dio
Ja
ck
connec
li
on.
r
eco
rding
level i
s-
adju
sted
with
the
Microphone
Rec
o
rdin
g Level
Co
n
tr
ois.

 Loading...