Do you have a question about the Alcatel-Lucent Enterprise OmniSwitch 2x60 and is the answer not in the manual?
Details hardware and software safeguards for preventing data flow loss and ensuring switch uptime.
Action of adding, removing, or replacing hardware components without powering off the switch.
Describes switch monitoring via built-in sensors and CLI commands for operational status.
Covers requirements, site preparation, electrical needs, and airflow considerations for installation.
Lists necessary tools and items for hardware installation.
Details environmental and electrical requirements for the installation site.
Provides crucial safety guidelines to protect equipment against electrical surges.
Guidelines for ensuring proper airflow and ventilation around the switch.
Guidance on connecting network, console, and management cables to the switch.
Procedure for establishing an initial serial connection for configuration.
Steps involved in powering on and starting the switch.
Initial configuration steps after the first login, including password and system settings.
Details the default login credentials and the initial welcome banner.
Procedure to enable various remote access session types like Telnet, FTP, and SNMP.
Instructions for changing the administrative user's password for security.
Configuring the system's time zone, date, and time for accurate logging.
Configuration of administrative contact, system name, and location for identification.
Command to persist the configured settings in the switch's memory.
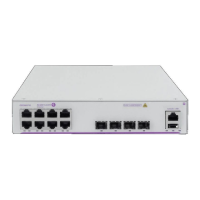
Front panel, rear panel, and specifications for the OS2260-10 model.
Front panel, rear panel, and specifications for the OS2260-P10 model.
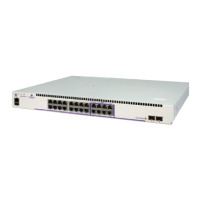
Front panel, rear panel, and specifications for the OS2x60-24 model.
Front panel, rear panel, and specifications for the OS2x60-P24 model.
Front panel, rear panel, and specifications for the OS2x60-48 model.
Front panel, rear panel, and specifications for the OS2x60-P48 model.
Front panel, rear panel, and specifications for the OS2x60-P48X model.
Explains the meaning of front panel LEDs for status indication.
Guidance on physically installing the switch in various configurations.
Key advice for rack or shelf mounting the switch.
Guidelines for proper ventilation to prevent overheating.
Detailed procedures for installing the chassis in a standard rack.
Steps to attach rack-mount flanges to the chassis.
Securing the switch chassis to rack posts using screws.
Instructions for placing the switch on a flat surface without a rack.
Information on mounting smaller width chassis units.
Specific instructions for using the L-bracket mounting kit.
Essential safety procedure for connecting the chassis to earth ground.
Procedures for checking the status of chassis hardware.
Command to view information about installed modules and slots.
Checking the switch's internal temperature status.
Understanding and addressing warning/danger temperature thresholds.
General specifications for Alcatel-Lucent's PoE support.
Lists the default configuration settings for PoE.
Details available PoE wattages based on power supplies.
Command to view installed power supply type and status.
Command to display current PoE status and port settings.
How powered devices are classified for automatic power adjustment.
Procedures for enabling and disabling PoE functionality.
Activating PoE on a slot-by-slot basis using CLI commands.
Deactivating PoE on specific ports or entire slots.
Feature for providing PoE power shortly after chassis power-on.
Uninterrupted PoE power during switch reboots or reloads.
Adjusting the maximum power allowance for individual ports.
Adjusting the maximum power allowance for entire slots.
Assigning priority levels (low, high, critical) to ports for power management.
Enabling a specific method for legacy IP phones.
Managing power for new PDs with limited budget.
How the system handles power deficits when adding devices.
Enabling or disabling the priority disconnect feature.
Explains how priority disconnect works under different power deficit conditions.
Using CLI commands to monitor PoE statistics and settings.
Statement confirming compliance with CE directives.
Information on proper disposal of electronic waste.
Table detailing hazardous substances in components per China RoHS.
Table detailing hazardous substances per Taiwan RoHS regulations.
Warning about chemical exposure from the product.
Lists safety, EMI/EMC, and environmental standards met by the product.
List of international safety certifications and standards.
List of electromagnetic interference and compatibility standards.
List of standards related to environmental testing.
Statements for FCC, Canada, JATE, CISPR, Korea, VCCI, and Taiwan/China markets.
Compliance statement for FCC Part 15 Class A digital device.
Compliance statement for Canadian radio noise emissions.
Compliance with Japan Approvals Institute of Telecommunications Equipment.
Warning regarding potential radio interference in domestic environments.
Statement regarding Korean electromagnetic wave compatibility.
Compliance with Voluntary Control Council for Interference by IT Equipment.
Warning for potential radio interference in residential areas.
Warnings related to laser, electrical, and ESD hazards during operation and handling.
Warning about Class 1M laser radiation when the chassis is open.
Safety warning against installing exposed network cables outdoors.
Warning about invisible laser radiation from open apertures.
Safety advice to avoid electrical shock from operating voltage.
Caution to disconnect power before servicing or moving the unit.
Importance of connecting the power cord to a properly wired and earthed receptacle.
Requirement for DC power supply ground wire connection to common earth ground.
Reminder to read the Getting Started chapter for safety info.
Requirement to install equipment in a location that restricts access.
Procedure to eliminate ESD before handling components.
| Switching Capacity | 128 Gbps |
|---|---|
| Power Supply | Internal |
| Weight | 4.5 kg |
| Storage Temperature | -40°C to 70°C |
| Product Type | Switch |
| Switch Type | Managed |
| Port Speed | 10/100/1000 Mbps |
| MAC Address Table Size | 16K |
| Jumbo Frame Support | Yes |
| Management | CLI, Web, SNMP |
| Form Factor | 1U Rack-mountable |
| Operating Temperature | 0°C to 50°C |