HMSOMP
Attachment and
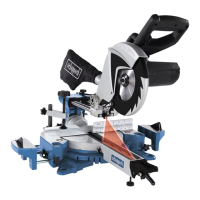
7.8 Mitre cut 0o- 45o
and turntable
0o-
45o
(Fig.
1,2,6,9)
The crosscut saw can be used
to make mitre cuts
to the left of 0'-
45' in relation
to the work face
and, at the same time,
0' - 45" to the left
or 0' - 45' to the
right in
relation to the fence
(double mitre cut).
Gaution! To make
mitre cuts
(inclined
saw head), the adjustable
fence
(28)
must
be
fixed
at the outer
position.
.
Open the set screw
(29)
for
the adjustable
fence
(28)
and
push
the adjustable
fence outwards.
.
Warning! The adjustable fence
(28)
must be flxed far
enough in front
of the in-
nermost
position
that the distance
between the fence
(28)
and the
saw blade
(7)
amounts
to a maximum of 5 mm.
.
Before making a cut, check
that the fence
(28)
and the saw blade
(7)
cannot
collide.
.
Secure the set screw
(29)
again.
.
Move
the machine head
(5)
to its upper
position.
.
Release
the turntable
(16)
by loosening
the screw
(26).
.
Using the Locking lever
(13), set the turntable
(16)
to the desired
angle
(refer
al-
so to
point
7.4 in this regard).
r
Re-tighten
the screw
(26)
in order
to secure the turntable.
.
Undo the set lever
(22)
and use
the handle
(1) to tilt the machine head
(5)
to
the
left until it coincides with
the required angle
value
(in
this connection
see
also
section 7.6).
.
Re-tighten the
set
lever
(22).
o
Cut
as described under section
7.5.
7.9 Limiting
the cutting depth
(Fig. 3)
o
The cutting depth can be
continuously adjusted
using the screw
(26).
To do
this
loosen the knurled nut on
the screw
(26).
Turn
the screw
(26)
in
or out to set
the
required cutting
depth. Then re-tighten
the knurled nut
on the screw
(26)
.
Check the setting by completing
a
test cut.
Cutting capacity: See Vlll
Technical data
7.10 Precision
adjustment for
crosscut 90"
(Fig.
3,5,18)
.
No angle
gauge
included.
.
Lower the machine head
(5)
and secure
using the locking
bolt
(24).
r
Loosen
the set lever
(22).
o
Position the angle
gauge (a)
between
the
saw
blade
(7) and the turntable
(16).
o
Slacken the
counternut
(d).
Adjust
the adjusting screw
(30)
until
the angle be-
tween the saw blade
(7)
and turntable
(16)
is 90'.
.
Retighten
the counternut
(d)
to secure this setting
o
Subsequently
check the
position
of the angle indicator.
lf necessary
loosen
the
pointer
(20)
using a Philips
screwdriver, set to
position
0"
on the angle
scale
AFTER SALES SUPPORT
El support@schePPach.com.au
MODEL:HMSOMP
PRODUCT
CODE:
53666
06/2017
23
I
r"r
1300 855 831