and
operation
HMSOMP
allow the machine head to move
upwards slowly whilst
applying light counter
pressure.
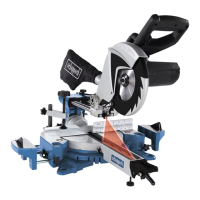
7.6 Cross cut 90' and turntable
0o - 45o
(Fig.
1,6,7)
The crosscut saw can be used
to make crosscuts of 0'
-45' to the left and 0'
-45'
to the right in relation
to the fence
Caution! For bevel cuts
(inclined
saw head), the moveable fence
(28)
must be
fixed
in the outer
position.
o
Open the set
screw
(29)
on the moveable fence
(28)
and
push
the moveable
fence
(28) outwards
.
Warning! The moveable fence
(28)
must be locked in a
position
far enough
from the inner
position
that the
distance between the fence
(28) and the saw
blade
(7)
is no more than
5 mm
o
Before making
the cut, check that no collision
could occur between
the fence
(28)
and the saw blade
(7).
.
Tighten the
set screw
(29)
again.
.
Use the locking lever
(13) to
adjust
the turntable
(16)
to the desired
angle. The
pointer
(14) on the turntable
(16)
must match
the desired angle on
the
scale
(''l5)
on the fixed
saw table
(17).
o
Tilt the locking lever
(13)
back
up again to fix the turntable
(16)
in
place
.
Cut as described under section 7.5.
7.7
Mitre
cut 0"- 45' and turntable
0' (Fig.
1,2,6,81
The crosscut saw can be used to make mitre
cuts of 0" - 45' in relation
to the
work face.
Caution!
To make mitre cuts
(inclined
saw head),
the adjustable fence
(28)
must
be flxed
at the outer
position.
.
Open the set screw
(29)
for the adjustable fence
(28)
and
push
the adjustable
fence outwards.
.
Warning! The adjustable
fence
(28)
must be fixed far
enough in front of the in-
nermost
position
that the distance
between the fence
(28)
and
the saw blade
(7)
amounts to
a maximum of 5 mm.
.
Before making
a cut, check that
the
fence
(28) and the saw blade
(7)
cannot
collide.
.
Secure the set screw
(29)
again
.
Move
the machine head
(5)
to
the
top
position
o
Fix the turntable
(16)
in the
0'
position
.
Loosen the set lever
(22)
and
use the handle
(1) to
angle the
machine head
(5)
to the left, until the
pointer
(20)
indicates the desired
angle measurement on
the
scale
(19).
o
Re-tighten
the set
lever
(22)
.
Cut as described in
section 7.5.
22
AFTER SALES SUPPORT
E support@scheppach.com.au
t
r,'
1300
855 831
MODEL: HM80MP PRODUCT
CODE: 53666 06/2017