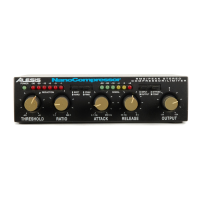
Your First Session with the NanoCompressor
Auditioning the Compressor
If you’re using a compressor for the first time, this section will explain how to get
your NanoCompressor up and running. First, get a signal into the NanoCompressor
using one of the methods listed in “Basic Connections”, above. Once you can see
level on the Signal Meters, set the controls like this:
• [RATIO] set for 4:1 (about 12 o’clock)
• [PEAK/RMS] set for RMS
• [HARD/SOFT] Knee set for SOFT
• ([ATTACK] and [RELEASE] controls are disabled in RMS mode, so don’t use
them yet.)
• Make sure [BYPASS/COMP] is set for COMP
Next, turn the [THRESHOLD] control all the way up (clockwise) and slowly start
turning it down (counter-clockwise). As you lower the threshold, you will see the
[REDUCTION] meter start to show more and more gain reduction. For this example,
set the [THRESHOLD] knob so that the [REDUCTION] meter shows -3 to -6 dB of
gain reduction. This will give your input signal a nice, even sound which is perfect
for recording vocals or bass guitar.
Bypassing Compression
At any time you can bypass the compressor, thereby allowing the direct signal to
pass through the NanoCompressor unchanged. This is done by pressing the
[BYPASS/COMP] switch so that it is set for COMP (pushed out). Note that the
[OUTPUT] knob does not function when the NanoCompressor is bypassed.
Placement and Installation
The NanoCompressor may be mounted almost anywhere it's needed: on a table, on
top of an amp, or next to a mixing console. In any case, make sure to place it safely
where it will not fall or be damaged. If it will be on furniture, make sure to attach the
provided rubber feet to the bottom of the unit. While the NanoCompressor itself
doesn't generate any magnetic or hum fields, its power supply may do so. Make sure
to place the power supply away from other audio equipment that is sensitive to
induced fields, and away from the signal wiring. In rare instances, the
NanoCompressor itself may pick up noise fields generated by other equipment such
as large power amplifiers; in this case, move the NanoCompressor until the noise
goes away.
Rack Mounting
The most secure mounting is on a "universal" rack shelf, available from various rack
manufacturers or your music dealer. The NanoCompressor's height conforms to
single-space mounting, and up to three NanoCompressors may be mounted side-by-
side in a standard universal EIA 19" equipment rack.