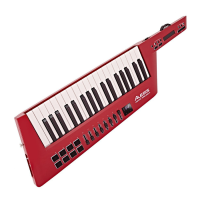
3
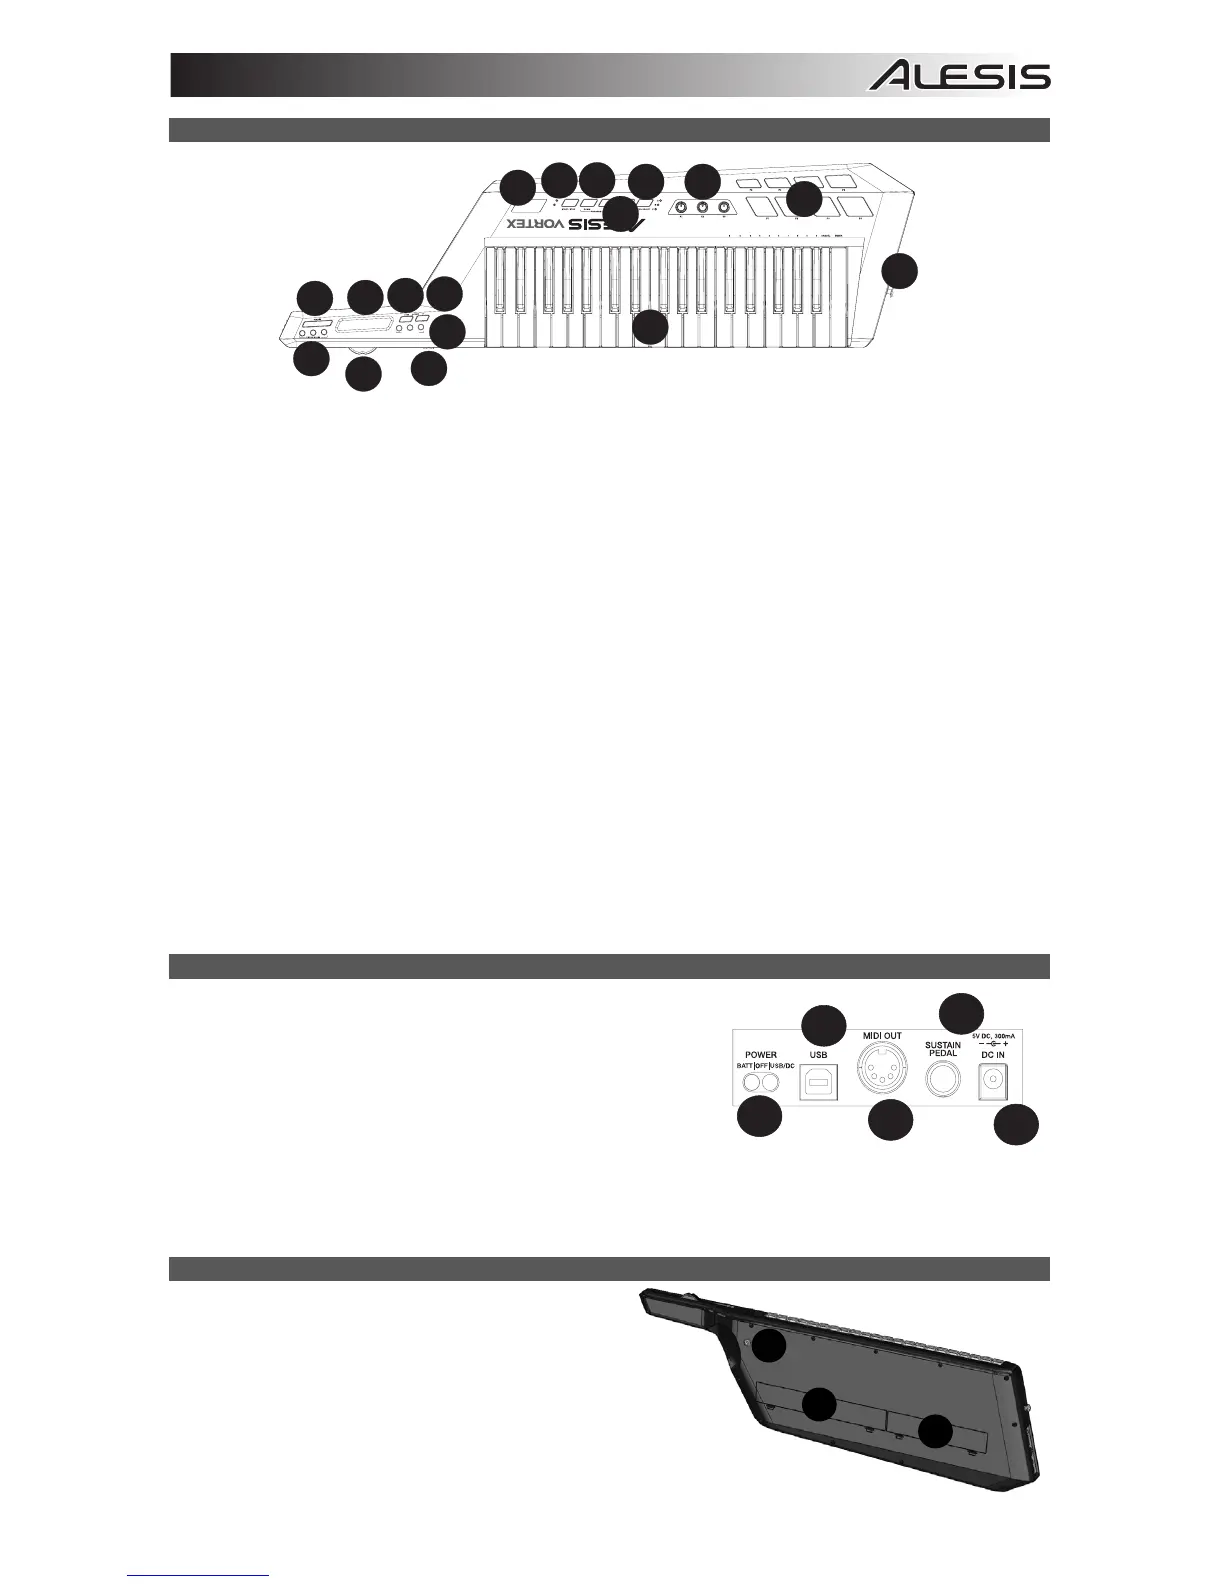
NECK – TOP PANEL
1. Sustain Button – This button continues notes that are playing when depressed, or are played while
depressed, until it is released.
2. *Ribbon Controller – Touch-sensitive strip that sends MIDI messages.
3. Octave Down – Press this button to shift the KEYBOARD's octave range down.
4. Octave Up – Press this button to shift the KEYBOARD's octave range up.
5. *Ribbon Control Buttons – Sets the type of MIDI message to be sent by the Ribbon Controller.
6. Pitch Wheel – Transmits MIDI Pitch Bend information to raise or lower the pitch of a note temporarily.
7. *Slider – Sends MIDI data for the currently assigned parameter.
8. *Keyboard Zone Buttons – Press these buttons to enter the various Keyboard zones.
9. Keyboard – Velocity-sensitive keys with aftertouch for sending MIDI notes. Use the keys to manually enter
values in Patch Edit mode.
10. Display – Shows the data, values, settings, and various Vortex functions.
11. *Start/Stop Button – Transport control button to toggle MIDI Start/Stop message. The LED will light up when a
Play command is sent and will turn off when a Stop command is sent.
12. Program Change Up/Down – Sends program change messages to your computer software or MIDI device.
Hold either button to scroll through 10 programs at a time.
Note: Vortex will not send a program change message until the Up/Down buttons are released.
13. Patch Edit Button – Press this button to toggle between Edit and Performance Mode.
Note: The three Patch Select LEDs will be lit when in this mode.
14. Patch Select – Press and use the drum pads to select onboard patches. The pad of the currently selected
patch will light up.
15. *Knobs – Sends various MIDI messages when turned. Each knob can be individually assigned to a different
MIDI parameter.
16. *Trigger/Drum Pads – Press the pads to send MIDI messages or use the Patch Select button along with the
pads to select onboard patches.
17. Strap Button – Use the included guitar-style strap for added stability when playing.
*See the Appendix for more information.
SIDE PANEL
1. Power Switch – Use this three-position switch to power the unit
on/off. When the switch is set to the left position, the unit will be
battery-powered. When set to the middle position, the unit will be
off. When set to the right position, the unit will be powered
through USB or a power adapter (sold separately).
2. USB Port – Connects to a computer’s USB port, using the
included USB cable. The USB connection will power Vortex.
3. MIDI Output – Connects to an external device’s MIDI input port
with a standard MIDI cable.
4. Sustain Pedal Input – Connect a 1/4" TS sustain pedal (a standard non-latching footswitch, sold separately) to
this input.
5. Power Connector – Connect a power adapter (optional, sold separately) here.
BOTTOM PANEL
1. Storage – Use this compartment to store your own
cables, such as USB and MIDI cables.
2. Battery Compartment – Install four AA batteries
here (optional, sold separately) to power Vortex.
3. Strap Button – Use the included guitar-style strap
for added stability when playing.