2
www.observint.com
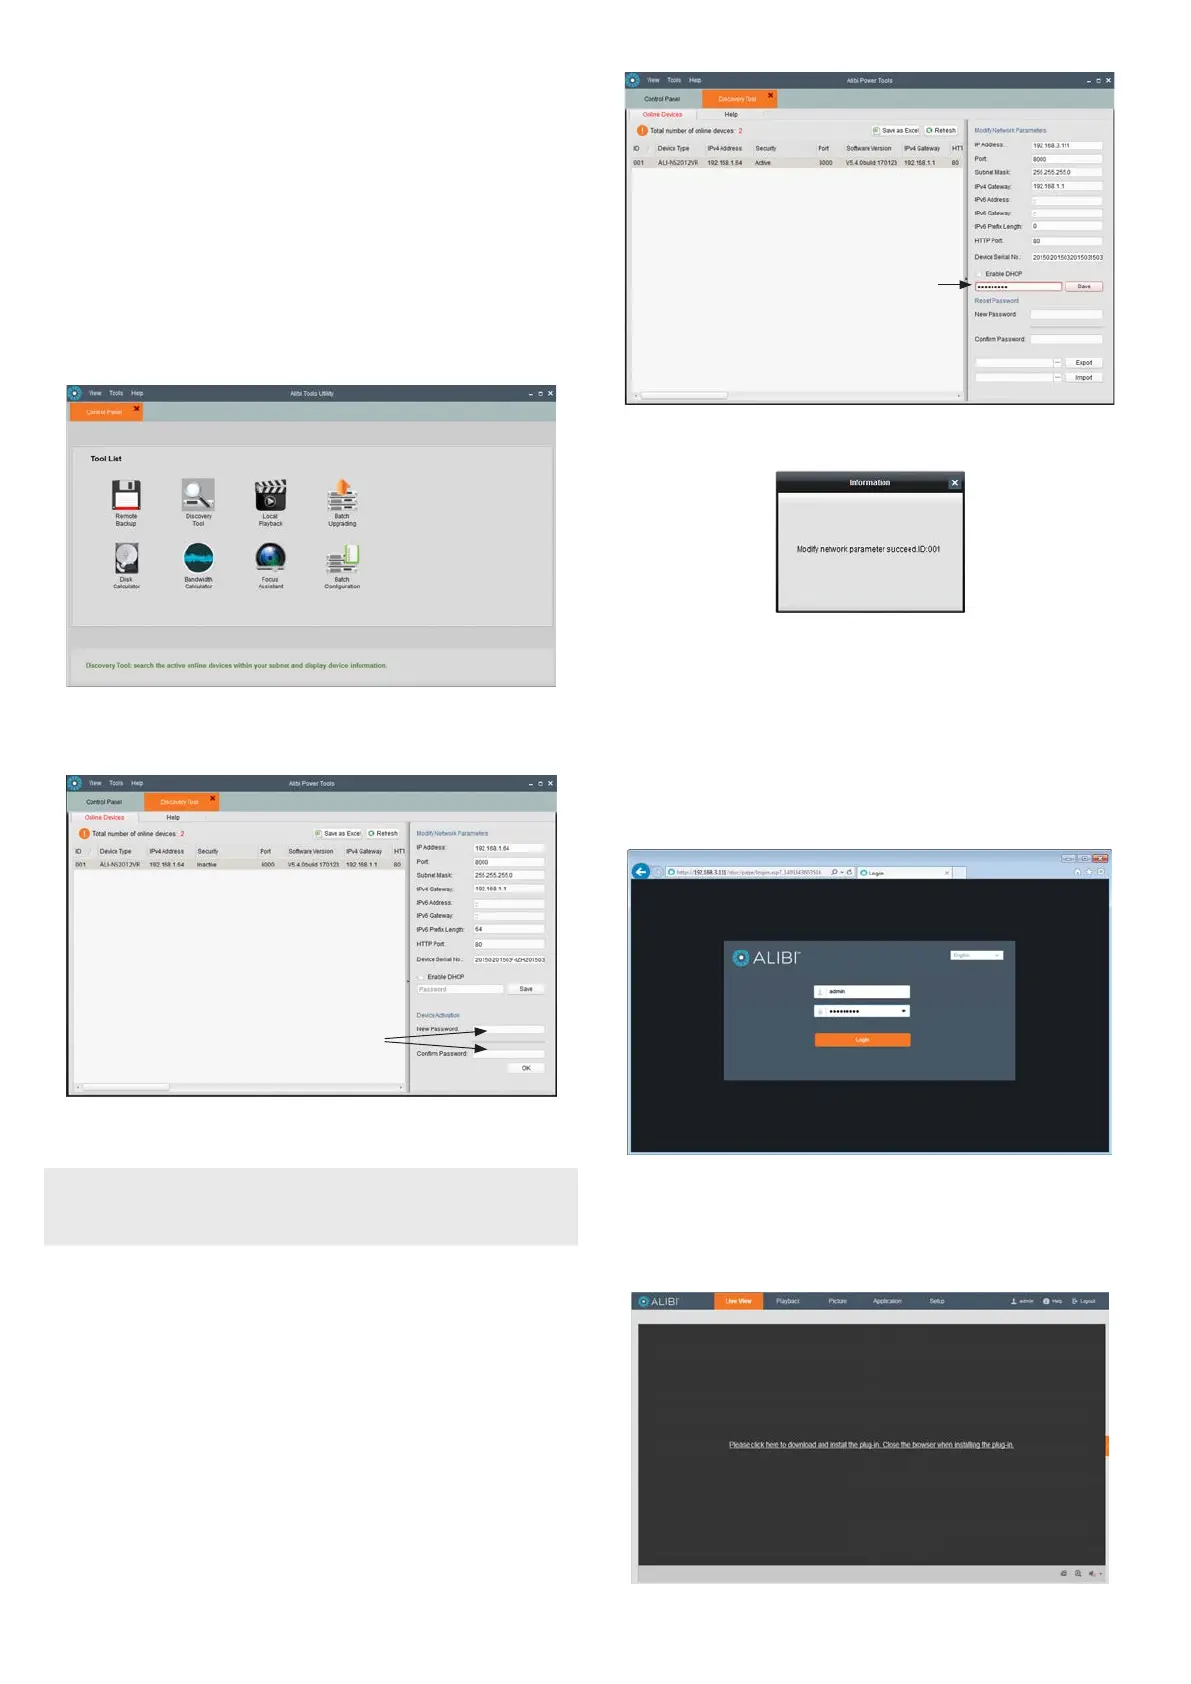
Step 2. Install the Alibi Discovery Tool software
Alibi Discovery Tool is a software utility used to “discover” Alibi cameras and NVRs/DVRs installed on
the physical Ethernet network (LAN) and change their network settings. Discovery Tool is provided in
the Alibi Power Tools software suite available for download from AlibiSecurity.com/resources. It
should be installed on a Window PC attached to the same LAN as your camera. To install the Alibi Power
Tools suite and use the Discovery Tool:
1. Download the Alibi Power Tools installer le and user manual from AlibiSecurity.com/
resources.
2. Copy the installer le to a Windows PC that is attached to the same Ethernet network your
camera is installed on.
3. Install Alibi Power Tools. Refer to the ALIBI™ Power Tools Installation and User Manual. When the
program opens, the following screen appears.
4. Double click on the Discovery Tool icon. The tool will automatically discover Alibi cameras and
recorders installed on the network. For example, in the example below, Discovery found the
ALI-NS2012VR camera.
Enter new
password in
the New and
Conrm elds
Notice that the IP address of the camera is 192.168.1.64 (default IP address), and the camera
Security is Inactive. The camera must be “activated” before it can be used.
NOTE
If an Alibi digital video recorder exists on the same LAN as the camera, the recorder may automatically
activate the camara, assigning the same admin user password setup in the recorder to the admin user
of the camera, and congure the network settings to be compatible with the LAN and the recorder. If
this occurred automatically, skip this step and the nest step of this procedure.
To Activate the camera:
a. Click on the camera entry in the Online Devices list to select it. The Network Parameters
and other device information will appear in the right column.
b. Enter a “strong” password in the New Password and Conrm Password elds. Strong
passwords have: 8 to 16 characters and include at least one character from two of the
following groups: uppercase, lower case, numbers and special characters.
c. Click OK to set the new password. The Security status should change to Active.
5. To change the network settings of the camera to be compatible with the LAN where it is
installed, do the following:
a. Click on the new camera to highlight it.
b. In the right frame, click the box to Enable DHCP to acquire network settings from a
DHCP server on the network, or enter a new IP address, Subnet Mask, and Gateway that is
compatible with your LAN (see below).
Password eld
c. Enter the password for the camer ain the password eld, and then click Save. If the new
settings were applied, the following window will appear.
If the window above didn’t appear, use the information provided to adjust the parameters,
and then Save the settings.
d. Close the Discovery tool and Alibi Power Tools.
Step 3. Login to the camera
To access the camera from a computer on the LAN:
1. Open your Microsoft Internet Explorer (IE) browser on your computer and enter the IP address of
the camera in the URL eld. In the example below, the IP address of the camera is 192.168.3.111.
2. In the login window, enter admin for the User Name and the password you created in the
Password eld, the click Login.
3. If this is the rst time you are logging into a camera, you may see the message in the following
screen. If this appears, follow the sub-steps below.
© 2017 Observint Technologies. All rights reserved.