EasyManua.ls Logo

Allstar Challenger 9300M - User Manual

Default Icon
20 pages
Print Icon
To Next Page IconTo Next Page
Loading...
INSTALLATION AND OWNER’S MANUAL
As of date of
manufacture, meets all
ANSI/UL 325 Safety
Requirements for
Vehicular Garage
Door Operators
110060
TABLE OF CONTENTS
Pre-Power On Installation Checklist ...............14
Section E: Operation & Adjustments.....................15
Important Safety Instructions .........................15
Turning on the Power ......................................15
Basic Operating Parameters ...........................15
Manual Door Operation..................................... 9
Adjustments .....................................................16
Opening Travel Adjustments...........................16
Open & Closing Force Adjustment .................16
Setting The Close Limit ...................................16
Obstruction Sensing Adjustment....................16
Testing The Obstruction Sensing ...................17
Positive Mechanical Lock Adjust ....................18
Alignment of Safe Finish Photoelectric ..........18
Photoelectric Obstruction Test .......................18
Wiring Diagram .......................................................19
Troubleshooting Guide ..........................................19
Warranty Information .............................................20
INSTALLER: Place this manual in the plastic envelope provided and
permanently attach to the wall near the pushbutton.
READ THIS MANUAL CAREFULLY BEFORE INSTALLATION OR USE
WARNING
Indicates a
MECHANICAL
hazard of INJURY
OR DEATH. Gives
instructions to avoid
the hazard.
CAUTION
READ THESE STATEMENTS CAREFULLY AND FOLLOW THE INSTRUCTIONS CLOSELY
The Warning and Caution boxes throughout this manual are there to protect you and your equipment.
Pay close attention to these boxes as you follow the manual.
WARNING CAUTION
Indicates an ELECTRICAL
hazard of DAMAGE to the
door, door operator, or
equipment. Gives
instructions to avoid the
hazard.
Indicates an
ELECTRICAL hazard
of INJURY OR
DEATH. Gives
instructions to avoid
the hazard.
Indicates a MECHANICAL
hazard of DAMAGE to the
door, door operator, or
equipment. Gives
instructions to avoid the
hazard.
Product Features ......................................................2
Tools Required..........................................................2
Component Identification ........................................3
A: Assembly Instructions ....................................3
Identify Your Door Type ...........................................4
B: Important Installation Instructions.....................5
C: Installing the Operator ........................................6
Mounting the Front Bracket...............................6
Mounting the Power Head .................................7
Door Bracket Installation...................................7
Door Arm Installation.........................................8
Connecting Electrical Power .............................9
The Convenience Lamp .....................................9
D: Control & Auxiliary Equipment..........................10
Standard Wall Button Installation ...................10
Programming the Radio Transmitter ..............11
Programming the Radio Receiver ...................13
Safe Finish™ Photosystem Installation..........13
SAVE THESE INSTRUCTIONS
BY
CHALLENGER 9000M SERIES
Residential Vehicular Garage Door Operator
MODEL NUMBERS 9300M, 9500M, and J9500M
Question and Answer IconNeed help?

Do you have a question about the Allstar Challenger 9300M and is the answer not in the manual?

Summary

ASSEMBLY INSTRUCTIONS

IMPORTANT INSTALLATION INSTRUCTIONS

INSTALLING THE OPERATOR

Mounting the Front Bracket

Instructions for securely installing the front mounting bracket on the header wall.

Door Bracket Installation

Steps for attaching the bracket to the garage door for arm connection.

Connecting Door Arm to Trolley

Attaching the door arm assembly to the opener trolley for sectional doors.

Connecting Door Arm to Door

Attaching the door arm to the door bracket for proper operation.

Connecting Door Arm to Door - One Piece Doors

Specific steps for one-piece doors using the optional arm assembly.

Connecting Electrical Power

Instructions for safely connecting the opener to the electrical power supply.

CONTROL AND AUXILIARY EQUIPMENT

Pre-Power On Installation Checklist

A vital checklist to ensure all installation steps are completed before applying power.

OPERATION AND ADJUSTMENT INSTRUCTIONS

Important Safety Instructions

Essential safety warnings and guidelines for operating the garage door opener.

Obstruction Sensing Adjustment

Setting the sensitivity for the door to reverse upon encountering an obstacle.

Opener Obstruction Sensing Test

Performing a test to verify the obstruction sensing feature is working correctly.

Troubleshooting Guide

Helps diagnose and resolve common problems with the garage door opener.

Overview

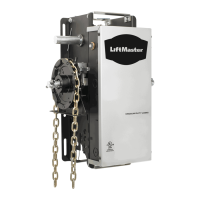
The Challenger 9000M Series Residential Vehicular Garage Door Operator is designed to provide automated and secure operation for overhead garage doors. This manual covers models 9300M, 9500M, and J9500M, offering a comprehensive guide for installation, operation, and maintenance. The device is intended for residential use and complies with ANSI/UL 325 Safety Requirements.

Function Description:

The Challenger 9000M Series operates by automating the opening and closing of garage doors. It utilizes a chain-drive mechanism connected to a power head unit, which moves a trolley along a rail to articulate the door. The system incorporates several safety and convenience features to ensure reliable and secure operation.

Key functional components include:

  • Power Head/Drive Rail Assembly: The main operational unit that houses the motor, control board, and drive mechanism.
  • Trolley: A component that connects to the door arm and moves along the rail, pulling or pushing the garage door.
  • Chain Assembly: The primary drive component that moves the trolley.
  • Limit Switches: These define the fully open and fully closed positions of the door, preventing over-travel.
  • Sensing System: A built-in feature that detects obstructions during door operation. In the downward (close) travel mode, the opener will sense an obstruction and reverse the direction of the door. In the open mode, the opener will stop. This system has independent adjustments for customizing the force level required for normal opening and closing.
  • Safe Finish™ Photosystem: An invisible infrared beam of light guards the door opening. If this beam is broken by a stationary or moving object during downward travel, the door will reverse. The motor control circuitry constantly monitors this system for proper operation.
  • Digital Radio Controls: The opener comes with a pre-programmed transmitter that uses one of over nineteen thousand private codes. It can be easily re-programmed to accept new transmitter signals.
  • Manual Release: A pull cord allows for the separation of the drive mechanism from the door, enabling manual operation during power failures or when desired.
  • Automatic Reconnection: After a manual release, once power is restored or automatic operation is desired, initiating operation (via push button or radio control) will automatically reconnect the manual release mechanism.
  • Alternating Action Operation: The mechanical wall push button operates in an Open/Stop/Close/Stop-Reverse to Open mode during normal operation.
  • Close Limit Switch Override: During the last one inch of closing travel, the Close Limit Switch overrides the Sensing System, preventing the door from reversing if it encounters an obstruction at this point. This is useful for situations like small pieces of ice or packed snow under the door.
  • Constant Contact To Close: For enhanced safety and security, the standard operation mode requires constant contact on the mechanical Push Button to close the door if the Safe Finish™ Photosystem is misaligned or if there is an irregularity in its wiring. In this mode, a Radio Transmitter cannot be used to close the door.
  • Positive Mechanical Lock: The garage door opener is designed with an automatic mechanical locking system that secures the door in the fully closed position.

Usage Features:

The Challenger 9000M Series offers several features designed to enhance user convenience and safety during daily operation:

  • Remote Control Operation: Users can operate the garage door from their vehicle using the supplied radio transmitter. The transmitter is pre-coded at the factory and can be reprogrammed to a custom code or to control multiple operators. It can be mounted on a visor or attached to a key-chain. The system is also compatible with HomeLink® systems.
  • Wall Push Button Control: A standard wall push button provides convenient operation from inside the garage. It should be mounted at least 5 feet above the floor and away from moving parts of the door to prevent access by small children.
  • Emergency Release: In case of power failure or emergency, the red pull knob handle allows for manual disconnection of the door from the opener, enabling manual opening and closing. The handle is located 6 feet above floor level for accessibility.
  • Safety Reverse System: The opener is designed to automatically reverse the door during closing travel if it encounters an obstruction. This is a critical safety feature that must be tested monthly.
  • Obstruction Stop System: During opening travel, if the door encounters an obstruction, the opener will stop.
  • Convenience Lamp: The power head unit includes a light socket for a rough service lamp bulb (75 Watt maximum). The lamp illuminates during operation and remains on for a set period (4 minutes 30 seconds) after the door reaches its open or close limit, providing illumination in the garage.
  • Optional Keyless Entry System: An outdoor keypad (optional accessory) allows entry to the garage using a four-digit PIN code, eliminating the need for a key or radio transmitter. Lighted buttons enhance nighttime use.

Maintenance Features:

Proper maintenance is crucial for the longevity and safe operation of the garage door opener. The manual outlines several maintenance checks and procedures:

  • Monthly Safety Tests:
    • Obstruction Sensing Feature Test: The door must reverse upon contact with a 1-1/2" high object (a piece of standard 2x4 board laid flat) placed on the floor during closing. If it fails, adjustments to the sensitivity or close limit are required, followed by retesting. This test ensures the safety reverse system is functioning correctly.
    • Photoelectric Obstruction Test: An object (e.g., a 6” x 12” box) should be placed in the path of the Safe Finish™ Photosystem beam. The door should stop closing and reverse to the open position if the beam is broken. If the system fails this test, the photosystem units may need alignment or adjustment of their installation height.
  • Door Balance Check: It is critical to ensure the garage door is properly balanced. An unbalanced door can prevent the sensing system from working correctly and may cause severe injury or death. If the door is not balanced, a qualified service person should be contacted to make repairs to cables, spring assemblies, and other door hardware.
  • Lubrication: The trolley and the release mechanism should be properly lubricated to ensure smooth operation.
  • Battery Replacement (Transmitter): The Quik-Code transmitter is powered by two 3-volt CR2032 batteries, which should be replaced after two years of normal use. The transmitter code is retained in permanent memory during battery replacement.
  • Antenna Wire Check: The antenna wire on the power head unit should be pointed straight down toward the floor for optimal radio reception.
  • Wiring Inspection: Periodically check all wiring connections for security and integrity. Ensure ground continuity and proper grounding of the power cord.
  • Reinforcement for Lightweight Doors: Fiberglass, aluminum, or lightweight steel garage doors may require reinforcement before installing the door mounting bracket to prevent damage and ensure proper operation of the safety reverse system. The door manufacturer should be consulted for a reinforcement kit.
  • Professional Service: For issues related to springs, pulleys, cables, or mounting hardware, or if the opener fails safety tests after adjustments, an experienced service professional should be contacted. Users are warned against attempting to adjust components under extreme tension.
  • Warning Label Placement: The Entrapment Warning Label and Emergency Release Instruction Card must be installed in prominent locations near the control push button and emergency release, respectively, to remind users of safety precautions.

By following these instructions, users can ensure the safe, reliable, and long-lasting performance of their Challenger 9000M Series garage door operator.

Allstar Challenger 9300M Specifications

General IconGeneral
TypeChain Drive
DriveChain
Horsepower1/2 HP
Frequency60 Hz
SecurityRolling Code
Battery BackupNo
Voltage120V

Related product manuals