EasyManua.ls Logo

Allstar MVP - User Manual

Allstar MVP
20 pages
Print Icon
To Next Page IconTo Next Page
Loading...
INSTALLATION AND OWNER’S MANUAL
As of date of manufacture,
meets all ANSI/UL 325 Safety
Requirements for Vehicular
Garage Door Openers
READ THIS MANUAL CAREFULLY BEFORE INSTALLATION OR USE
107063
INSTALLER: Place this manual in the plastic envelope provided and
permanently attach to the wall near the pushbutton.
Product Features....................................................2
Tools Required/Component Identification ..... 2 & 3
Assembly Instructions ........................................... 3
Identify Your Door Type......................................... 4
Important Installation Instructions........................5
Installing the Opener..............................................6
Mounting the Front Bracket ............................6
Mounting the Power Head...............................7
Using the Manual Release Mechanism...........7
Door Arm Installation ......................................8
Power Requirements/Permanent Wiring........9
Control and Auxiliary Equipment ........................ 10
Standard Wall Push Button Installation ....... 10
Installation of the Super Station ................... 10
Remote Control Radio System ..................... 11
TABLE OF CONTENTS
WARNING
Indicates a
MECHANICAL
hazard of INJURY
OR DEATH. Gives
instructions to avoid
the hazard
.
FCC and IC Radio Operation Statement ...... 12
Installation of Safe Finish Photosystem.......13
Installation Checklist.....................................14
Operation and Adjustment Instructions............15
Important Safety Instructions .......................15
Basic Operating Parameters.........................15
Testing the Limit Settings .............................16
Testing the Sensitivity...................................16
Testing the Reversing System......................16
Testing the Safe Finish Photosystem...........17
Operating the Super Station Wall Station .... 17
Wiring Diagram.....................................................18
Auxiliary Equipment Wiring Diagram..................19
Troubleshooting Guide ........................................19
Warranty Statement..............................................20
CAUTION
READ THESE STATEMENTS CAREFULLY AND FOLLOW THE INSTRUCTIONS CLOSELY
The Warning and Caution boxes throughout this manual are there to protect you and your equipment.
Pay close attention to these boxes as you follow the manual.
WARNING CAUTION
Indicates an ELECTRICAL
hazard of DAMAGE to the
door, door opener, or
equipment. Gives
instructions to avoid the
hazard
.
Indicates an
ELECTRICAL hazard
of INJURY OR
DEATH. Gives
instructions to avoid
the hazard
.
Indicates a MECHANICAL
hazard of DAMAGE to the
door, door opener, or
equipment. Gives
instructions to avoid the
hazard
.
Residential Vehicular Garage Door Operator
MODELS: MVP and MVP-SQ
By

Other manuals for Allstar MVP

Question and Answer IconNeed help?

Do you have a question about the Allstar MVP and is the answer not in the manual?

Summary

Product Features

Digital Radio Controls

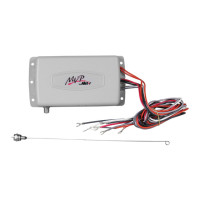
Describes the opener's radio transmitter with over 19,000 private codes that can be reprogrammed.

Safe Finish Photosystem

An invisible infrared beam that reverses a downward door if broken by an object.

Super Station Deluxe Wall Push Button

A feature-packed accessory unit with independent Open, Close, Stop buttons and opener light control.

Manual Release and Reconnection

A pull cord allowing manual operation of the door during power failures and automatic reconnection.

Sensing and Limit Systems

Details the obstruction sensing system and the close limit switch for safe door operation.

Constant Contact To Close Operation

Requires constant contact on the push button to close the door for safety and security.

Optional Wireless Keyless Entry

Describes the wireless keypad system for entry without a key or radio transmitter.

Tools Required for Installation

Component Identification

Assembly Instructions

Door Type Identification

Important Installation Instructions

Installing the Opener

Mounting the Front Bracket

Guides the user through marking the header and securely mounting the front bracket.

Mount Power Head to Ceiling

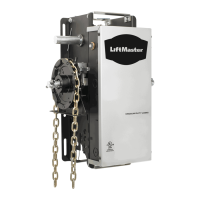
Details securing the power unit to ceiling joists using appropriate mounting hardware.

Door Arm Connection and Installation

Explains how to assemble and connect the door arm to the trolley and the door bracket.

Electrical Connections and Limit Settings

Covers electrical hookup, lamp installation, and setting the limit cams for door travel.

Control and Auxiliary Equipment

Installation of Standard Wall Push Button

Guides wiring and mounting a basic wall-mounted push button for door operation.

Installation of the Super Station

Steps to install the deluxe Super Station, a multi-function control panel for the opener.

Remote Control Radio System

Information on the transmitter's pre-coded system and compatibility with HomeLink®.

Resetting the Transmitter Code

Procedure for setting or changing the unique codes for the transmitter buttons.

Programming the MVP Radio Receiver

Instructions on how to program the opener to recognize specific transmitter codes.

Installing the Transmitter

Guidance on mounting the transmitter, typically to a car's sun visor.

Battery Replacement

Steps for replacing the batteries in the transmitter unit.

Installation of 2 Wire Safe Finish Photosystem

Step-by-step guide to install the safety photosystem sensors on door jambs.

Pre-Power On-Installation Checklist

Operation and Adjustment Instructions

Important Safety Instructions

Critical safety warnings and guidelines for operating the garage door opener.

Basic Operating Parameters

Explains how the opener responds to standard wall push button or radio control inputs.

Testing the Limit Settings

Procedures for setting the door's open and close travel limits correctly.

Adjusting the Sensitivity Force

How to adjust the opener's force sensitivity to safely detect and react to obstructions.

Testing the Openers Reversing System

Verifies the safety reversing feature by testing with a floor obstruction.

Testing the Safe Finish Photosystem

Confirms the proper function of the safety photosystem by testing its beam detection.

Operating the Super Station Controls

Describes the function of each button on the Super Station deluxe wall pushbutton.

Super Station Button Functions

Explains the operation of the Open, Close, Stop, Light, and Security buttons on the Super Station.

Security Switch Features

Describes how the Security Switch and Security Disable Switch provide enhanced safety and control.

Wiring Diagram

A schematic illustrating the electrical connections for the opener and its components.

Wiring Auxiliary Equipment

Photocell Wiring Options

Shows diagrams for parallel and series connections of photocell systems.

Troubleshooting Guide

Manufacturers Limited Warranty

Allstar MVP Specifications

General IconGeneral
ManufacturerAllstar
Horsepower1/2 HP
Battery BackupNo
Power SourceAC
Drive TypeChain Drive
Remote ControlYes
SecurityRolling Code

Related product manuals