USER MANUAL / ENGLISH
MICRO USB-C PORT
The micro-USB-C port (5V – *A) makes it possible to recharge the SuperCapacitors using the USB-C / micro-USB-C cable provided.
Charging can be completed with a standard USB-C charger (not included), like those used for cell phones. Recharging the SuperCapacitors with the
micro-USB-C cable takes priority over recharging via the 2 AA batteries.
The SuperCapacitors can be recharged with the micro-USB-C cable even in the absence of the AA batteries.
5
ON / OFF ET AUTO-TEST
To turn on the E2 System, use the ON / OFF switch. This safety switch
prevents undesired activation inside the bag. Pull the switch up, turn it
clockwise and hold for 2 seconds.
Each time it is turned on, the E2 System conducts an auto-test to verify
that the motor, SuperCapacitors and electronics are functioning properly.
During this self-test, the 3 LEDs light up chronologically to check that the
LEDs are functioning. Simultaneously, the LCD display blinks to check
that the LCD display is working properly and all icons are visible.
During this auto-test, the motor completes a first rotation at low
speed, switching on the green LED.
If the auto-test is succesfully completed, the motor rotates a second time and the green / orange LED will blink
>The system is ready for use.
If the auto-test detects a malfunction, the motor will rotate 4x and the red LED will remain on There is a problem in the system and it is not
operational.
If the system detects a malfunction and it is charging, the red LED will remain on and the orange LED will blink rapidly.
If there is a failure during the self-test, the following icon will be displayed on the LCD:
To turn the system OFF, pull the switch and turn it clockwise (same procedure as for turning ON). The motor will rotate 1 x and the red LED will turn
on and off again to indicate that the system has shut down.
NOTE: The LED blinking speed indicates that the system is either charging (2 x per second) or in standard ON mode (1 x every 3 seconds).
TERRAIN USE AND LED STATUSES
To use the E2 System on terrain, you will need to:
1- Turn ON the E2 System (see section 5)
2- Verify that the auto-test is okay (see section 5)
If the green LED blinks, the system is operational with at least six hours of autonomy
If the orange LED blinks, the system is operational with less than six hours of autonomy.
If the red LED blinks, the system cannot guarantee 100% inflation (but it will still attempt to inflate the airbag as much as possible).
If the red LED remains on, the system is defective and should not be used.
NOTE: The LED blinking speed indicates that the system is either charging (2 x per second) or in standard ON mode (1 x every 3 seconds).
To activate the airbag inflation, pull hard (between 5 to 10 kg) on the activation trigger.
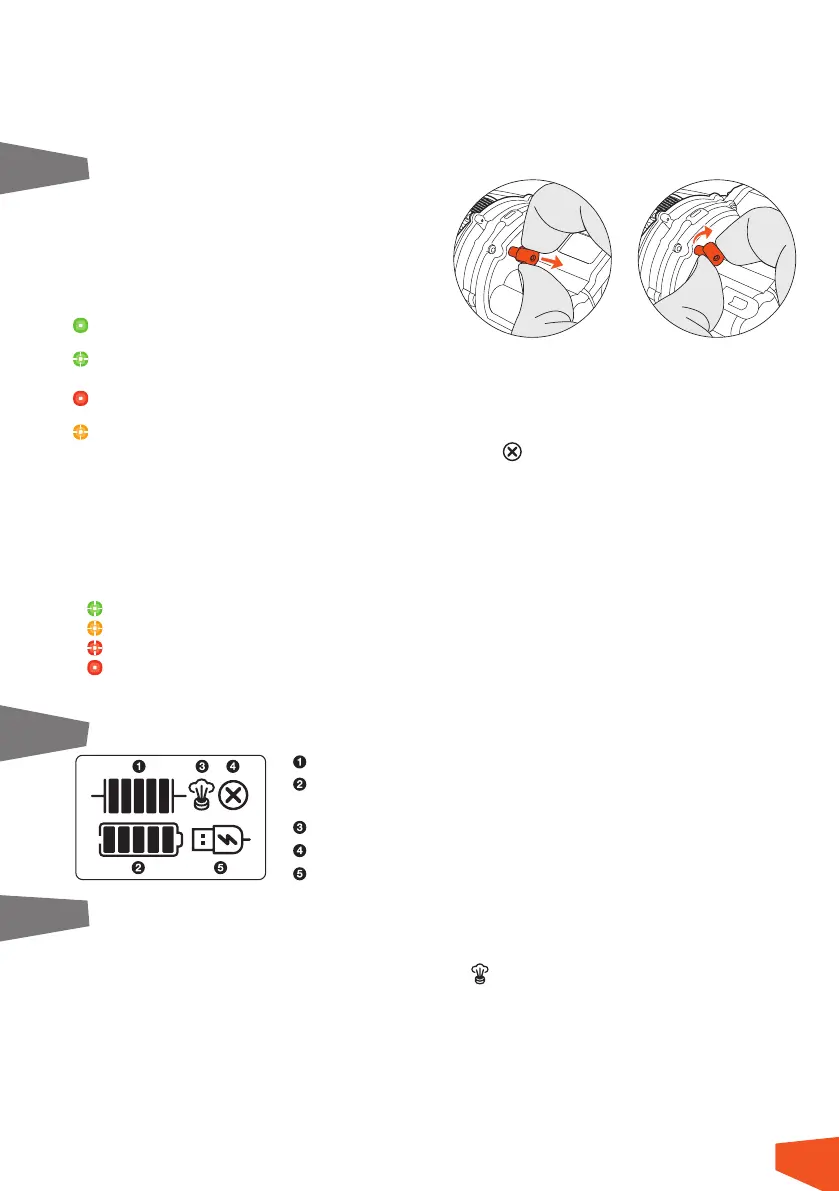
6 AFFICHAGE LCD
7 PRESSURE RELIEF VALVE:
The pressure relief valve is a solenoid-type electric valve and is active 3 minutes after the end of inflation for a maximum of 10 minutes or less
depending on the residual energy in the batteries or SuperCapacitors. It will then close automatically.
As soon as the valve is activated, the following icon appears on the LCD display.
The purpose of this valve is to reduce the airbag pressure 3 minutes after inflation. This is to reduce the stress on the seams and fabric of the airbag,
ensuring a longer lifespan inflation after inflation.
The pressure relief valve also allows passive and partial deflation of the airbag by reducing its pressure but does not allow complete deflation of
the airbag.
The operation of the pressure relief valve is controlled 3x during each self-test and can be clearly heard from the characteristic ticking noise (like
a Swiss watch!)
SuperCapacitor charge level
AA battery power level: if the batteries are missing or completely empty, the icon blinks
to indicate that batteries need to be changed or installed.
Displays when the pressure relief valve is triggered
Displays if the self-test is not functioning
Displays when the USB-C cable is connected and powered
6
 Loading...