Do you have a question about the Alti-2 Altimaster Series and is the answer not in the manual?
Congratulates the user and lists compatible Altimaster altimeter models.
States the manual does not substitute training and lists critical safety warnings.
Explains how altimeters use air pressure to indicate relative altitude.
Details the aneroid capsule's function in response to pressure changes.
Describes the system transferring capsule motion to the pointer.
Mandates training completion and recommends backup devices for altimeter use.
Explains warning segments and the altimeter's measurement limitations.
Identifies barometric pressure and drop zone altitude as key adjustment factors.
Provides a method for adjusting the altimeter based on airport vs. drop zone elevation.
Details the procedure for zeroing the altimeter before each use.
Recommends using other methods, like visual judgment and second altimeters, for altitude determination.
Explains how tumbling or turbulence can affect altimeter readings, especially for chest mounts.
Discusses how high drop zone elevations can decrease altimeter accuracy above certain altitudes.
Suggests testing methods like using an altitude test chamber or comparing with other altimeters.
Clearly states that Altimaster altimeters are not designed or tested for base jumping.
Advises checking for safety notices and what to do if the altimeter malfunctions.
Provides guidelines for cleaning and general care of the altimeter.
Outlines when to return the altimeter for service and the return process.
Specific operational checks for the Altimaster II, including air hole and O-ring.
Instructions on adjusting and mounting the Altimaster II altimeter.
How to adjust Altimaster III, Galaxy, and Stratosphere altimeters.
Details on replacing the lens and available mounting kits.
A comparative table of technical specifications for different Altimaster models.
The Altimaster Series Altimeter is a mechanical device designed for sport parachuting, providing an indication of changes in altitude based on variations in air pressure. It is crucial to understand that the altimeter does not directly measure altitude but rather relies on the relationship between air pressure and altitude, where air pressure decreases as altitude increases. This relationship is assumed to remain relatively constant during a typical skydive. The device translates these pressure changes into a visual indication of relative altitude via a needle on a dial.
The core of the Altimaster altimeter's function lies in its aneroid capsule and mechanical movement. The aneroid capsule, composed of two welded diaphragms of copper and beryllium alloy, is evacuated to create a near-vacuum. As atmospheric pressure changes with altitude, the capsule expands or contracts. Specifically, with increasing altitude (and decreasing atmospheric pressure), the capsule expands. Conversely, as altitude decreases, the capsule returns to its normal state. This linear motion of the capsule is then amplified and converted into a rotational motion by a system of levers and gears, which in turn rotates a pinion to which the altimeter's pointer (needle) is attached. This allows the pointer to indicate relative altitude on the altimeter's dial.
A key responsibility of the user is to adjust the altimeter to ensure it accurately reflects the Above Ground Level (AGL) altitude above the intended landing area, and that it reads zero when on the ground at that location. This adjustment accounts for variations in barometric pressure and differences between the drop zone altitude and the airport altitude.
The Altimaster altimeter is intended as an aid for checking altitude during skydiving. It is strongly emphasized that users should not rely solely on the altimeter for safety, as it is a mechanical device prone to malfunction. Users are advised to employ multiple methods for altitude determination, including visual cross-referencing with the ground, using a second altimeter, an audible altimeter, and an Automatic Activation Device (AAD).
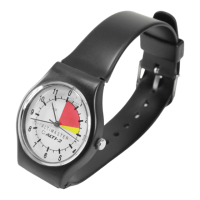
The altimeter features red and yellow warning segments on its faceplate. These segments serve as additional visual cues for close proximity to the ground and are not meant to dictate the exact parachute deployment altitude. Deployment altitude should be determined based on the type of skydive and agreed upon by all jumpers before the jump.
The standard Altimaster II Altimeter has an operating range up to 17,000 ft Mean Sea Level (MSL). Beyond this limit, the needle may cease to move until the altitude drops below 17,000 ft MSL. Users should be aware that if the drop zone is at a high elevation, the altimeter's accuracy may decrease at higher altitudes, particularly when exceeding 13,000 ft AGL (18,000 ft MSL), due to operating outside its linear range.
Adjusting the altimeter involves rotating a knob or bezel to set the needle to the zero position before each use. If the drop zone elevation differs from the airport elevation, a specific procedure must be followed: determine both altitudes, calculate the airport altitude relative to the drop zone, and then set the altimeter to this calculated altitude at the airport. A critical warning is issued regarding miscalculations, especially if the airport elevation relative to the drop zone is incorrectly set as a negative number, which could lead to dangerous misreadings.
Users are cautioned against making any adjustments to the altimeter after "zeroing" it, as this can have serious consequences, particularly during ascent, exit from the aircraft, or contact with other skydivers in freefall.
The Altimaster II can be mounted using a wrist strap or a chest mount. For chest mounting on a pillow or similar, the hand mount can be removed, and the instrument stitched to the pillow using the provided holes.
Proper care and use are generally sufficient, and no routine servicing should be required. However, specific guidelines are provided for certain situations.
Users are strongly advised against disassembling the altimeter themselves, as special equipment is needed for re-assembly, and doing so voids all warranties. All maintenance, unless explicitly described in the manual, should be performed by Alti-2 Inc.
For cleaning, a brush can be used to remove dirt, and a damp cloth to wipe off contaminants. The altimeter should never be washed by placing it in liquid, nor should it be oiled.
If the altimeter is immersed in water, it should be returned to Alti-2 Inc. If immersed in salt water, it is likely damaged beyond repair, but users are instructed to disassemble it and rinse with fresh water before returning it to Alti-2 Inc. (without reassembling).
Regular inspection of the small O-Ring at the base of the calibration knob on the Altimaster II is recommended. This O-ring provides friction to prevent accidental calibration changes. If it is damaged or if the knob turns too easily or with difficulty, the altimeter should be returned for service. Similarly, if the lens becomes excessively scratched and obscures the needle or faceplate, it should be returned for service.
The small air hole on the back of the Altimaster II is critical for proper operation and must not be blocked. Cleaning this hole should only be done with light suction; compressed air or sharp objects should not be used. Damage or blockage of this hole necessitates returning the altimeter for service.
If the altimeter exhibits abnormal or unusual behavior, or if it has been dropped onto a hard surface, its use should be discontinued immediately, and it should be returned to Alti-2 Inc. for servicing. When returning an altimeter, users should include contact information and a description of the problem. Repair status can be checked via the Alti-2 Inc. website or by contacting their Repair Department.
| Display | LCD |
|---|---|
| Units | Feet / Meters |
| Type | Altimeter |
| Resolution | 1 ft |
| Water Resistance | Water Resistant |