EasyManua.ls Logo

American Standard STUDIO 2946.BW - User Manual

American Standard STUDIO 2946.BW
6 pages
Print Icon
To Next Page IconTo Next Page
Loading...
STUDIO
®
SHOWER & BATH WALLS
MODELS: 2946.BW & 2946.SW
755140-100
PREPARATION:
TOOLS:
TOOLS & MATERIALS REQUIRED....
Studio
®
shower walls are to be installed directly
over stud walls. Drywall is not required.
• Drill & Hole Saw or Sabre Saw
Tape Measure
• Caulking Gun
• Pencil
• Square
• Level
A) Remove dry wall surface and ensure that
alcove is plumb and square. (Illustration 1)
MATERIALS:
Acrylic/Latex or Acrylic/Silicone Sealant
• Galvanized (or corrosion resistant) flat head
screws 3/4" minimum length
• 2 x 4 lumber for additional wall studs as required
Tub Surround Adhesive
• 1 x 4’s if installing shower doors
USE SHOWER WALL 2946.SW WITH SHOWER BASE 2946.STR or 2946.STL
USE BATH WALL 2946.BW WITH BATH TUB 2946.102 or 2946.202
Illustration 1
Installation for Model# 2946.SW
The studs should be located as shown to
properly support walls. Provide additional
studs where illustrated.
B) Identify your model number in the illustrations
which follow. Prepare studs as indicated.
8"
(203mm)
10-1/2"
(267mm)
32"
(813mm)
6"
(152mm)
12"
(305mm)
60"
(1524mm)
9-1/4"
(235mm)
9-1/4"
(235mm)
10"
(254mm)
10"
(254mm)
SAVE FOR FUTURE USE
Local building codes vary by location. Observe all local plumbing and building codes.
Unpack your new shower walls and inspect them carefully for damage. Verify that the walls are the correct size for your
installation. Refer to American Standard roughing-in information for specific dimensions for each model.
To ensure maximum performance and pleasure from this product, please follow the instructions and cautions.
BEFORE YOU BEGIN....
!
Thank you for selecting American Standard – the benchmark of fine quality for over 100 years. To ensure this product is installed
properly, please read these instructions carefully before you begin. (Certain installations may require professional help.) Also be
sure your installation conforms to local codes.
NOTE: Take extra care in handling surfaces of the walls. Use only non-abrasive cloths to avoid scratching.
INSTALLATION INSTRUCTIONS
All product names listed herein are trademarks of AS America, Inc. unless otherwise noted.
© AS America, Inc. 2016
Each alcove
stud must
be plumb
and square.
(Left hand shower base shown)
Question and Answer IconNeed help?

Do you have a question about the American Standard STUDIO 2946.BW and is the answer not in the manual?

Summary

Installation Instructions

Model Identification

Identifies the specific Studio Shower & Bath Wall models covered by the instructions.

Model Compatibility

Specifies compatible shower bases and bathtubs for each wall model.

Before Installation

Key considerations before starting installation, including local codes and product inspection.

Tools and Materials

Lists all necessary tools and materials required for the installation process.

Preparation Overview

Details preparation steps, including wall surface removal and stud identification.

Installation for Model 2946.SW

Specific instructions and diagrams for installing Model 2946.SW.

Installation Procedures

Installation for Model 2946.BW

Specific instructions and diagrams for installing Model 2946.BW.

Important Notes

Crucial reminders regarding plumbing and installation over different wall materials.

Shower Door Preparation

Instructions for preparing side walls if a shower door is to be installed.

Panel Installation Steps

Panel Placement and Marking

Guidance on positioning panels, marking cutouts for fixtures, and marking alignment lines.

Applying Adhesive and Sealant

Instructions for applying tub surround adhesive and sealant to studs and ledges.

Securing and Finishing Panels

Securing Wall Panels

Steps for drilling clearance holes and securing wall panels with screws.

Installing Side Panels

Instructions for applying adhesive to side panels and aligning them with marked lines.

Final Assembly and Care

Securing Side Panels

Detailed instructions for drilling and securing the side panels with screws.

Temporary Bracing

Guidance on using temporary braces to secure panels while adhesive cures.

Greenboard Installation Note

Specific advice for screw placement when installing over greenboard.

Post-Installation and Maintenance

Final Sealant and Connections

Instructions for applying final sealant beads and making supply and drain connections.

Post Installation Clean-Up

Procedures and recommended materials for cleaning the installation area.

Aftercare and Cleaning

Essential warnings and guidelines for cleaning and maintaining the shower wall surface.

Overview

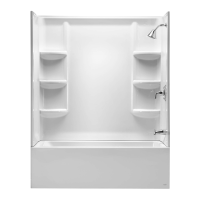
This document is an installation manual for the American Standard Studio® Shower & Bath Walls, specifically models 2946.BW and 2946.SW. These walls are designed to be used with either a shower base (2946.STR or 2946.STL for 2946.SW) or a bathtub (2946.102 or 2946.202 for 2946.BW). The primary function of these products is to provide a finished, waterproof wall surface for shower and bath alcoves, installed directly over existing stud walls without the need for drywall.

Important Technical Specifications and Installation Requirements:

The manual provides detailed dimensions for stud placement to ensure proper support for the walls. For the 2946.SW shower wall, the alcove width is 60 inches (1524mm), with specific stud placements at 9-1/4 inches (235mm), 10 inches (254mm), 10 inches (254mm), and 9-1/4 inches (235mm) from the center. The depth from the back wall to the front of the shower base is 32 inches (813mm), with additional stud measurements at 8 inches (203mm), 12 inches (305mm), and 6 inches (152mm) from the back, and a 10-1/2 inch (267mm) measurement from the front.

For the 2946.BW bath wall, the alcove width is also 60 inches (1524mm), with similar stud placements at 9-1/4 inches (235mm), 10 inches (254mm), 10 inches (254mm), and 9-1/4 inches (235mm) from the center. The depth from the back wall to the front of the bathtub is 32 inches (813mm), with stud measurements at 9 inches (229mm), 12 inches (305mm), and 6 inches (152mm) from the back, and a 9-3/4 inch (248mm) measurement from the front.

The installation process requires several tools and materials. Essential tools include a drill and hole saw or sabre saw, tape measure, caulking gun, pencil, square, and level. Required materials consist of acrylic/latex or acrylic/silicone sealant, galvanized (or corrosion-resistant) flat head screws (3/4" minimum length), 2x4 lumber for additional wall studs as needed, and tub surround adhesive. If installing shower doors, 1x4s are also required.

Usage Features and Installation Process:

The Studio® Shower & Bath Walls are designed for direct installation over stud walls, eliminating the need for drywall. This simplifies the installation process and potentially reduces material costs. The walls feature nailing flanges at the top and front for secure attachment to the studs. Side panels also include pockets on the back for installing 1x4 supports if a shower door is planned.

The installation procedure involves several key steps:

  1. Preparation: Ensure the alcove is plumb and square, removing any existing drywall. Identify the model number and prepare studs according to the provided diagrams, adding additional studs where necessary for proper wall support.
  2. Shower Door Support (Optional): If a shower door is to be installed, cut and attach a 1x4 board into the pocket on the back of both side walls using tub surround adhesive. The 1x4 should be cut at a 45° angle at one end and butt up to the top of the pocket. The length of the 1x4 varies depending on whether it's for a shower base (71-1/2" or 1816mm) or a tub (57-1/2" or 1460mm).
  3. Panel Placement and Marking: Position the three wall panels into the alcove, ensuring they fit properly onto the shower base or tub. Mark cutouts for plumbing fixtures on the appropriate side panel, referring to plumbing fixture installation instructions for dimensions. Carefully cut these holes using a hole saw and attach any fire retardant pads as instructed. Once satisfied with the fit, mark a line across the top of the panels on each stud, then remove the panels. This line will aid in alignment during subsequent steps.
  4. Adhesive and Sealant Application (Back Panel): Apply a bead of tub surround adhesive down each stud that will contact the back panel, staying below the marked line. Do not apply adhesive to corner studs. Lay a bead of sealant along the shower base or tub ledge. Reposition the back panel, aligning it with the pencil line, and press firmly against the studs.
  5. Securing the Back Panel: Locate and drill clearance holes in the center of the top nailing flange and on each stud. Also, drill four evenly spaced clearance holes on the front nailing flange on each side. Install galvanized screws through these holes into the studs to secure the back wall panel. Add a bead of sealant down the vertical corner of the back panel.
  6. Adhesive and Sealant Application (Side Panels): Apply a bead of tub surround adhesive down each stud that will contact the side panels, staying below the marked line. Lay a bead of sealant along the side panel mating surface and the shower base or tub ledge.
  7. Securing the Side Panels: Align the top nailing flange of each side panel with the marked pencil line. Press firmly into place to ensure proper adhesion to studs. Check alignment with all mating surfaces and reposition if necessary. Locate and drill clearance holes in the center of the top nailing flange and on each stud. Also, drill clearance holes in the front nailing flange on each side panel at approximately 12-inch intervals. Install galvanized screws through these holes into the studs to secure the side wall panels.
  8. Bracing: Install temporary braces to hold the center of the back and side panels tightly against the studs for approximately 24 hours while the adhesive sets. Use cushioning between panels and braces to prevent scratching.
  9. Finishing: After greenboard (if used) is installed, apply a finished sealant bead to all edges and joints, following the sealant manufacturer's recommended cure time. Make connections to supply and drain lines.

Maintenance Features and Aftercare:

The manual provides comprehensive aftercare and cleaning instructions to maintain the appearance and longevity of the shower and bath walls.

  • Post-Installation Clean-up: Remove construction debris. Tile grout can be removed with a wooden popsicle stick or tongue depressor. Avoid using wire brushes or any other metal implements on the surface. General clean-up can be done with warm water and liquid dishwashing detergent. Stubborn dirt or stains can be removed with granular Spic and Span® mixed with water. Painter's naphtha can be used to remove excess adhesives and/or wet oil-base paint.
  • Regular Cleaning: Clean after use with a mild liquid household detergent cleaner.
  • Warnings:
    • Do not use cleaning products with labels that say "not suitable for use with ABS, acrylic or polystyrene." Read all labels carefully.
    • Avoid excessively hot water, as it may cause surface damage.
    • HARSH CHEMICALS SHOULD NEVER BE USED ON SHOWER WALL SURFACE. This includes products like Lestoil, Lysol Disinfectant (spray or concentrate), Lysol Basin, Tub and Tile Cleaner, Windex, Mr. Clean, Dow Disinfectant Bathroom Cleaner, or cleaning products in aerosol cans.
    • Do not use wire brushes, knives, or sharp objects to remove stains, cigarette tar deposits, or other surface blemishes.
    • Abrasive cleaners or powders must not be used, as they will dull the surface. If the glossy surface loses its sheen, dulled areas or light scratches can be restored by rubbing with a white "automotive type" polishing compound and waxing with a "liquid wax."
    • Do not wax areas where you walk or stand.
    • Do not allow nail polish remover, acetone, dry cleaning fluid, paint remover, or other solvents to come into contact with the surface. Clean surrounding surfaces immediately after using caustic drain cleaners.
    • Burning cigarettes will damage the surface.
    • Should damage occur, repairs can be made quickly and easily; distributors or builders can provide details.

Warranty Information:

American Standard offers a Limited Lifetime Warranty for Shower and Bath Walls to the original consumer purchaser. This warranty covers repair or replacement of defective parts under normal residential use and maintenance, as long as the product is owned by the original purchaser. To activate the warranty, purchasers must register their bath walls online within thirty days of purchase. The warranty does not cover the cost of repair or replacement of installation materials like tiles or marble.

The warranty specifically excludes:

  1. Defects or damages from shipping, installation, alterations, accidents, abuse, misuse, lack of proper maintenance, and use of non-genuine American Standard replacement parts.
  2. Deterioration through normal wear and tear and the expense of normal maintenance.
  3. Commercial application.
  4. Options and accessories, which have a separate one-year limited warranty for parts only (excluding labor).
  5. Postage or shipping costs for returning products for repair or replacement, and labor or other costs incurred during product removal or installation.
  6. Any liability for consequential or incidental damages, or the extension beyond the duration of this limited warranty of any implied warranties, including those of merchantability or fitness for an intended purpose.
  7. Responsibility for compliance with local code requirements.

Contact information for warranty service is provided for the United States, Canada, and Mexico.

American Standard STUDIO 2946.BW Specifications

General IconGeneral
BrandAmerican Standard
ModelSTUDIO 2946.BW
CategoryPlumbing Product
LanguageEnglish

Related product manuals