EasyManua.ls Logo

American Standard SYMPHONY 4501 User Manual

American Standard SYMPHONY 4501
2 pages
To Next Page IconTo Next Page
Page #1 background imageLoading...
Page #1 background image
FINISHED WALL
4"
TOP OF TUB RIM
BOTTOM OF TUB
74" FOR HEAD
CLEARANCE
3-5/8" REF.
1-5/8" TO 3-1/4"
18" OPTIONAL
5-1/8" REF.
1/2" NPT
1/2" NPT''
6-3/4"
3-5/8"
5-1/2" REF.
"SEE ILLUSTRATION "
Certified to comply with ANSI A112.18.1
THREADED INLETS
INLETS 3-3/8"
INLETS 1/2" NPT
3-3/8"
SHR. 1/2" NPT
TUB PORT 1/2" NPT
'
ROUGHING-IN DIMENSIONS
Installation
Instructions
To assure proper positioning in relation
to wall, note roughing-in dimensions.
4501
4501S
SYMPHONY
1
ROUGHING-IN
Turn off water at main supply.
CAUTION
When soldering, remove PLASTER GUARD, CARTRIDGES and CHECK STOPS (IF PRESENT). When finished soldering,
flush valve body, replace cartridges, check stops (if present) and plaster guard to continue installation. Use thread
sealant or Teflon tape on threaded connections.
NOTE
If the valve is installed on a fiberglass
or other thin wall application, the
PLASTER GUARD (4) can be used as a support.
Connect hot and cold water supplies.
Cap off shower pipe (5) and tub filler pipe (6).
For support, use pipe BRACES (7) secured to wooden braces.
With valve turned off, turn on water supplies. Check for leaks.
COLD
HOT
Cut a 4" dia. hole in the shower stall.
Drill two additional 1" holes to allow access
to the stops.
Remove PLASTER GUARD (4), rotate 90˚
so that indicated screw holes fit MANIFOLD (2).
Push CAP on valve, place ESCUTCHEON on and
attach with screws.
1
7
5
3
6
4
2
See Roughing-in diagram before starting.
Connections are:
1/2" female NPT for threaded inlets
Connect RISER PIPE (1) to MANIFOLD (2)
top outlet marked "SHR".
Connect TUB FILLER PIPE (3) at bottom
outlet marked "TUB".
For proper positioning the finished wall
must be within side wall of PLASTER
GUARD (4).
M968805 REV. 1.4
OPTIONAL TO FINISHED
FLOOR USUALLY
BETWEEN 65'' AND 80''
PRESSURE BALANCING BATH
AND SHOWER TRIM KITS
Thank you for selecting American-Standard...the benchmark
of fine quality for over 100 years.
To ensure that your installation proceeds smoothly--please
read these instructions carefully before you begin.
Question and Answer IconNeed help?

Do you have a question about the American Standard SYMPHONY 4501 and is the answer not in the manual?

American Standard SYMPHONY 4501 Specifications

General IconGeneral
Bowl ShapeElongated
ADA CompliantYes
MaterialVitreous China
Color OptionsWhite, Bone, Linen
Flush TypeGravity
Rough-In Size12 inches
Trap Size2 inches

Summary

ROUGHING-IN

ROUGHING-IN DIMENSIONS

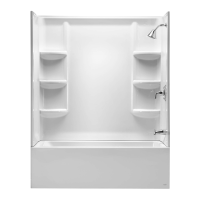
Diagram detailing required wall measurements for proper positioning of bath and shower components.

WATER SUPPLY SAFETY

Essential safety warning to shut off the main water supply before commencing work.

SOLDERING PROCEDURES AND NOTES

Important procedural notes for soldering, including component removal and reassembly.

PIPE CONNECTION GUIDE

Instructions for connecting riser pipe and tub filler pipe to the manifold.

FIBERGLASS WALL INSTALLATION

Specific steps for installing the valve on thin-walled or fiberglass shower stalls.

INSTALL TRIM

ESCUTCHEON AND HANDLE INSTALLATION

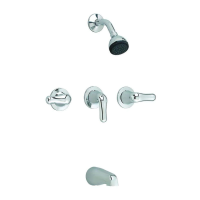
Steps for mounting the escutcheon, handle, and setting the index button.

SHOWER ARM AND SPOUT INSTALLATION

Instructions for installing the shower arm with flange, shower head, and diverter spout.

ADJUST HOT LIMIT STOP

HOT WATER TEMPERATURE SETTING

Procedure to adjust the hot limit safety stop for optimal hot water temperature.

SERVICE

FAUCET DRIP TROUBLESHOOTING

Basic troubleshooting for faucet drips by operating the handle.

CARTRIDGE AND INLET CLEANING

Steps to clean clogged cartridge inlets to restore proper flow.

CARE INSTRUCTIONS

CLEANING GUIDELINES

Recommendations for cleaning the product using water and a soft cloth.

Related product manuals