Troubleshooting
If you experience operation or performance problems with this product, compare your installation
with the electrical wiring diagram on the previous pages. If problems persist, read the following
troubleshooting tips, which may help, eliminate the problems.
Amplifier will not
power up.
Check to make sure you have a good ground connection.
Check that the Remote Input (Turn-On) has at least 12V.
Check that there is battery power on the (+) terminal.
Check that there is at least 12V.
Check all fuses, replace if necessary.
Make sure that the Protection LED is not illuminated.
If it is it, shut off the amplifier briefly, and then repower it.
Protection LED
comes on when
amplifier is powered
up.
Check for short circuits on speaker leads.
Turn down the volume control on the head unit to prevent overdriving.
Remove speaker leads, and reset the amplifier. If the Protection LED still
comes on, then the amplifier is faulty and needs servicing.
No output.
Check that all fuses are OK.
Check that amplifier is properly grounded.
Check that the Remote Input (Turn-On) has at least 3VDC.
Check that the RCA audio cables are plugged into the proper inputs.
Check all speaker wiring.
Low output.
Reset the Level Control.
Check the Crossover Control settings.
SYMPTOM Try this!
Audio present in only
one channel.
Check the RCA interconnect cables. Check all speaker wiring.
High hiss in the
speakers.
Disconnect all RCA inputs to the amplifiers. If the hiss disappears, then
plug in the component driving the amplifier and unplug its inputs. If the
hiss disappears at this point, go on until the faulty/noisy component is
found.
It is best to set the amplifier's input level control as low as possible. The
best subjective signal-to-noise ratio is achieved in this manner. Try to set
the head unit as high as possible (without distortion) and the amp input
level as low as possible.
Squealing noise from
speakers.
Check for improperly grounded RCA interconnects.
Distorted sound.
Check that the Input Level Control is set to match the signal level of the
head unit. Always try to set the Input Level as low as possible.
Check that all crossover frequencies are properly set.
Check for short circuits on the speaker leads.
Amplifier gets very
hot.
Check that the minimum speaker impedance for the amp model is
correct.
Check that there is good air circulation around the amp. In some
applications, it may be necessary to add external cooling fan(s).
Engine noise (static
type).
This is usually caused by poor quality RCA cables, which can pick up
radiated noise. Use only the best quality cables, and route them away
from power cables.
Engine noise
(alternator whine).
Check that speaker leads are not shorted to the vehicle chassis. Check
that the RCA grounds are not shorted to the vehicle chassis. Check that
the head unit is properly grounded.
11
GND
REM
+12V
PRO
PWR
BRIDGE
CH1 CH2
CH3 CH4
POWERINPUT
SPEAKEROUTPUT
GND
REM
+12V
PRO
PWR
BRIDGE
CH1 CH2
CH3 CH4
POWERINPUT
SPEAKEROUTPUT
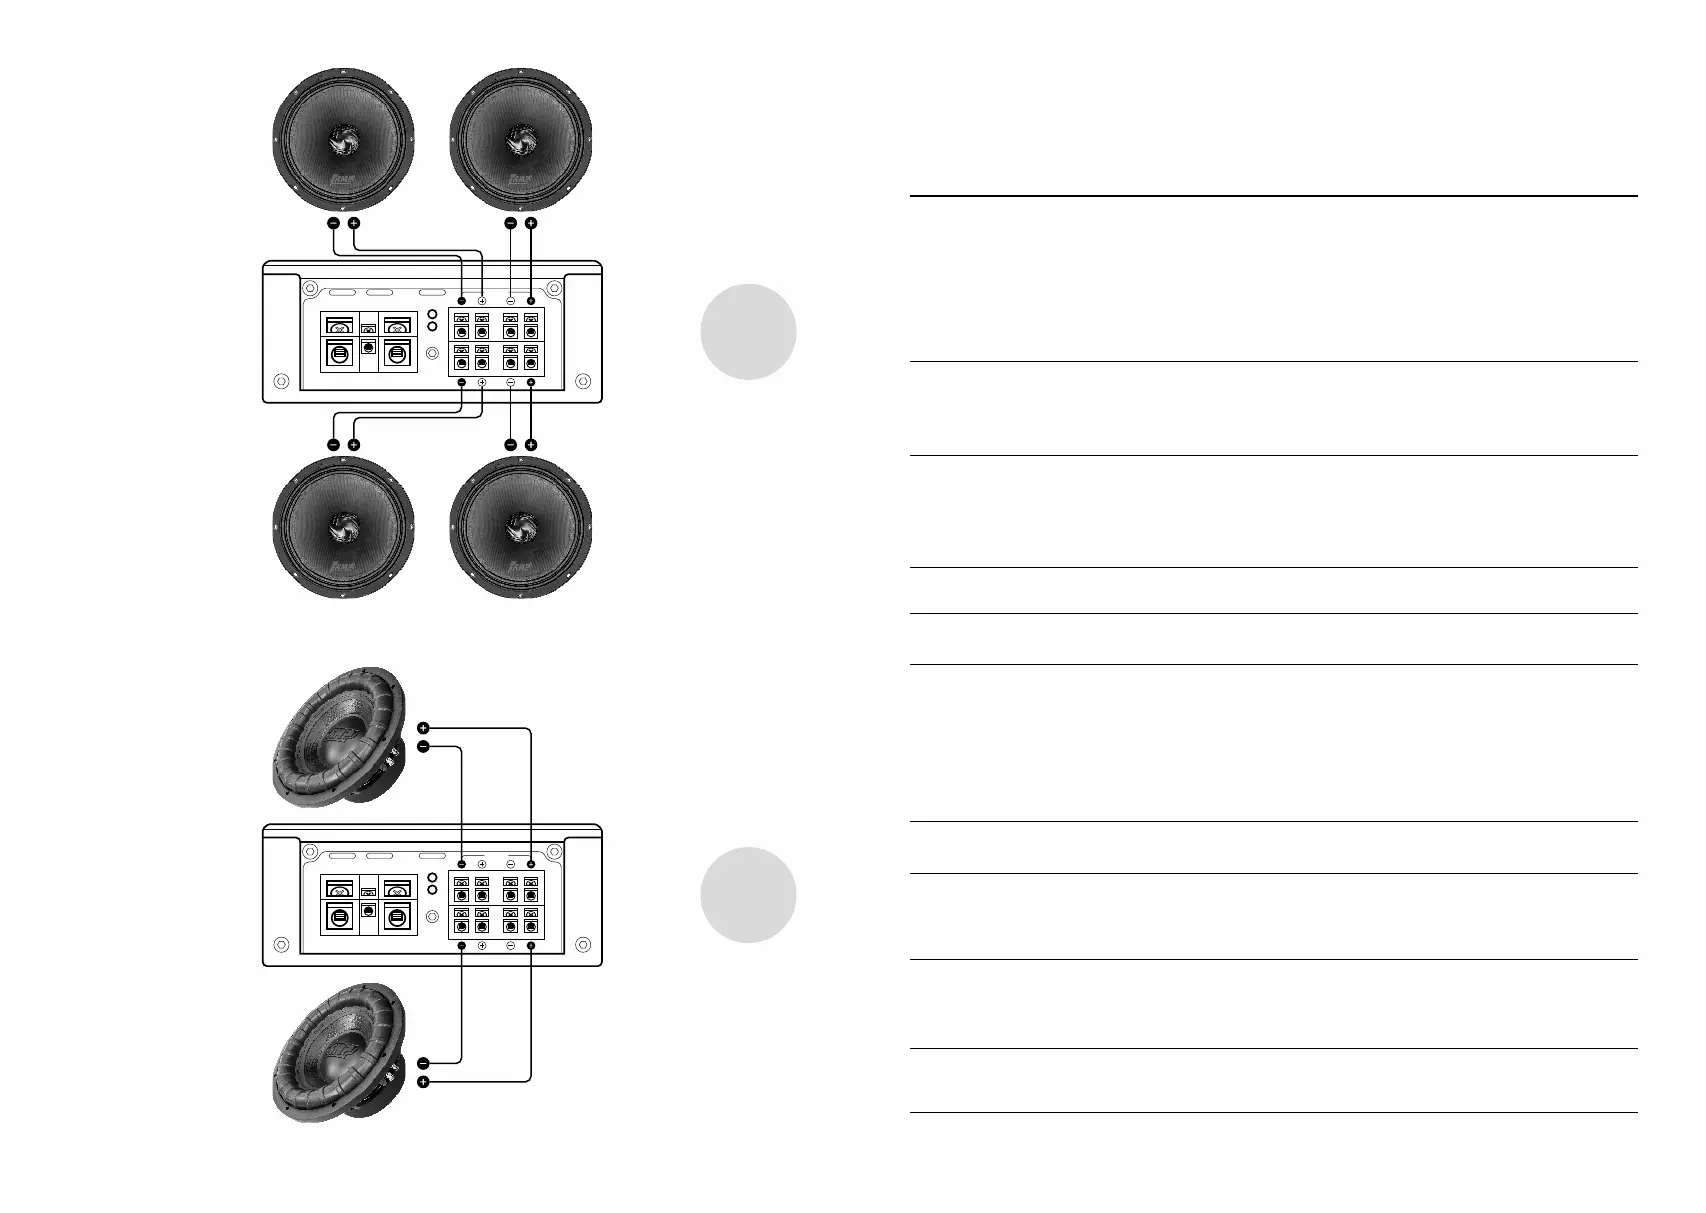
4 Channel
amplifier
CH1 Speaker CH2 Speaker
CH3 Speaker CH4 Speaker
Bridge Mode
4 Channel
amplifier
CH3- CH4+
CH1- CH2+
SPEAKER
IMPEDANCE
2-8 OHMS
SUBWOOFER
IMPEDANCE
4-8 OHMS
10
 Loading...