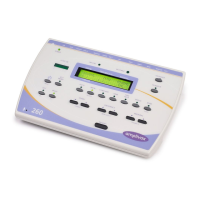
USING THE AUDIOMETER
9 MODEL 260 INSTRUCTION FOR USE
3. USING THE AUDIOMETER
3.1. SWITCHING THE AUDIOMETER ON AND OFF
Press the ON/OFF key located at the left of the front panel. No warm-up time is required. The display will briefly show
the model and the type of headphone currently in use.
If a secondary headphone has been enabled (e.g. E-5A) it will then be necessary to select the required headphone as
follows:
• Either - press YES to confirm the current headphone selection
• Or - press NO to toggle to the other option and then YES to confirm the selection
Note: headphone selection must be confirmed before any other operation can be performed.
The display will then be as shown in Section 3.3.
To switch off, press and hold the ON/OFF key. While holding the key press YES to confirm. To cancel the switch-off
release the ON/OFF key.
3.2. TESTING THE PATIENT RESPONSE SWITCH
Press the patient response switch and the light labelled RESPONSE (above and to the right of the display) will illuminate
green.
3.3. AUDIOMETER DISPLAY
On start-up the display will show the following default setting:
SIGNAL FREQUENCY Hz MASKING
This indicates that when the PRESENT key is pressed, a tone will be presented at 30dBHL at a frequency of 1kHz (1000Hz)
to the designated ear. On start up the audiometer defaults to the left ear.
3.4. AUDIOMETER CONTROLS
3.4.1. MULTIFUNCTION KEYS
Several keys on the audiometer have different functions depending on the actual mode of operation. These are ON/OFF
(MENU), LEFT (NO), RIGHT (YES) and FREQUENCY (MENU SELECT). The use of these keys is described below.
 Loading...