Do you have a question about the Anker SOLIX Solarbank 2 E1600 PRO and is the answer not in the manual?
Explains warning symbols related to high voltage danger and electric shock risks.
Provides an overview of the guide's content, covering unboxing, product overview, installation, and safety.
Details steps to check outer packaging and deliverables for damage or missing items before installation.
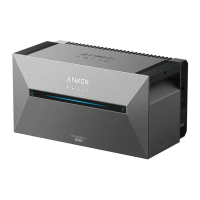
Lists the items included in the Anker SOLIX Solarbank 2 E1600 Pro package, including the model number.
Illustrates and labels the Anker SOLIX Solarbank 2 E1600 Pro and its accessory components.
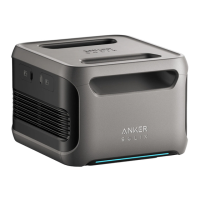
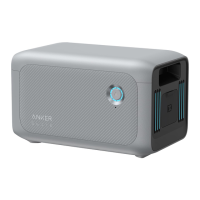
Lists optional accessories like expansion batteries and smart meters that must be ordered separately.
Details the functions of buttons on the device, including turning on/off and network pairing.
Explains the status indicated by different light bar patterns and power button light behavior.
Outlines environmental requirements for installing the Solarbank, including protection from hazards and altitude limits.
Lists necessary tools and components for installation, noting items not included in the package.
Provides sequential instructions for stacking units and mounting the Solarbank and expansion batteries.
Describes the process of attaching wall mount fittings, drilling holes, and securing the unit to the wall.
Explains the importance of proper grounding for electrical safety and the device's isolation transformer.
Guides on connecting Solarbank to home outlet and solar panels using provided cables.
Warns against connecting components in series to prevent overvoltage damage.
Details the steps to turn on the Solarbank for the first use and enable network pairing.
Guides on downloading the Anker app and registering an account, emphasizing region selection.
Explains the process of pairing the Solarbank with the app via network connection.
Provides step-by-step instructions for initializing the device and configuring its network connection via the app.
Explains how to add other Anker devices to the system through the app interface.
Details selecting a Wi-Fi network and entering the password for device connectivity.
Guides on adding Anker SOLIX Smart Meter to the home system via QR code and app process.
Instructions on updating firmware for Solarbank and Smart Meter to ensure compatibility and performance.
Guides on initializing power modes, including creating a system and setting energy scenes.
Explains how to set up charging/discharging plans for maximizing solar energy use and managing household loads.
Answers common questions regarding installation, power-off procedures, grounding, and panel connections.
Provides detailed technical specifications for the Anker SOLIX Solarbank 2 E1600 Pro.
The Anker SOLIX Solarbank 2 E1600 Pro is a comprehensive energy storage system designed for whole-home photovoltaic energy cycles, serving as the main service equipment. This guide provides a detailed overview of its unboxing, installation, electrical connections, and operational features, along with safety guidelines and customer service information. The system is designed to be user-friendly, with intuitive controls and app integration for seamless management of solar energy.
The Anker SOLIX Solarbank 2 E1600 Pro functions as a central hub for managing solar power in a residential setting. It stores energy generated by solar panels and intelligently distributes it to household loads, or back to the grid, optimizing energy consumption and reducing reliance on traditional power sources. The system is scalable, capable of supporting up to five Anker SOLIX BP1600 Expansion Battery modules, significantly increasing its energy storage capacity. It also integrates with the Anker SOLIX Smart Meter for enhanced energy management.
The core function revolves around its ability to store excess solar energy in its integrated battery. This stored energy can then be used during periods of low solar production, at night, or during peak electricity demand to minimize utility costs. The Solarbank 2 E1600 Pro acts as an inverter, converting DC power from solar panels and batteries into AC power suitable for household use.
The Anker SOLIX Solarbank 2 E1600 Pro offers a range of usage features designed to make solar energy management efficient and convenient:
The Anker SOLIX Solarbank 2 E1600 Pro is designed for ease of maintenance, with clear instructions for installation and troubleshooting:
Overall, the Anker SOLIX Solarbank 2 E1600 Pro is a robust and intelligent solar energy storage solution, designed to provide efficient, reliable, and user-friendly management of home solar power. Its comprehensive features, app integration, and clear maintenance guidelines ensure a seamless experience for users seeking to optimize their energy consumption and embrace sustainable living.
| Battery Type | LiFePO4 |
|---|---|
| Cycle Life | 3000 cycles to 80% capacity |
| Input Voltage | 11-60V |
| Output Voltage | 120V |
| IP Rating | IP65 |
| Warranty | 5 years |
| Output Ports | 2 USB-C |
| Weight | 20 kg |
| AC Output | 1600W |
| Dimensions | 45 x 28 x 28 cm |