•
Do not overfill! Make sure that the maximum fill level (MAX marking in the cup / blender/soup
jug) is not exceeded.
•
Danger of damage from incorrect use of the accessories! The device should only be
used if it has been completely and correctly assem
bled!
•
Danger of damage or injury from unforeseen events! Do not leave the device
unattended when it is in use.
•
Make sure that the device remains stable during operation. Always hold the motor
unit firmly with one hand.
•
The device must not be moved while it is switched
ON.
•
The device has an automatic switch-off function. If no settings are made within
the space of 3 minutes in stand-by mode, the device switches off automatically. To
carry on working, switch the device back on by pressing the Start / Stop button (C).
•
The display (A) and the operating light (7) are only switched on if the cup or blender/
soup jug has been fitted on the
motor
unit
correctly
.
•
A
program can be changed at any time during operation by pressing the
Function button (B)
or be stopped by pressing the
Start
/ Stop button (C).
Processing Cold Ingredients
CAUTION: Danger of burns! Never fill the small or large cup with hot food
or
liquids!
The contents must not be hotter than 50°C.
When processing frozen fruit or vegetables, always pour a little
liquid
into the cup as
well.
For all
programs:
1. Place the motor unit (5) on a flat and stable surface:
o The surface must be dry.
o
The
suction feet on the bottom of the appliance must stick to it firmly.
o Make sure that there is a sufficient gap from the edge of the work surface
so that the device does not fall off during operation.
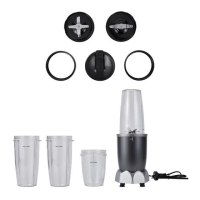
2. Select the small or large cup (10, 12). If required, attach the ice tube (11) (see “Ice Tube”
section)
to
the larger cup (10) and make sure that the lid (13) is screwed securely.
3. Pour the ingredients you want into the cup (do not exceed the
MAX
marking in the cup).
4. Screw the blade attachment for cup (4) clockwise onto the cup
.
5. Turn the cup upside down, place the blade attachment housing into the electric
motor unit (5) and twist clockwise
to
secure it in place. Pay attention to the
arrow
markings for proper secure fitment.
6. Insert the supply cord plug into a mains power outlet socket that is easily accessible.
7. Switch ON the device: Press the Start / Stop button (C) once. The
op
erating light (7)
will flash and the display (A) will switch
ON.