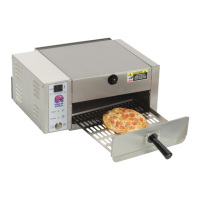
The Antunes CM-100 Cheese Melter is a commercial appliance designed for use in various food service environments such as restaurants, canteens, hospitals, bakeries, and butcheries. It is not intended for continuous mass production of food.
Function Description:
The CM-100 Cheese Melter utilizes an open steam generator to rapidly melt cheese or other food products. Water is sprayed onto the generator surface, instantly flashing into steam to cook or melt the product placed on the spatula. The unit features a "Ready" indicator light that flashes during warm-up and becomes steady when the unit reaches operating temperature. A "Steaming" indicator light illuminates during the steaming cycle. An audible signal sounds at the end of the steaming cycle, indicating the product is ready to be served. The unit incorporates a Hi-Limit Thermostat that turns off electrical power to the generator and transformer circuits if the unit overheats, ensuring safety.
Important Technical Specifications:
- Dimensions:
- Width (A): 17 3/8" (441 mm)
- Depth (B): 17 5/8" (448 mm)
- Height (C): 8 3/8" (213 mm)
- Electrical Ratings:
- CM-100 9100416:
- Volts: 208
- Watts: 3300
- Amp: 16
- Hertz: 50/60
- Electrical Cord & Plug Configuration: NEMA 6-20P
- CM-100 9100418:
- Volts: 230
- Watts: 3300
- Amp: 16
- Hertz: 50/60
- Electrical Cord & Plug Configuration: CEE 7/7
- Water Pressure: Must not exceed 25 psi (1.7 kg/cm² or 172 kPa). A water pressure regulator is recommended to reduce pressure to 20-25 psi (1.4-1.7 kg/cm² or 138-172 kPa).
- Water Supply: Requires installation of a reverse osmosis filtration system. Flexible water line (not supplied) for water hookup should be 1/4" (6.5 mm) I.D. An in-line water strainer (P/N 7000333) is recommended to prevent debris from entering the solenoid valve.
- Generator Surface Temperature: 380-420°F for proper steaming.
Usage Features:
- Preparation: Before use, the unit requires a preheat time of approximately 20-30 minutes. The green Ready Light will flash during warm-up and become steady when the unit reaches temperature. The Cycle/Start button should not be pressed during warm-up.
- Cooking Procedure:
- Pull out the Spatula and place the product to be steamed onto it.
- Push the Spatula fully into the unit. Full insertion is required to start a steam cycle.
- Press and release the CYCLE/START button. The green Ready Light will remain lit during the steaming cycle.
- At the end of the approximately 7-second steaming cycle, an audible signal sounds until the Spatula is removed, and the green Ready Light turns back on.
- Carefully remove the steamed product and re-insert the Spatula.
- Water Volume Calibration: If the unit does not steam properly and water pressure is 20-25 psi, the water volume can be calibrated using a small screwdriver to adjust the Water Volume Control located on the bottom left side of the unit. Turning clockwise increases water volume, counterclockwise decreases it. The control is numbered 0-9 and preset to 6, beeping with each turn.
- Safety Warnings:
- Electrical shock hazard: Unit must be properly grounded. Do not modify the power supply cord plug, use extension cords, or unplug while running.
- Scalding hazard: Be careful when removing the Spatula, allowing steam to escape before placing hands or face over the steamer. Do not use loaded containers with liquids or cooking goods that become fluid by heating to higher, less observable levels.
- The appliance is not to be used by persons with reduced physical, sensory, or mental capabilities, or lack of experience and knowledge, unless supervised or instructed. Children must be supervised and not play with the appliance.
- Toasters must not be used near or below curtains or other combustible materials.
- Hot steam can come out when opening the door of the cooking compartment.
- Water pressure must not exceed 25 psi (1.7 kg/cm² or 172 kPa) to prevent poor performance or flooding.
- Connect to a cold water supply line only; hot water supply will void the warranty.
- Excessive force will damage the Water Volume Control; do not turn past built-in stops.
Maintenance Features:
- General Maintenance:
- Turn off power, unplug, and allow the unit to cool to room temperature before any service or maintenance.
- Do not use abrasive materials or corrosive chemicals (e.g., bleach, sanitizers, degreasers, detergents with chlorides or phosphates) as they can permanently damage the stainless steel finish, causing discoloration, dulling, pits, voids, holes, or cracks, which is not covered by warranty.
- Always use a soft, damp cloth with clear water, wiping dry in the direction of metal polish lines.
- Routine cleaning should be performed daily with soap and water.
- Rub off finger marks and smears using soap and water.
- Do not clean unit or components in a dishwasher unless specified in cleaning instructions.
- Do not clean the unit with a water jet or steam cleaner.
- Daily Cleaning (Frequency determined by water conditions, usage, and filter systems):
- Turn off power, unplug, and cool down the unit.
- Check Water Quick Disconnect Fitting and hose clamp connections for leakage; tighten or replace if needed.
- Remove Top Cover, Spatula, and Liner.
- Remove Chimney from the rear of the unit.
- Hand wash Top Cover, Spatula, Liner, and Chimney in hot, soapy water, rinse, and wipe dry.
- Clean the chamber of any product spills.
- Clean the entire unit with a clean, hot, damp (not dripping wet) cloth and wipe dry.
- Re-install Chimney, Liner, Spatula, and Top Cover.
- Plug in and test the unit.
- Monthly Cleaning (Steam Generator):
- This unit uses an open steam generator, and mineral deposits will build up on the surface. While some deposits are needed for proper operation, excessive buildup causes poor steaming efficiency and excessive moisture.
- Turn off power, unplug, and cool down the unit.
- Remove Top Cover, Wing Nut, and Generator Cover.
- Remove Diffuser.
- Examine steam ports for mineral deposits. Use a flat blade screwdriver or wire brush to scrape openings clean. Excessive buildup will come off in flakes or layers.
- Use a brass or stainless steel wire brush and small scraper to loosen and remove excessive deposits from the generator surface.
- If deposits are still excessive, pour food-safe delimer solution or white vinegar onto the Generator surface (follow manufacturer's directions).
- Remove delimer solution and rinse with clear water.
- Clean Spatula Liner, Chimney, Diffuser, Top Cover, and Generator Cover in hot detergent water, rinse, and wipe dry.
- Clean steam chamber of any product spills.
- Clean the unit surface with a hot, clean, damp cloth.
- Re-install all parts and fasten the Generator Cover.
- Plug in power cord and water line.
- Seasoning the Generator Surface: To ensure proper steaming, some mineral deposits are needed. If the surface becomes bare aluminum after cleaning, add plain tap water to the surface and allow it to boil off. In soft water areas, a seasoning mixture (2 tablespoons baking soda, 1 cup water) can be used. Pour 1/4 cup onto the hot generator, and after it converts to steam, remove loose powder. Repeat until a thin, white mineral coating forms.
- Service: Inspection, testing, and repair of electrical equipment must be performed only by qualified service personnel. Turn off power, unplug, and allow the unit to cool before performing service or maintenance. If the supply cord is damaged, it must be replaced by the manufacturer, its service agent, or a similarly qualified person.
- Warranty: The unit is warranted for one year from the date of purchase against electrical and mechanical defects under normal use and service. The warranty covers electromechanical parts, non-overtime labor, and travel expenses up to 2 hours (100 miles/160 km) round trip from the nearest Authorized Service Center. It does not cover installation costs, defects from improper storage/handling, overtime charges, unauthorized service, normal maintenance/calibration/adjustments, consumable/wear items, damage to load cell/assembly from abuse/misuse/dropping/exceeding weight capacity, water contamination, water pressure problems, or incorrect voltage supply.