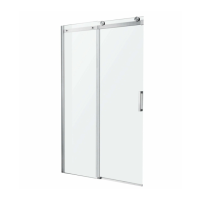
This document is an installation and operation manual for an ANZZI Glass Shower Door, specifically models SD-FRLS05701** and SD-FRLS05702**. It provides detailed instructions for assembly, installation, and maintenance of the shower door.
Function Description
The ANZZI Glass Shower Door is designed to enclose a shower area, providing a barrier against water splash while offering a modern aesthetic. It features a sliding door mechanism, allowing for easy access to the shower. The installation process involves mounting a fixed panel and a sliding door panel to a wall and threshold, supported by a horizontal support bar.
Important Technical Specifications
The manual outlines two models with different dimensions:
- SD-FRLS05701 (48"x76"):
- Overall width: 47.6"-48.2" (1209-1224mm)
- Overall height: 76" (1930mm)
- Door panel width: 25.5" (648mm)
- Fixed panel width: 22.2" (563mm)
- Handle length: 7.5" (190.5mm)
- Handle projection: 1.8" (46mm)
- Threshold space required: Minimum 2-3/16" (55mm)
- SD-FRLS05702 (60"x76"):
- Overall width: 59.6"-60.2" (1514-1529mm)
- Overall height: 76" (1930mm)
- Door panel width: 31.5" (800mm)
- Fixed panel width: 28.1" (715mm)
- Handle length: 7.5" (190.5mm)
- Handle projection: 1.8" (46mm)
- Threshold space required: Minimum 2-3/16" (55mm)
Parts List:
The manual includes a comprehensive list of parts required for assembly:
- [01] Magnetic Wall Column (x1)
- [02] Wall Jamb (x1)
- [03] Support Bar (x1)
- [04] Bottom Rail (x1)
- [05] Threshold Gasket (x1)
- [06] Magnetic Gasket (x1)
- [07] Gasket (x1)
- [08A/B] Side Gasket (x2)
- [09] Door Panel (x1)
- [10] Fixed Panel (x1)
- [11] Handle Set (x1)
- [12] Trolley Wheel (x2)
- [13] Fasteners (x2)
- [14] Wheel Guard (x2)
- [15A/B] Bottom Guide (L&R) (x1)
- [16A/B] Seal (L&R) (x1)
- [17] Bottom Guide Cap (x1)
- [18] Wall Bracket (x1)
- [19] Screw ST5x35mm [1-3/8"] (x2)
- [20] Screw ST4x35mm [1-3/8"] (x4)
- [21] Wrench (x1)
- [22] Anchor (x6)
- [23] Allen Key 2mm (x1)
- [24] Allen Key 3mm (x1)
Tools Required:
- Phillips Screwdriver
- Level
- Tape Measure
- Drill
- 1/8" (3mm) Drill Bit
- 1/4" (6mm) Drill Bit
- 100% Silicone Sealant
- Pencil
- Rubber Mallet
- Safety Glasses
- Hack Saw
- Metal File
- Tin Snips
- Stud Finder
- Knife
Usage Features
The shower door is designed for installation on a finished threshold and against finished walls. It requires a minimum flat level threshold space of 2-3/16" (55mm). The installation process involves drilling into the wall and threshold, requiring careful measurement and adherence to instructions. The sliding door mechanism uses trolley wheels on a support bar for smooth operation. The door height can be adjusted using the trolley wheels and wheel guards to ensure proper alignment. Magnetic gaskets and wall columns ensure a secure and watertight seal when the door is closed.
Maintenance Features
The manual provides detailed care and maintenance instructions for different components of the shower door:
Bases and Back Walls (if installed):
- Wipe off after each use with a soft cloth.
- Clean acrylic surfaces with non-abrasive sprays or cream-based cleaners.
- Avoid aerosol spray cleaners, abrasive cleansers, metal brushes, or scrapers to prevent scratches or dulling.
Glass:
- Rinse and wipe off after each use with a soft cloth or squeegee to prevent soap buildup and water spots.
- Avoid abrasive cleaners or cleaning products containing scouring agents, bristle brushes, or abrasive sponges to prevent surface damage.
Hardware:
- Wipe off metal parts after use with a soft cloth to maintain the finish.
- Avoid abrasive cleaners or cleaning products containing ammonia, bleach, or acid. If accidentally used, rinse the surface immediately to prevent damage.
- After cleaning polished finishes, rinse thoroughly and wipe dry.
- Clean stainless steel surfaces at least once a week.
- When applying stainless steel cleaner or polish, work with the grain.
- Never use abrasive sponges, cloths, steel wool, or wire brushes, as they may permanently scratch the surfaces.
General Maintenance:
- Regularly inspect the glass and all hardware for misalignment, proper attachment, and damage.
- Contact ANZZI for any questions or concerns.
- After installation, apply a good quality silicone sealant on the walls and threshold along the bottom and wall profiles. Allow 24 hours for the silicone to fully cure before using the shower.
Important Installation Notes:
- Check for damage and missing parts immediately upon delivery.
- Handle the product with care, avoiding impact to glass sides and edges.
- Consult local plumbing codes.
- Keep corner protectors on the glass during installation to reduce breakage risk.
- Ensure all surfaces are level, solid, and capable of supporting the unit's total weight. Walls must be at right angles.
- Protect all primary surfaces during installation; never set glass directly on a tile floor.
- This product is heavy and may require two people for installation.
- Wear protective eyewear, gloves, and closed-toe shoes when cutting or drilling metal components or handling glass.
- Failure to follow instructions may result in personal injury, property damage, product failure, and may void the warranty.
- The shower door must be mounted to a stud. A stud finder is required to locate a stud at the installation point for the support bar and wall jamb.
- The installation instructions provided are for installing the fixed panel on the right; for left-side installation, transpose all instructions.
- Anchors [22] MUST be used for secure installation.