Receiver Setup
Setting up your subwoofer through your receiver only
requires a few simple steps. You may have a receiver
that has an auto calibration microphone, and while these
are convenient, they are not always accurate. For best
results, we recommend accessing the setup menu of
your receiver and manually setting up the speakers. Most
modern receivers use an On Screen Display setup menu
(OSD) that make setup a breeze.
1. In your receiver’s setup menu, go to “Speaker Setup”
or “Speaker Configuration”. Set the subwoofer value to
“Yes” if your front speakers are “Small”. If your front
speakers are “Large” set the subwoofer value to “LFE +
Main” (sometimes called Plus or Double Bass).
Note: Some receivers automatically turn off the subwoof-
er output when the front speakers are set to “Large” in
the speaker setup menu. So be sure that you overide this
by completing setup number 1 above.
2. In the crossover menu, confirm that the crossover
point of your front speakers matches the crossover point
of your sub (e.g. - if your front speakers are crossed-over
at 100Hz, your sub should be crossed-over at 100Hz).
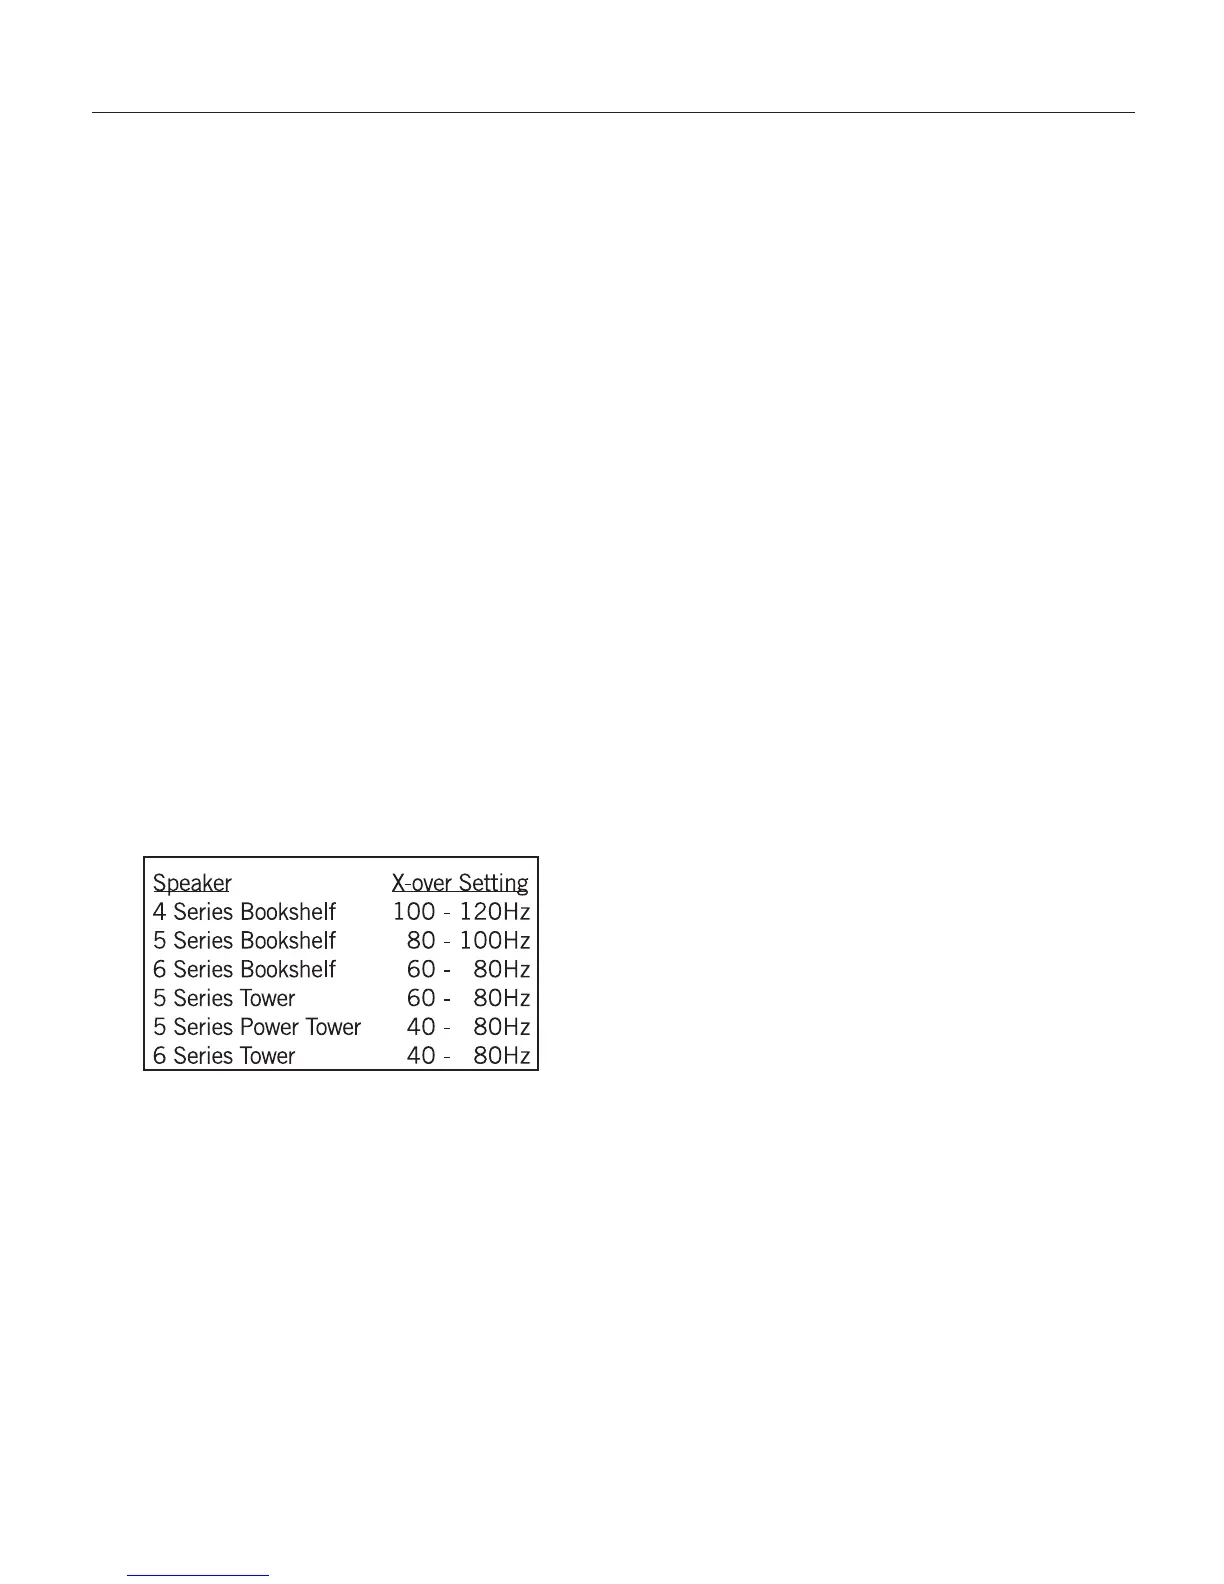
The manufacturer should list a recommended crossover
point for of your speakers. Here are some of the recom-
mended crossover points for Aperion Audio speakers.
*If your Aperion speakers are not listed here, please check our website for
crossover recommendations. www.aperionaudio.com
Important: Frequencies above 80Hz start becoming
directional - meaning your ear can locate where they are
coming from. So if your subwoofer is crossed-over above
80Hz, try to position it as close to your television as pos-
sible.
Note: Aperion Audio Bravus Subwoofers have an inter-
nal crossover. You can set a different crossover point
for each listening mode: Music, Movie, or Game. If you
would like to use the subwoofer’s internal crossover
instead of your receiver’s, you can defeat your receiver’s
crossover by turning it up to its maximum. For instruc-
tions on using your subwoofer’s internal setup, refer to
pages 8-9.
3. Next, navigate to the speaker distance menu. Here,
simply measure the distance between your listening po-
sition and your sub and enter the value into the menu.
4. Finally, the subwoofer’s volume level must be adjust-
ed in the channel level menu. Of course, your subwoof-
er’s volume will most frequently be changed using the
subwoofer remote or the buttons on its display. Calibrat-
ing your subwoofer’s volume in the setup menu simply
alters the strength of the signal sent to your subwoofer
from your receiver. Thus, it is not necessary to dial your
subwoofer volume perfectly in the channel level menu.
To make a long story short, set the subwoofer level at
zero in the channel level menu. All other adjustments to
the subwoofer volume should be made with the remote
or the controls on the front of the subwoofer.
Note: Often times a receiver’s auto setup tool will set
the subwoofer volume to +12 or -12. In fact, if your
subwoofer level is set to -12 in your receiver, it might be
too low for the auto on function of your sub to detect. We
think zero is a sensible place to start.
7
Receiver Setup
Receiver Setup
 Loading...