292930
HEATED 20” BIRD BATH
Item # 600
Miller Manufacturing, Glencoe, MN 55336 USA • www.miller-mfg.com
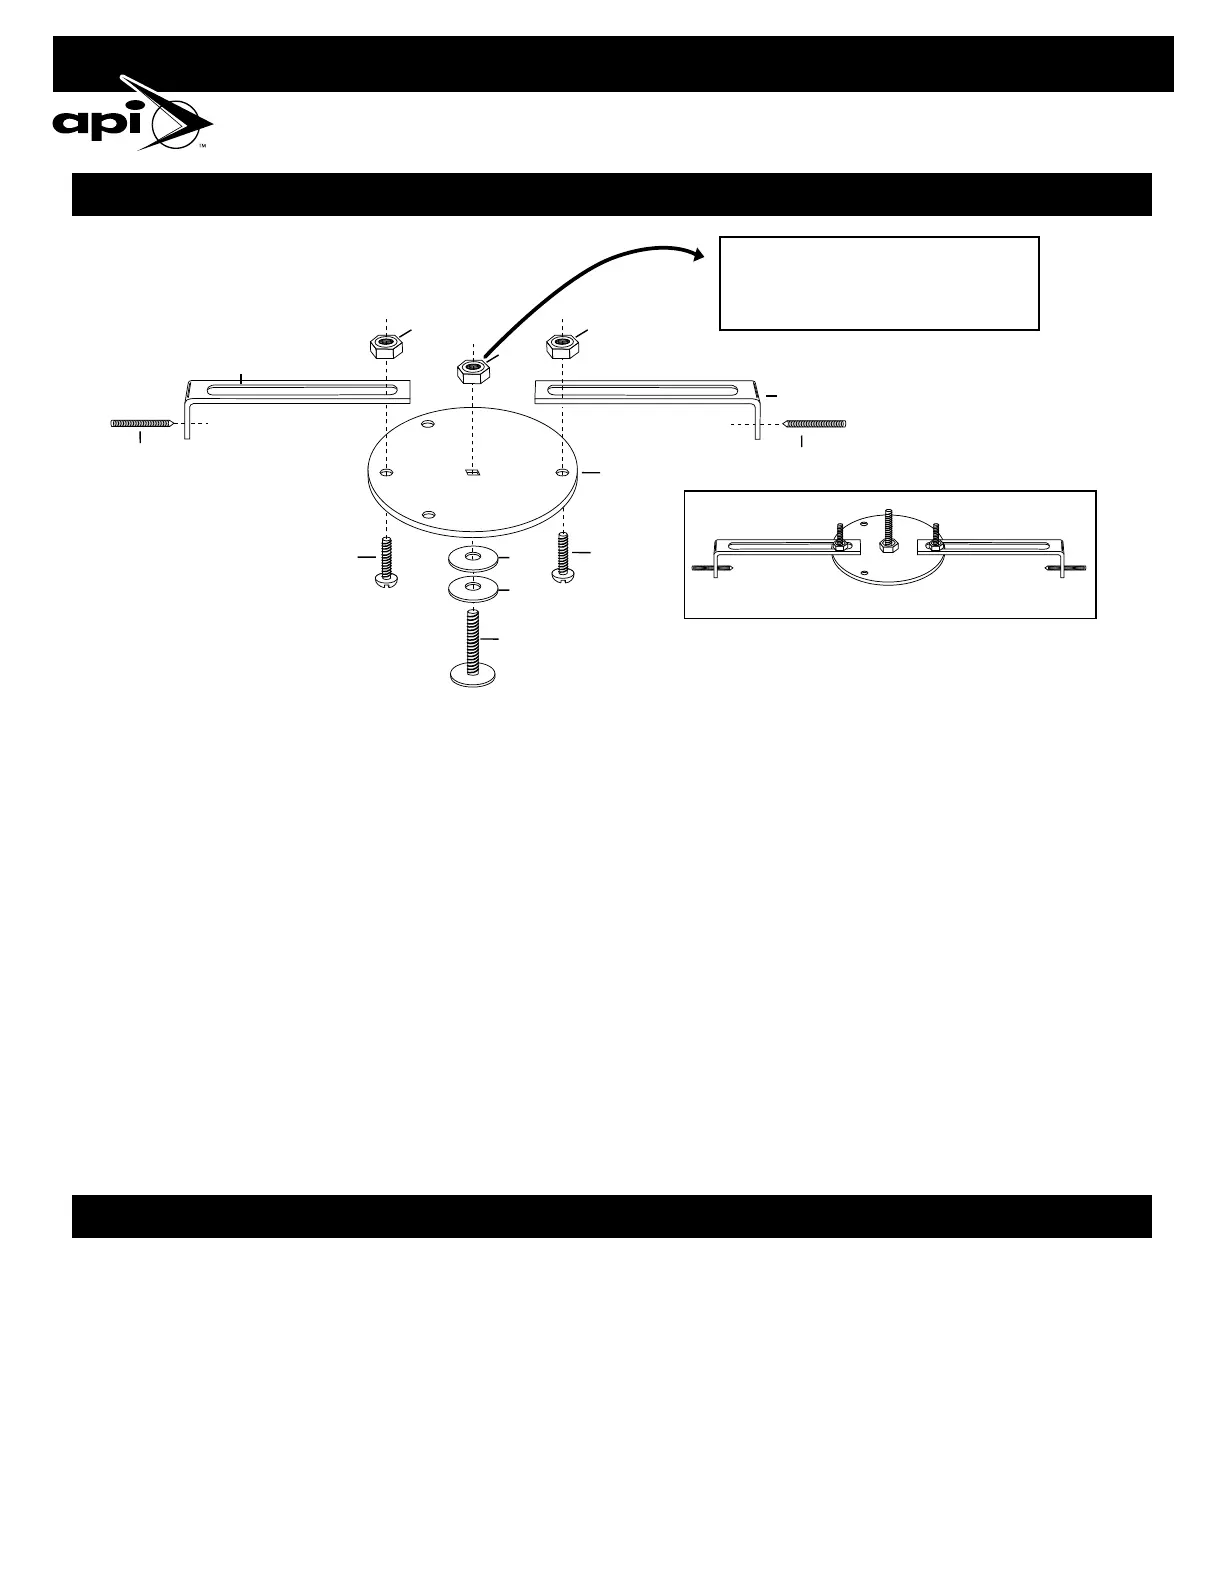
1. Assemble mount as shown but leave the nuts (part #I) loose enough to
allow adjustment of bracket.
2. Back out the long set screws (part #G) as far as possible out of both
arms (part #A).
3. Position bracket so the elevator bolt (part #N) is in the center of your
rail.
4. Open or close bracket by sliding both arms (part #A) towards each
other. Ideally so that both arms (part #A) are hugging the sides of the
railing.
a. If the bracket will not close small enough for your rail, push the arms
together until they stop. Position the center elevator bolt (part #N) in
the center of your wooden rail. Then screw the set screws (part #G)
deeper into both arms until the cone points on the set screws (part
#G) hit the wooden surface. This will act as a spacer.
b. If the bracket is still too large then try the next smaller configuration
for a wooden railing.
c. If the bracket is too small then try a permanent mount. See the
section titled “permanent mount”.
1. Take the elevator bolt (part #H) and insert this bolt through the center
square hole in the round disc (part #C). Fasten this elevator bolt
(part #H) with 3 washers (part #K) and 1 nut (part #L). Make sure the
washers are on the same side of the round disc (part #C) as the nut
(part #L). Use a wrench to tighten this assembly.
5. Make sure that the center bolt (part #N) is in the center of your wooden
rail. Then lift the mount off the surface and tighten the two screws (part
#I). You must use a wrench and screwdriver to tighten these properly.
6. While applying pressure to the top of the mount (so the bottom surface
of the elevator bolt (part #N) is flush against the wooden surface) use
a screwdriver to tighten the two set screws (part #G). The set screws
should dig into the wood – but only slightly. Do not over tighten
because this will cause the mount to bend. As a rule, tighten the set
screws just past the point of the mount bending.
7. Do not be concerned if the mount assembly wobbles back and forth.
This wobble will correct itself once the bath is “spun” onto the mount
and tightened against the bracket surface.
8. Set the bath onto the center screw (part #N) and “spin” the bath into
place. It should be spun until the bottom surface of the bath rests tight
against the surface of the mount and there is no wobble. If the mount
comes loose, tighten the set screws (part #G). Keep doing this until
the bath rests tight against the mount and the mount is fastened tight
against the wood surface.
2. You may fasten this assembly to any flat surface via any two of the holes
provided along the diameter of the round disc.
3. Set the bath onto the center screw (part #H) and “spin” the bath into
place. It should be spun until the bottom surface of the bath rests tight
against the mounting surface and there is no wobble.
MOUNTING TO A WOODEN RAILING 8.75” TO 12” WIDE
PERMANENT MOUNT
If this nut does not fit flush and tight with the
round disc (part #C), then you should add 2
washers between the round disc and the nut.
(Exploded Diagram)
(Finished Diagram)
A
A
K
K
N
I
C
G
G
L
L
L
I